Are you looking to control two light bulbs with just one switch? It might sound tricky, but it’s easier than you think.
Imagine turning on two lights with a single flick—saving you time and making your space more convenient. In this guide, you’ll learn simple steps to connect two bulbs to one switch safely and effectively. Keep reading, and by the end, you’ll have the confidence to do this yourself without any hassle.
Your home lighting is about to get a smart upgrade!
Tools And Materials Needed
Before you start connecting two light bulbs to one switch, gather all necessary tools and materials. Having everything ready makes the process safer and faster.
Using the right tools helps you avoid mistakes and ensures a secure connection. Below is a list of what you need for this project.
Tools Required
- Screwdriver (flathead and Phillips) for screws
- Wire stripper to remove insulation
- Voltage tester to check live wires
- Needle-nose pliers to bend and hold wires
- Electrical tape to secure connections
Materials Needed
- Light bulbs (matching type and wattage)
- Light sockets for holding bulbs
- Electrical wires (14 or 12 gauge, depending on circuit)
- Switch to control the bulbs
- Wire nuts or connectors to join wires safely
- Wall plate to cover the switch
Safety Gear
- Insulated gloves to prevent shocks
- Safety glasses to protect eyes
Safety Precautions
Working with electricity requires care and attention. Safety is the most important part when connecting two light bulbs to one switch. Taking the right steps prevents accidents and protects your home. Follow clear safety rules before starting any electrical project.
Turn Off The Power
Always switch off the power at the circuit breaker. This stops electricity from flowing while you work. Use a tester to check if wires are live. Never trust a switch alone to cut power.
Use Proper Tools And Equipment
Use insulated tools made for electrical work. Avoid using damaged or worn tools. Wear rubber-soled shoes to reduce shock risk. Have all parts ready before starting the job.
Understand Your Wiring
Know the type of wiring in your home. Identify live, neutral, and ground wires clearly. Mixing wires can cause shorts or shocks. Label wires if needed to avoid confusion.
Follow Local Electrical Codes
Local laws set rules for safe wiring. Check codes before beginning your project. Use approved parts and materials only. This keeps your installation safe and legal.
Work In A Dry Area
Water and electricity do not mix. Choose a dry place to work on wiring. Avoid wet floors and damp conditions. This lowers the risk of electric shock.
Types Of Light Bulb Wiring
Understanding the types of light bulb wiring helps connect two bulbs to one switch safely. Different wiring methods affect how bulbs work and how power flows. Knowing these types makes your wiring job easier and safer.
Series Wiring
Series wiring connects bulbs one after another in a single path. Power flows through the first bulb, then to the second. If one bulb burns out, the circuit breaks and both bulbs go off. This wiring type is simple but not common for home lighting. It can cause dim lights because voltage splits between bulbs.
Parallel Wiring
Parallel wiring connects bulbs on separate paths to the power source. Each bulb gets full voltage and works independently. If one bulb fails, the other stays lit. This method is common for home lighting. Parallel wiring gives brighter lights and better control.

Credit: www.youtube.com
Choosing The Right Switch
Choosing the right switch is important when connecting two light bulbs to one switch. The switch controls the power flow to the bulbs. It must handle the total load safely and work well with your wiring setup.
Picking the correct switch helps avoid electrical problems. It also makes your lighting system reliable and easy to use. This section explains different types of switches and what to consider before buying one.
Types Of Switches For Two Bulbs
Simple single-pole switches work well for controlling two bulbs together. They turn both bulbs on and off at the same time. This option is easy to install and cost-effective.
Double switches or two-gang switches let you control each bulb separately. This setup adds flexibility but needs more wiring work.
Switch Rating And Load Capacity
Each switch has a load rating. This number shows how much electrical current it can handle safely. Add the wattage of both bulbs to find the total load.
Choose a switch with a rating higher than the total load. This ensures the switch does not overheat or fail.
Switch Compatibility With Wiring
Check the type of wiring in your home before picking a switch. Some switches work better with certain wiring types.
Standard switches fit most homes with typical wiring. Special switches may be needed for smart wiring or unusual setups.
Step-by-step Wiring Process
Connecting two light bulbs to one switch can brighten your room efficiently. The wiring process is simple if you follow clear steps. This guide breaks down each step to ensure safety and success. Take your time and follow carefully.
Turn Off Power
Always start by turning off the power at the breaker box. This prevents electric shock during wiring. Use a voltage tester to confirm no power flows in the switch wires. Safety first.
Prepare The Switch Box
Remove the switch cover plate and unscrew the switch. Pull the switch out gently to expose wires. Check the wires for damage or wear. Strip about half an inch of insulation from each wire end.
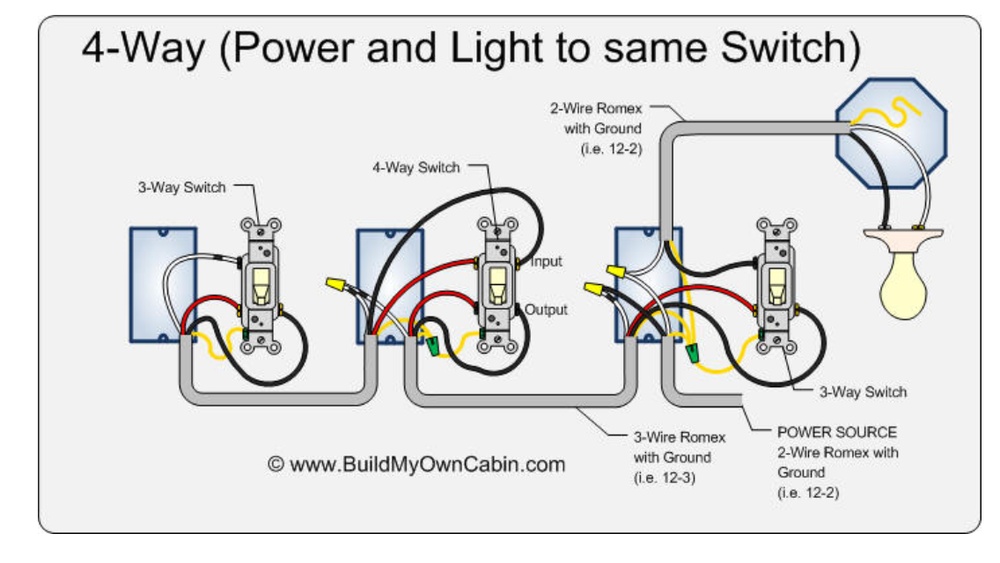
Connect The Wires
Join the black (hot) wires from both bulbs to the switch’s terminal screw. Connect the white (neutral) wires together using a wire nut. Attach the ground wires (green or bare copper) together and to the switch’s ground screw. Ensure tight, secure connections.
Attach The Light Bulbs
Connect the wires from the bulbs to the corresponding wires in the ceiling box. Black wires link to black, white wires to white. Use wire nuts to join wires safely. Confirm no bare wires are exposed.
Secure The Connections
Push all wires back into the switch box carefully. Screw the switch back into place. Attach the cover plate. Turn on the power and test the switch to ensure both bulbs light up properly.

Credit: diy.stackexchange.com
Testing The Setup
Testing the setup is an important step after connecting two light bulbs to one switch. It ensures the wiring is correct and both bulbs work properly. This step helps find and fix any issues before final use.
Careful testing improves safety and saves time. It also confirms that the switch controls both bulbs as intended. Follow these simple checks to test your setup.
Turn On The Switch
Start by turning on the switch. Both light bulbs should light up together. If one or both bulbs do not turn on, check the wiring connections.
Check Each Bulb
Look closely at each bulb. Make sure both bulbs glow steadily. Flickering or dim light may mean loose connections or faulty bulbs.
Turn Off The Switch
Switch off and confirm both bulbs go dark. This step shows the switch properly controls the circuit. If bulbs stay lit, there could be a wiring error.
Inspect Wiring Connections
Turn off the power before checking wires. Confirm all wires are tightly connected to terminals. Fix any loose or exposed wires to avoid hazards.
Use A Voltage Tester
Use a voltage tester to check electrical flow. Test at the switch and bulb sockets. This tool helps find breaks or shorts in the wiring.
Troubleshooting Common Issues
Troubleshooting common issues helps fix problems quickly. Small mistakes can stop two bulbs from working on one switch. Checking each part carefully saves time and effort. This guide highlights easy fixes anyone can try.
Check The Wiring Connections
Loose or wrong wires often cause bulbs not to light. Make sure all wires connect tightly to the switch and bulbs. Match wire colors correctly: usually black is hot, white is neutral. Use wire nuts to secure connections well.
Inspect The Switch Function
A faulty switch can block power to both bulbs. Test the switch by turning it on and off several times. Replace the switch if it feels loose or does not click. Use a voltage tester to check if power flows through the switch.
Examine The Light Bulbs
Burned-out bulbs are a common reason for no light. Replace both bulbs with new ones to be sure. Use bulbs with the same wattage and type for safety. Check if bulbs fit correctly in the sockets without wobbling.
Look For Power Supply Issues
Power problems can stop bulbs from working. Check the circuit breaker or fuse box for tripped breakers. Reset any tripped breakers or replace blown fuses. Make sure the main power to the switch is on and stable.
Test The Socket Condition
Old or damaged sockets can cause poor contact. Inspect sockets for corrosion, cracks, or loose parts. Clean sockets gently with a dry cloth if dirty. Replace sockets if they show signs of damage or wear.

Credit: www.electrical-online.com
Tips For Energy Efficiency
Connecting two light bulbs to one switch is simple and useful. Saving energy while doing this is important. Small changes can lower electricity bills and help the environment. Here are some easy tips for energy efficiency.
Use energy-efficient bulbs like LEDs. They use less power and last longer than regular bulbs. This change reduces energy use and saves money over time.
Control light usage with timers or motion sensors. These devices turn lights off automatically when not needed. This prevents wasting electricity and keeps your home smart.
Choose the right bulb brightness for each room. Too bright bulbs waste energy. Use softer light for relaxing spaces and brighter light for work areas.
Choose Led Bulbs
LED bulbs use up to 80% less energy than incandescent bulbs. They last longer, so you replace them less often. Using LEDs cuts electricity bills and helps the planet.
Use Timers And Motion Sensors
Timers turn lights off after a set time. Motion sensors activate lights only when someone is in the room. Both reduce wasted energy and add convenience.
Adjust Brightness Levels
Bright lights are not always needed. Use dimmers or choose bulbs with lower wattage. This saves energy and creates a comfortable atmosphere.
Frequently Asked Questions
How Do I Wire Two Light Bulbs To One Switch?
Connect the switch’s output wire to the first bulb’s input. Then, link the first bulb’s output wire to the second bulb’s input. This series or parallel wiring allows both bulbs to operate from one switch efficiently and safely.
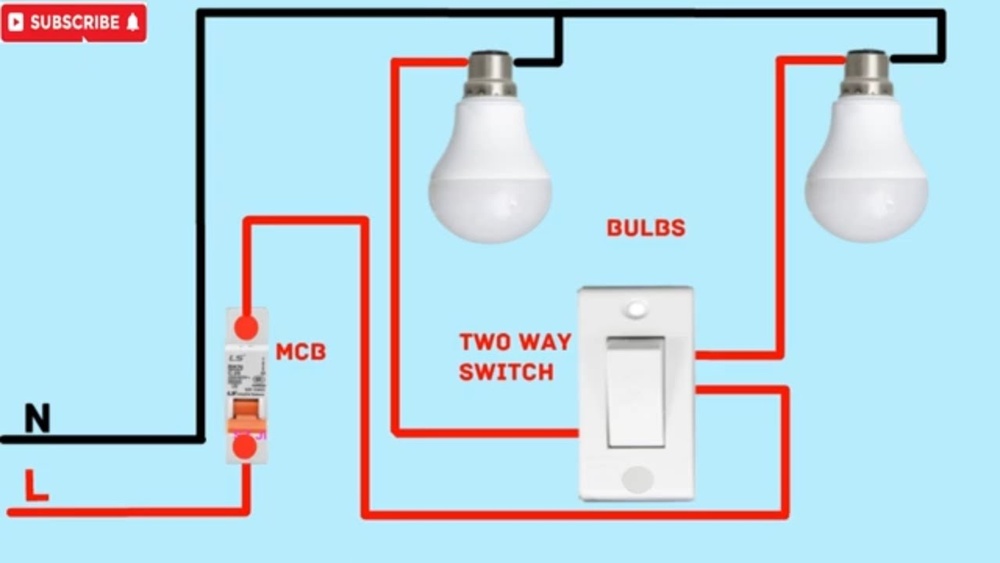
Can I Use One Switch For Multiple Light Bulbs?
Yes, one switch can control multiple bulbs. Wiring bulbs in parallel ensures each bulb receives full voltage. This setup lets you turn all bulbs on or off with a single switch conveniently.
What Tools Are Needed To Connect Two Bulbs To One Switch?
You’ll need a screwdriver, wire stripper, electrical tape, voltage tester, and wire connectors. These tools help you safely strip, connect, and secure wiring for the bulbs and switch installation.
Is It Safe To Connect Two Bulbs On One Switch?
Yes, connecting two bulbs to one switch is safe if done correctly. Always follow electrical codes and turn off power before wiring. Use proper insulation to prevent short circuits or hazards.
Conclusion
Connecting two light bulbs to one switch is simple and useful. It saves space and adds convenience to your room. Always turn off power before starting any wiring work. Use the right tools and follow safety rules carefully. Check your connections twice to avoid problems later.
Now you can control both bulbs with one switch easily. This small task can improve your lighting setup quickly and safely. Give it a try and enjoy better lighting today.