Are you struggling with a Deadbolt lock that just won’t come off? Whether you’re upgrading your security or fixing a stubborn lock, uninstalling a Deadbolt can feel tricky if you don’t know the right steps.
But don’t worry—you’re about to discover a simple, clear guide that makes the whole process easy and stress-free. Keep reading, and you’ll learn exactly how to remove your Deadbolt quickly and safely, even if you’ve never done it before. Your door’s security is important, and getting this right will save you time and frustration.
Let’s get started!

Credit: www.youtube.com
Prepare For Removal
Preparing to remove a Deadbolt lock is important for a smooth process. Taking the right steps before starting helps avoid damage or injury. It also saves time and effort. Follow these simple guidelines to get ready for removal.
Proper preparation ensures you have everything you need. It keeps you safe while working on the lock. These steps make the job easier and faster.
Gather Necessary Tools
Collect all tools before you start. You will need a screwdriver, usually a Phillips or flathead. A drill may help if screws are tight. Keep a small container for screws and parts. Having tools ready avoids interruptions during removal.
Turn Off Power Supply
Deadbolt locks with electronic features need power off. Find the circuit breaker or unplug the device. Turning off power prevents shocks or damage. Confirm the lock is not powered before removal. Safety comes first in every step.
Access Deadbolt Components
Accessing the deadbolt components is the first step to uninstall it safely. You need to carefully remove parts to avoid damage. This allows you to reach screws and internal pieces for removal. Follow simple steps to reach each part easily.
Remove Interior Cover
Start by locating the interior cover of the deadbolt. It usually hides screws and internal parts. Use a screwdriver to gently pry off the cover. Some covers twist off, others lift straight out. Be gentle to avoid breaking plastic clips. Once removed, you can see the mounting screws inside.
Unscrew Exterior Assembly
After removing the interior cover, focus on the exterior assembly. Use a screwdriver to remove all visible screws. Keep track of each screw carefully. The exterior part should slide away from the door once screws are out. This step frees the lock from the door surface. Now, the deadbolt components are ready for full removal.
Disconnect Wiring
Disconnecting the wiring is an important step to safely remove a Deadbolt lock. It stops power flow and avoids damage to the lock or your home’s electrical system. Take your time and follow these steps carefully.
Identify Wiring Connections
First, open the Deadbolt’s interior panel. Look for the wires connected to the lock. Usually, there are two or more wires. Each wire has a specific function, like power or signal.
Check the colors of the wires. Common colors include red, black, white, and green. These colors help identify the purpose of each wire. Use the lock’s manual for exact details.
Note how the wires connect to the terminals. Take a photo or make a drawing. This helps if you need to reinstall or replace the lock later.
Safely Detach Wires
Turn off the power supply before handling wires. This avoids any risk of electric shock. Use a screwdriver to loosen the terminal screws holding the wires.
Carefully pull the wires away from the terminals. Avoid pulling on the wires themselves. Hold the connectors or terminals gently.
Keep the wires separated and organized. Use tape or wire caps to cover exposed wire ends. This prevents accidental contact and short circuits.
Remove Deadbolt Mechanism
Removing a deadbolt mechanism is a key step to uninstalling the lock. It involves taking out the parts fixed inside the door. This allows you to replace or repair the lock easily. The process requires some basic tools and careful handling.
Start by loosening the screws and gently pulling out the lock components. This prevents damage to the door and keeps the parts intact. Follow these steps to remove the deadbolt smoothly.
Extract Deadbolt From Door
Locate the screws on the interior side of the door. Use a screwdriver to remove them carefully. Keep the screws safe for later use or disposal. Once the screws are out, pull the interior knob or thumb turn away from the door. Next, grasp the exterior part of the lock and slide it out slowly. The deadbolt should come out with a little effort. Avoid forcing the mechanism to prevent damage to the door frame.
Remove Strike Plate
The strike plate is the metal piece on the door frame. It catches the deadbolt when the door locks. Use a screwdriver to remove the screws holding the strike plate. Pull the plate away from the frame gently. Sometimes, the strike plate is painted over, so apply a little pressure to loosen it. Removing the strike plate clears the way for a new lock installation or door repair.
Clean Up Installation Area
After removing the Deadbolt lock, the installation area often looks rough. Dirt, dust, and marks can remain on the door and frame. Cleaning this area helps prepare the door for a new lock. A neat surface also improves how the new lock fits and works. Taking time to clean and repair the door saves trouble later.
Patch Holes And Scratches
Check the door and frame for holes left by screws. Small holes can be filled with wood filler or putty. Use a putty knife to spread the filler smoothly. Let it dry fully before sanding it down. Sand the area until it is flat and even with the door surface. Scratches can also be lightly sanded or filled. This step creates a clean, smooth base for painting or staining.
Prepare Door For New Lock
Wipe the door and frame with a damp cloth to remove dust. Make sure the surface is completely dry before continuing. Test the door’s edge to confirm no leftover debris blocks the new lock. Mark the new lock’s position using the template or instructions. Drill holes carefully if needed, following the new lock’s size. A clean, prepared door helps the new lock fit tightly and work well.

Credit: diy.stackexchange.com
Troubleshooting Tips
Uninstalling a Deadbolt lock can be tricky at times. Some parts may not come off easily. Problems like stuck screws or wiring troubles can slow down the process. This section shares simple tips to solve common issues during removal. Follow these steps to make the job easier and faster.
Handling Stubborn Screws
Sometimes screws get stuck tight. Use a screwdriver that fits well. A loose tool can strip the screw head. Try pressing down hard while turning. If screws still won’t budge, apply a small amount of oil. Let it sit for a few minutes. Then, try again. For extra grip, use rubber bands on the screw head.
Dealing With Wiring Issues
Deadbolt locks with wiring can be confusing. Before unplugging wires, take a photo for reference. This helps during reinstallation. Gently disconnect wires one at a time. Avoid pulling hard to prevent damage. If wires are stuck, wiggle them slightly. Use a small tool to press release tabs. Keep wires organized to avoid mixing them up.
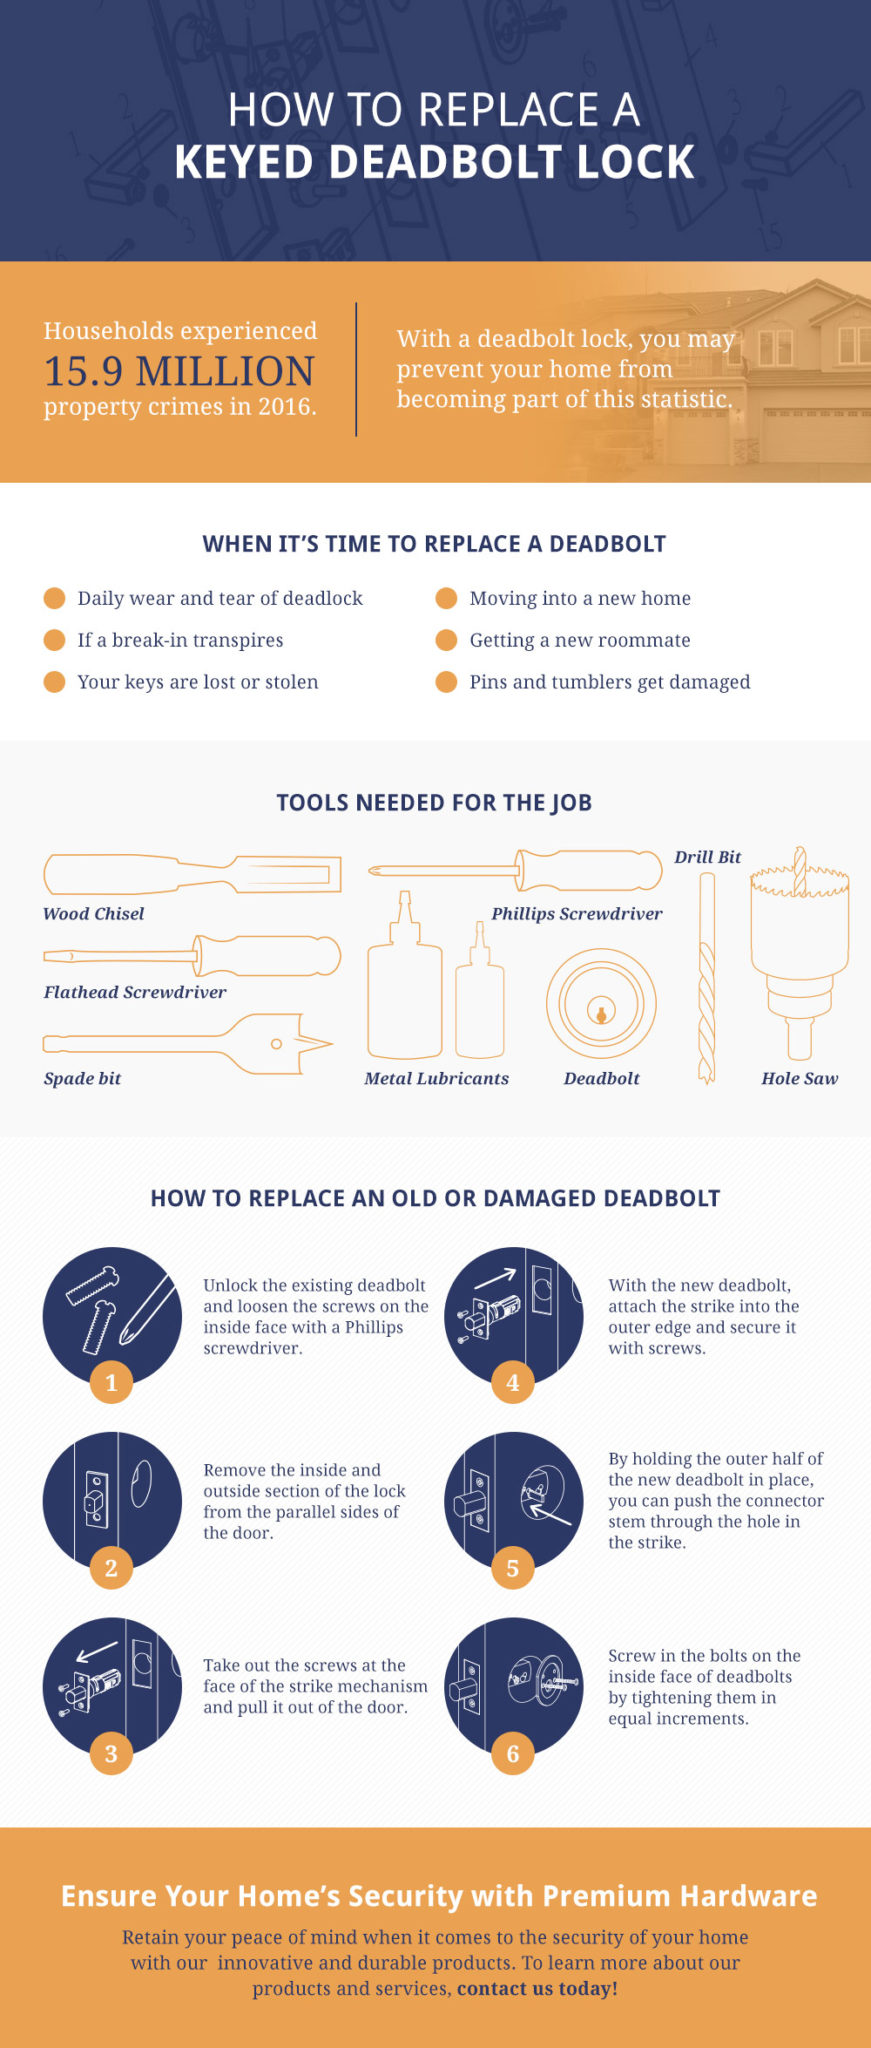
Credit: premiumhardware.net
Frequently Asked Questions
How Do I Uninstall Deadbolt Lock Safely?
To uninstall a Deadbolt lock, first remove the screws on the interior side. Then, detach the lock components carefully. Finally, pull the lock from the door. Always keep the screws safe for reinstallation or replacement.
What Tools Are Needed To Remove Deadbolt Locks?
You will need a screwdriver, usually Phillips or flathead, to remove Deadbolt screws. Sometimes, a drill can help with stubborn screws. A small pry bar may assist in loosening the lock if stuck.
Can I Uninstall Deadbolt Without Damaging The Door?
Yes, uninstalling Deadbolt locks can be done without damaging the door. Removing screws carefully and avoiding force prevents scratches or holes. Always handle lock parts gently during removal.
How Long Does It Take To Uninstall A Deadbolt?
Uninstalling a Deadbolt lock typically takes 10 to 20 minutes. The time depends on your experience and the lock’s condition. Proper tools speed up the process.
Conclusion
Uninstalling Deadbolt is simple with clear steps. Take your time and follow each instruction. Use the right tools to avoid damage. Check your work to ensure everything is removed. This helps keep your device clean and safe. Now you can try other apps or settings.
Feel confident in managing your device yourself. Easy and quick removal saves you time and stress.