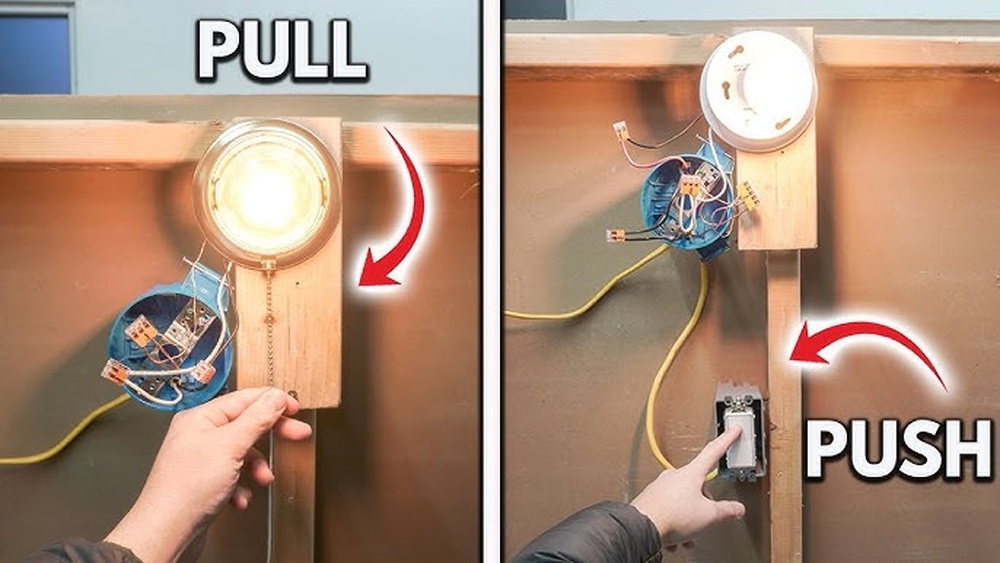
Have you ever struggled to turn off a pull chain light because the chain is hard to reach or just plain annoying? Adding a regular switch can make your life so much easier.
Imagine flicking a simple wall switch instead of tugging on that chain every time. In this guide, you’ll learn exactly how to add a switch to your pull chain light quickly and safely. By the end, you’ll have a smoother, more convenient way to control your lighting—without calling an electrician.
Keep reading, and let’s make your lighting work better for you!
Credit: www.houzz.com
Tools And Materials Needed
Adding a switch to a pull chain light requires a few basic tools and materials. Having the right items makes the job easier and safer. Prepare everything before you start working.
Gather tools that help with cutting, stripping, and connecting wires. Materials include the switch and electrical parts to complete the connection.
Tools Needed
- Screwdriver – to open the light fixture and secure connections
- Wire strippers – to remove insulation from wires
- Wire cutters – to trim wires to the right length
- Voltage tester – to ensure power is off before working
- Needle-nose pliers – to bend and twist wires easily
- Electrical tape – for extra insulation on connections
Materials Needed
- Inline switch – designed for easy installation on wires
- Electrical wire – to extend or connect the switch
- Wire connectors – to join wires safely and securely
- Light bulb – check if replacement is needed during installation

Credit: www.youtube.com
Safety Precautions
Safety is the top priority when adding a switch to a pull chain light. Working with electricity can be risky without the right steps. Simple mistakes can cause shocks or damage.
Follow clear safety rules to protect yourself and your home. These precautions make the process safer and easier.
Turn Off Power At The Breaker
Always switch off the power at the circuit breaker before starting. This stops electricity from flowing to the light fixture. Double-check by trying to turn on the light after switching off.
Use A Voltage Tester
Check wires with a voltage tester to ensure no current is present. This tool confirms the power is off and safe to touch. Never skip this step.
Wear Insulated Gloves
Wear insulated gloves to reduce shock risk. These gloves protect your hands from live wires. Use gloves rated for electrical work.
Work In A Dry Area
Keep the work area dry at all times. Water increases the chance of electric shock. Avoid working in damp or wet spaces.
Follow Manufacturer Instructions
Read and follow the switch manufacturer’s instructions carefully. Proper installation ensures safety and functionality. Use the right tools and parts for the job.
Identify The Pull Chain Light Wiring
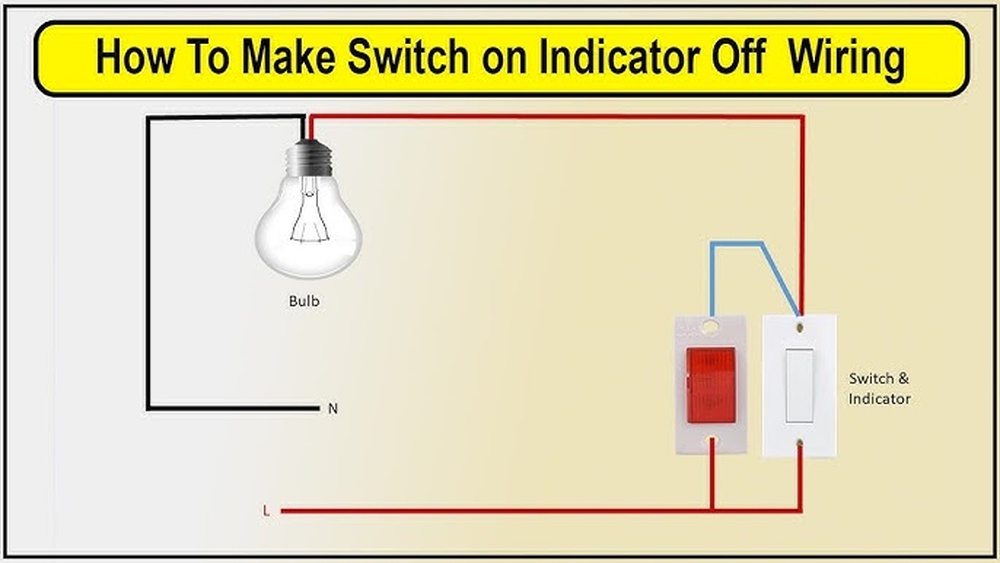
Start by locating the wires connected to the pull chain light. Identify the hot and neutral wires before adding a switch. This step ensures safe and correct wiring for the new switch installation.
Understanding The Basics Of Pull Chain Light Wiring
Before adding a switch, you need to identify the wiring of the pull chain light. Pull chain lights usually have two main wires: a hot wire and a neutral wire. The hot wire carries electricity to the light, while the neutral wire completes the circuit. Knowing which wire is which is essential for safe installation.
Turn off the power at the circuit breaker to avoid shocks. Use a voltage tester to check the wires carefully. Make sure no current is flowing before touching any wires.
Locating The Hot And Neutral Wires
Open the light fixture’s housing to see the wires inside. The hot wire is often black or red. The neutral wire is usually white. Sometimes, colors may differ, so use a tester to confirm. Label the wires with tape for easy identification later.
Do not guess the wires by color alone. Testing ensures you connect the switch correctly and avoid damage.
Identifying The Pull Chain Switch Wires
The pull chain switch inside the fixture interrupts the hot wire’s flow. It usually has two small wires connected to it. These wires control the light turning on and off. Disconnect these wires carefully to prepare for the new switch.
Mark the wires connected to the pull chain switch. This helps you connect the new switch without confusion.
Choose The Right Switch
Choosing the right switch is key to adding a switch to a pull chain light. The switch controls the power to the light. Picking the correct one ensures safety and ease of use. The wrong switch can cause problems or fail to work properly.
Consider the type, size, and compatibility of the switch. Each factor affects how well the switch fits and functions with your light fixture. The right switch makes your light easy to control and reliable.
Types Of Switches
Toggle, rocker, and push-button switches are common options. Toggle switches flip up or down. Rocker switches press on one side to turn on or off. Push-button switches click when pressed. Choose a type that feels easy to use and fits your style.
Switch Size And Rating
Check the switch size to match your fixture’s space. The electrical rating shows how much current the switch can handle safely. Use a switch rated for your light’s voltage and wattage. This prevents overheating and damage.
Compatibility With Pull Chain Lights
Some switches work better with pull chain lights than others. Look for switches designed for lighting or lamps. They connect easily to the existing wiring. Avoid switches made for other uses, like appliances.
Turn Off Power Supply
Turning off the power supply is the first and most important step before adding a switch to a pull chain light. It ensures your safety and prevents electric shock. Always treat electricity with respect.
Electricity can be dangerous. Even a small mistake can cause injury or damage. Taking time to turn off power protects you and your home.
Locate The Circuit Breaker
Find the main electrical panel in your home. It is usually in the basement, garage, or utility room. Look for the circuit breaker that controls the light you want to work on.
Switch Off The Correct Breaker
Flip the breaker switch to the off position. This cuts the power supply to the pull chain light. Double-check by turning the light on to confirm no power is flowing.
Use A Voltage Tester
Test the wires with a voltage tester before touching anything. This tool shows if the wires still have electricity. Never skip this step for your safety.
Remove The Pull Chain Mechanism
Start by turning off the power to the light fixture. Then, carefully unscrew and remove the pull chain mechanism from the socket. This step clears the way to install a new switch easily.
Prepare The Light Fixture
Start by turning off the power at the circuit breaker. This ensures safety while working. Next, remove the light bulb and shade if present. This gives clear access to the pull chain mechanism. Use a screwdriver to take off the fixture cover carefully.
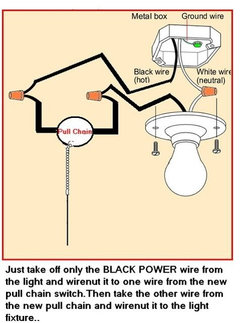
Disconnect The Pull Chain
Locate the pull chain switch inside the fixture. It is usually attached to the socket or housing. Gently pull the chain to confirm its connection. Unscrew or unclip the switch from the fixture. Take note of the wires connected to the switch.
Remove The Pull Chain Switch
Use a voltage tester to ensure no power flows to the wires. Carefully disconnect the wires from the pull chain switch. Loosen the screws or clips holding the switch in place. Remove the switch fully from the fixture. Keep the wires separated and safe for the next step.
Connect The New Switch
Connecting the new switch is a key step in changing a pull chain light. This process controls the flow of electricity to the light. Proper connection makes the switch work safely and smoothly.
Follow the steps carefully. Use tools like a screwdriver and wire stripper. Make sure the power is off at the breaker before starting. Safety first.
Identify The Wires
Look at the wires coming from the light fixture. Usually, there are two or three wires. One is the live wire, and another is the neutral wire. Sometimes, there is a ground wire. Know which wire is which before moving on.
Attach Wires To The Switch
Take the new switch and find its terminals. Connect the live wire to one terminal. Connect the wire going to the light to the other terminal. Use a screwdriver to tighten the screws securely. Loose wires can cause problems.
Secure The Connections
Wrap each wire connection with electrical tape. This prevents short circuits. Check that no bare wire is exposed. Proper insulation is very important. It keeps the switch safe to use.
Test The Switch
Turn the power back on at the breaker. Flip the new switch to see if the light turns on and off. If it works, you have done a good job. If not, turn off the power and recheck your connections.
Secure The Switch In Place
Securing the switch in place is a key step in adding a switch to a pull chain light. It ensures the switch stays fixed and works safely. A loose switch can cause problems or even be dangerous. Taking time to secure it right makes your project last longer and function well.
Use the right tools and materials to keep the switch steady. Follow clear steps to attach the switch firmly without damaging wires or the light fixture. Check the switch’s position before finalizing to make sure it is easy to reach and use.
Choose The Correct Mounting Location
Select a flat surface near the pull chain light. The switch should be easy to access. Avoid spots that block the light or interfere with other parts. The switch must not hang loosely or move around.
Use Screws Or Adhesive For Stability
Screws provide the strongest hold for the switch. Use small screws suitable for the fixture material. If screws are not an option, use strong double-sided tape or adhesive pads. Ensure the adhesive can support the switch’s weight and use.
Check For Wire Clearance
Make sure wires are not pinched or strained. Leave enough slack for safe connection. Arrange wires neatly behind the switch. This prevents damage and keeps the installation tidy.
Test The Switch After Securing
Once the switch is fixed, test it several times. Confirm it turns the light on and off smoothly. If the switch feels loose or stiff, adjust the mounting. Secure it again if needed before finishing.
Restore Power And Test
After installing a switch to your pull chain light, restoring power and testing the setup is essential. This step confirms everything works correctly and safely. Take your time to avoid any mistakes. Follow the instructions carefully.
Restore Power To The Circuit
Locate the circuit breaker that controls the light. Flip the switch back to the “on” position. This action restores electricity to the light fixture. Double-check that no wires are exposed before turning on the power. Safety first.
Test The New Switch
Press the new switch to turn the light on. Watch the light bulb closely. The light should turn on smoothly. Press the switch again to turn it off. If the light does not respond, recheck your wiring connections.
Check For Proper Functionality
Operate the switch several times. The light should switch on and off without flickering. Listen for any unusual sounds. A steady light and quiet operation mean success. If problems persist, turn off the power and inspect the installation again.

Credit: www.wikihow.com
Troubleshooting Common Issues
Adding a switch to a pull chain light can be simple. Yet, some common problems may arise. Troubleshooting these issues helps save time and effort. It also keeps your light working safely and well.
Check For Loose Connections
Loose wires can stop the switch from working. Turn off the power before looking inside. Tighten any loose wire nuts or screws. Make sure all wires connect firmly to the switch.
Test The Switch Itself
The switch might be broken. Use a multimeter to test for continuity. No continuity means the switch needs replacing. Swap the switch with a new one if needed.
Inspect The Pull Chain Mechanism
The pull chain may get stuck or broken. Pull gently to see if it moves freely. Replace the chain or switch if it feels stuck or damaged.
Confirm Power Supply To The Fixture
Power might not reach the light fixture. Check the circuit breaker or fuse box. Reset breakers or replace fuses if tripped or blown. Use a voltage tester to confirm power at the fixture.
Frequently Asked Questions
How Do I Add A Switch To A Pull Chain Light?
To add a switch, first turn off power. Disconnect the pull chain, then connect a wall switch in series. Use proper wiring techniques and secure all connections safely before restoring power.
Can I Replace A Pull Chain With A Wall Switch?
Yes, you can replace a pull chain with a wall switch. It improves convenience and accessibility. Ensure you follow electrical codes and safely disconnect the pull chain before installing the switch.
What Tools Are Needed To Add A Switch To A Pull Chain?
You will need a screwdriver, wire stripper, voltage tester, wire nuts, electrical tape, and the new wall switch. These tools ensure safe and proper installation of the switch.
Is It Safe To Install A Switch On A Pull Chain Light?
Yes, it is safe if you turn off the power and follow electrical safety guidelines. Proper wiring and securing connections reduce the risk of electric shock or fire.
Conclusion
Adding a switch to a pull chain light is simple and useful. It lets you control the light more easily. Follow the steps carefully and stay safe. Always turn off the power before starting. Use the right tools and parts.
After installation, test the switch to make sure it works. This small change can make your room more convenient. Enjoy the ease of switching your light on and off. A little effort brings big comfort.