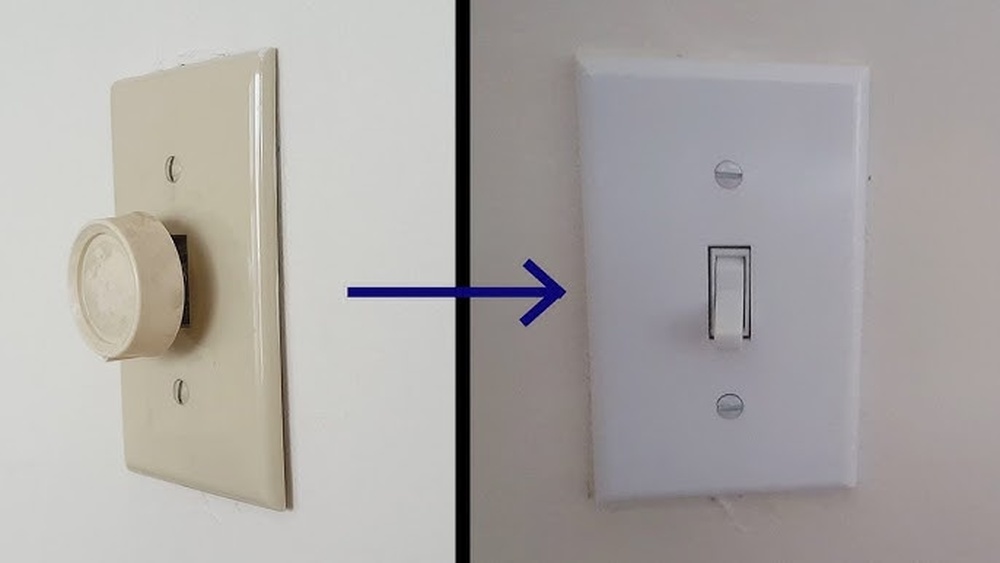
Are you tired of harsh, bright lights that drain the cozy feel from your room? Changing your regular light switch to a dimmer can transform your space instantly.
Imagine controlling the mood with just a simple slide or turn of a knob. It’s easier than you think, and you don’t need to be an expert electrician to do it yourself. In this guide, you’ll learn step-by-step how to make the switch safely and quickly.
Keep reading, and soon you’ll enjoy the perfect lighting for every moment in your home.

Credit: diy.stackexchange.com
Tools And Materials Needed
Changing a regular light switch to a dimmer switch needs the right tools and materials. Having everything ready makes the job easier and safer. This section lists what you need before starting.
Choosing The Right Dimmer Switch
Select a dimmer switch that matches your light bulbs. Not all dimmers work with every bulb type. Check if your bulbs are LED, incandescent, or CFL. Pick a dimmer designed for those bulbs. Also, consider the dimmer’s size to fit your switch box. Some dimmers have extra features like touch control or preset levels.
Essential Tools For The Job
Gather these tools before you begin:
- Screwdriver (flat and Phillips)
- Voltage tester to check power
- Wire stripper to remove insulation
- Needle-nose pliers for bending wires
- Electrical tape for safety
- Wire nuts to connect wires securely
Having these tools ready saves time and helps avoid mistakes.
Safety Gear To Use
Safety is important during electrical work. Use insulated gloves to protect your hands. Wear safety glasses to shield your eyes from sparks or debris. Make sure your shoes have rubber soles to reduce shock risk. Always turn off the power at the breaker before starting. Double-check with a voltage tester to confirm no electricity flows.
Preparing For The Switch Replacement
Preparing to change a regular light switch to a dimmer is important. It helps keep you safe and makes the job easier. Follow clear steps before you start. This guide will help you get ready.
Turning Off Power Safely
First, turn off the power at the circuit breaker. This stops electricity from flowing to the switch. Use a tester to check if the power is off. Never work on live wires. Safety is the top priority.
Removing The Old Light Switch
Remove the switch cover plate by unscrewing it. Unscrew the switch from the electrical box. Gently pull the switch out to see the wires. Take a photo of the wiring for reference. This helps during installation.
Checking The Wiring Setup
Look at the wires connected to the switch. Identify the live, neutral, and ground wires. Make sure the wires are not damaged. If wires are loose, tighten them carefully. Proper wiring is key for the dimmer to work.
Installing The Dimmer Switch
Installing the dimmer switch is the next step after turning off the power. This task requires careful attention to wiring and placement. Follow simple steps to ensure the dimmer works safely and correctly.
Connecting The Wires Correctly
Identify the wires in the wall box first. Usually, you will see a black (hot), white (neutral), and green or copper (ground) wire. Connect the dimmer’s wires to the matching wires in the box. Twist the exposed ends together and secure them with wire nuts. Make sure no bare wire shows outside the nuts. Proper connections prevent shorts and ensure the dimmer functions well.
Securing The Dimmer Switch
After wiring, push the dimmer switch gently into the wall box. Avoid bending or pinching the wires. Align the mounting holes on the dimmer with the box screws. Use a screwdriver to tighten the screws evenly. The switch should sit flush and firm. A loose switch can cause damage or create safety hazards.
Attaching The Faceplate
Place the faceplate over the dimmer switch. Line up the screw holes carefully. Insert the screws and tighten them just enough to hold the plate. Avoid overtightening to prevent cracking. The faceplate gives a clean look and protects the wiring inside the wall.
Credit: www.homedepot.com
Testing And Troubleshooting
Testing and troubleshooting are key steps after installing a dimmer switch. These steps make sure the dimmer works well and safely. They help find small problems early before they cause bigger issues. Follow these simple instructions to check your new dimmer switch.
Restoring Power And Testing
Turn the power back on at the circuit breaker. Then, test the dimmer switch by slowly turning the knob or sliding the control. The light should change brightness smoothly. If the light does not turn on, double-check the wiring connections. Make sure the switch is properly installed. Use a voltage tester to confirm power reaches the switch.
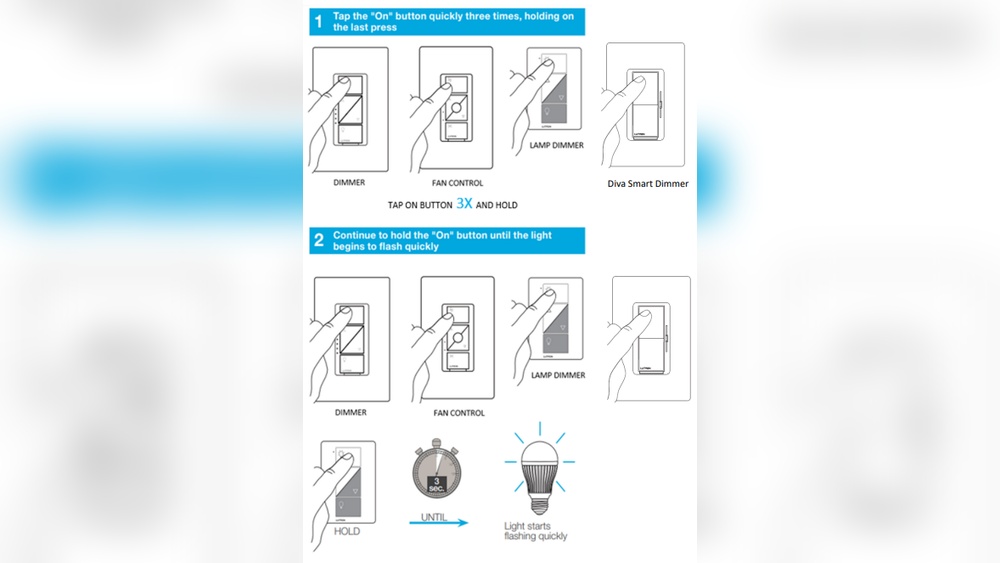
Adjusting Dimmer Settings
Some dimmers have a small dial for adjusting minimum brightness. Use a screwdriver to turn this dial if the light flickers or does not dim fully. Set the minimum level so the light stays steady at low brightness. Try different settings to find the best light level for your room. Adjust slowly to avoid damage to the bulb or switch.
Common Issues And Fixes
If the light flickers or buzzes, check the bulb type. Not all bulbs work with dimmers. Use dimmable LED or incandescent bulbs. Loose wiring can cause problems. Turn off power and tighten all wire connections. If the dimmer feels hot, it may be overloaded. Use a dimmer rated for your light wattage. Replace any faulty parts immediately to stay safe.
Tips For Choosing Dimmer Switches
Choosing the right dimmer switch is key for a smooth lighting upgrade. The right switch makes your lights work well and last longer. Consider a few important tips before buying a dimmer switch.
These tips help you pick a dimmer switch that fits your needs and your home’s lighting system.
Compatibility With Bulb Types
Not all dimmer switches work with every bulb. Some dimmers only support incandescent bulbs. Others work with LEDs, CFLs, or halogen bulbs. Check the dimmer’s packaging or manual. Make sure it matches your bulb type for best results.
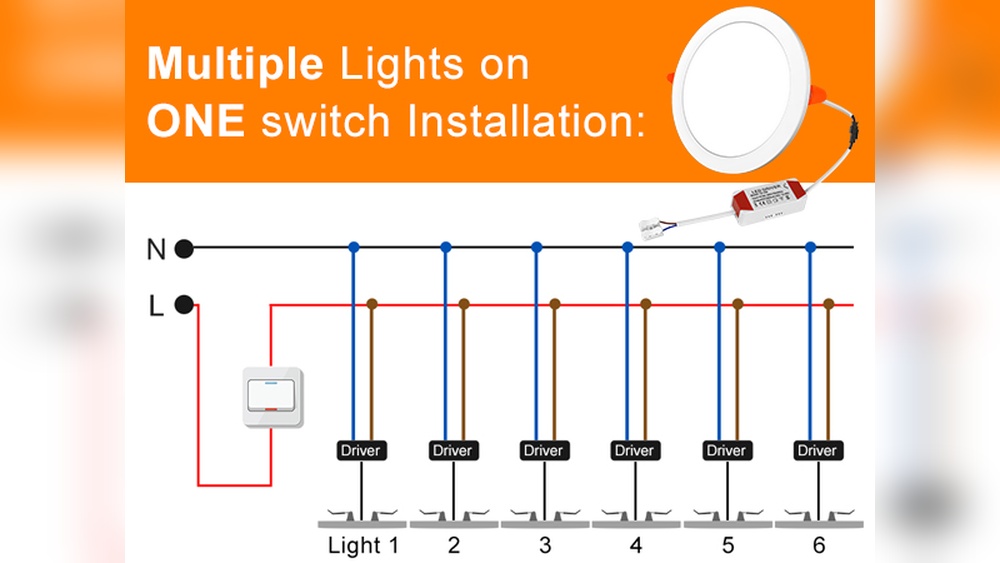
Wattage Limits
Each dimmer switch has a wattage limit. This limit shows how much power the switch can handle. Add the wattage of all bulbs on the circuit. The total should be less than the dimmer’s limit. Exceeding the limit can cause damage or poor performance.
Smart Dimmer Options
Smart dimmer switches allow remote control via phone or voice. They offer schedules and scenes for better lighting. Choose smart dimmers compatible with your home system. This adds convenience and modern control to your lighting.
Safety Precautions To Remember
Changing a regular light switch to a dimmer can improve your room’s lighting and mood. Safety is very important during this task. Taking proper safety steps helps avoid accidents and damage. Follow these key safety precautions to protect yourself and your home.
Avoiding Electrical Hazards
Turn off the power at the circuit breaker before starting. Use a voltage tester to check the wires for electricity. Never touch wires without confirming the power is off. Wear insulated gloves to reduce the risk of shock. Keep your work area dry and free of clutter. Avoid working in wet or damp places. Use tools with insulated handles for extra safety.
When To Call A Professional
Call an electrician if you feel unsure about wiring. Complex wiring or old electrical systems need expert help. Professionals ensure the dimmer switch is installed correctly and safely. Hiring a pro prevents damage to your home’s electrical system. It also reduces the risk of fire or injury.
Maintaining Your Dimmer Switch
Keep the dimmer switch clean and free of dust. Turn off power before cleaning the switch. Avoid using water or liquid cleaners on the switch. Check the dimmer switch regularly for any signs of damage. Replace it immediately if you see cracks or burning smells. Proper maintenance extends the life of your dimmer switch.

Credit: www.youtube.com
Frequently Asked Questions
How Do I Replace A Regular Switch With A Dimmer?
Turn off power at the breaker. Remove the old switch. Connect the dimmer wires following instructions. Secure and test the dimmer.
What Tools Are Needed To Install A Dimmer Switch?
You need a screwdriver, wire stripper, voltage tester, and the dimmer switch. These tools ensure safe and proper installation.
Can I Use A Dimmer Switch With All Types Of Bulbs?
No, dimmers work best with dimmable LED, incandescent, or halogen bulbs. Check bulb compatibility before installing.
Is It Safe To Install A Dimmer Switch Myself?
Yes, if you follow safety steps and turn off power. If unsure, consult a professional electrician.
Conclusion
Changing a regular light switch to a dimmer is simple and useful. It lets you control the light’s brightness easily. This small change can make a big difference in your room’s mood. Always turn off the power before starting the work.
Follow the steps carefully for safety. Soon, you will enjoy soft, adjustable lighting anytime you want. Try it yourself and see how easy it is to improve your space.