Have you ever noticed that your reverse lights don’t come on when you shift into reverse? This can be frustrating and even unsafe when backing up at night.
The good news is, changing a reverse light switch is something you can do yourself, even if you’re not a car expert. In this guide, you’ll learn simple, step-by-step instructions to fix this common issue quickly and confidently. Keep reading, and by the end, you’ll know exactly how to get your reverse lights shining bright again.
Tools And Materials Needed
Changing a reverse light switch requires certain tools and materials. Having the right items ready makes the job easier and safer. This section lists everything needed for the task. Prepare these before starting the repair.
Basic Hand Tools
You need simple hand tools to remove and install the switch. A wrench or socket set helps loosen the old switch. A screwdriver may be necessary to access panels or connectors.
New Reverse Light Switch
Buy a replacement switch that fits your vehicle’s make and model. Check the part number or consult your car’s manual to find the exact one.
Electrical Tape And Connectors
Use electrical tape to secure wires and prevent shorts. You may need new connectors if the old ones are damaged or worn out.
Gloves And Safety Glasses
Wear gloves to protect your hands from sharp edges and dirt. Safety glasses shield your eyes from debris during the repair.
Multimeter (optional)
A multimeter helps check if the switch works properly. It can test electrical connections and voltage before and after replacement.
Locate The Reverse Light Switch
Locating the reverse light switch is the first step to fix or replace it. This small part controls the reverse lights on your vehicle. Finding it saves time and effort during repair.
The switch is usually near the transmission or gear shift area. It senses when the car is in reverse gear. Knowing its location helps you work safely and effectively.
Check Near The Transmission
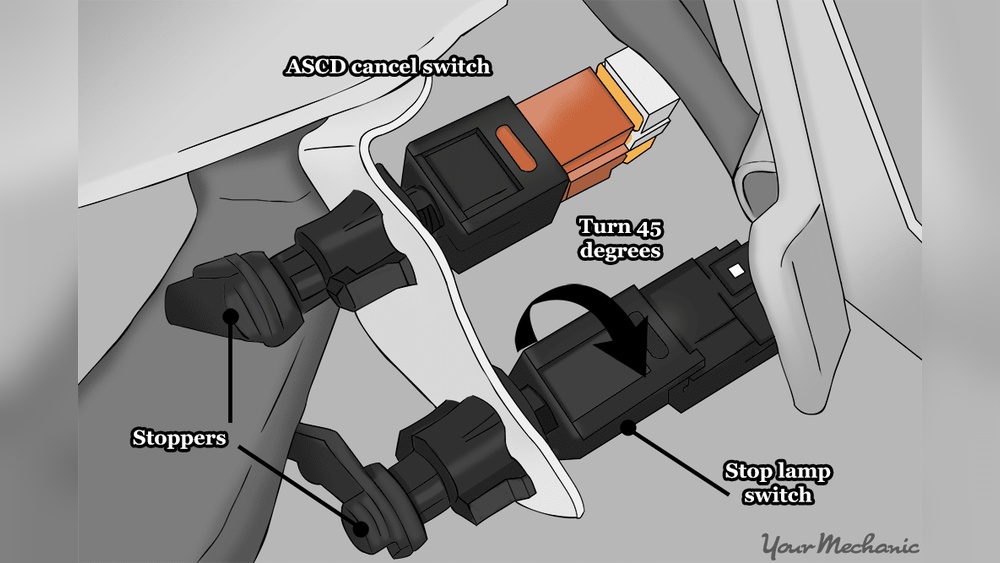
Most reverse light switches sit on the transmission housing. Look for a small, round or rectangular part with wires attached. It often screws into the transmission case.
Inspect The Gear Shift Assembly
Some cars have the switch on the gear shift lever. Remove the console cover to see inside. The switch may be clipped to the shift mechanism.
Use The Vehicle Manual
The manual shows the exact location of the switch. It gives diagrams and instructions. This guide is helpful for beginners and experts alike.
Look For Electrical Connectors
The reverse light switch has wires connected to it. Follow the wiring from the reverse lights at the back. This can lead you directly to the switch.
Prepare The Vehicle
Start by parking the vehicle on a flat surface and turning off the engine. Disconnect the battery to avoid any electrical shocks. This ensures safety and easy access to the reverse light switch.
Park The Vehicle On A Flat Surface
Choose a level spot to park your car. This stops the vehicle from moving.
Turn off the engine and set the parking brake. Safety first.
Disconnect The Battery
Open the hood and find the battery. Use a wrench to remove the negative cable first.
This prevents electrical shocks or short circuits during the repair.
Gather Necessary Tools
Prepare tools like screwdrivers, wrenches, and pliers. Keep them close for easy access.
Having the right tools saves time and avoids frustration.
Check your vehicle manual for the exact switch location. It is often near the transmission.
Knowing the location helps you work faster and safer.
Remove The Old Reverse Light Switch
Removing the old reverse light switch is the first step to replacing it. This part controls the light that turns on when your car is in reverse. Over time, the switch can wear out or stop working. Taking it out carefully ensures you do not damage any other parts.
Follow these steps to remove the old switch safely and easily. Keep tools ready and work in a well-lit area. Take your time to avoid mistakes or injuries.
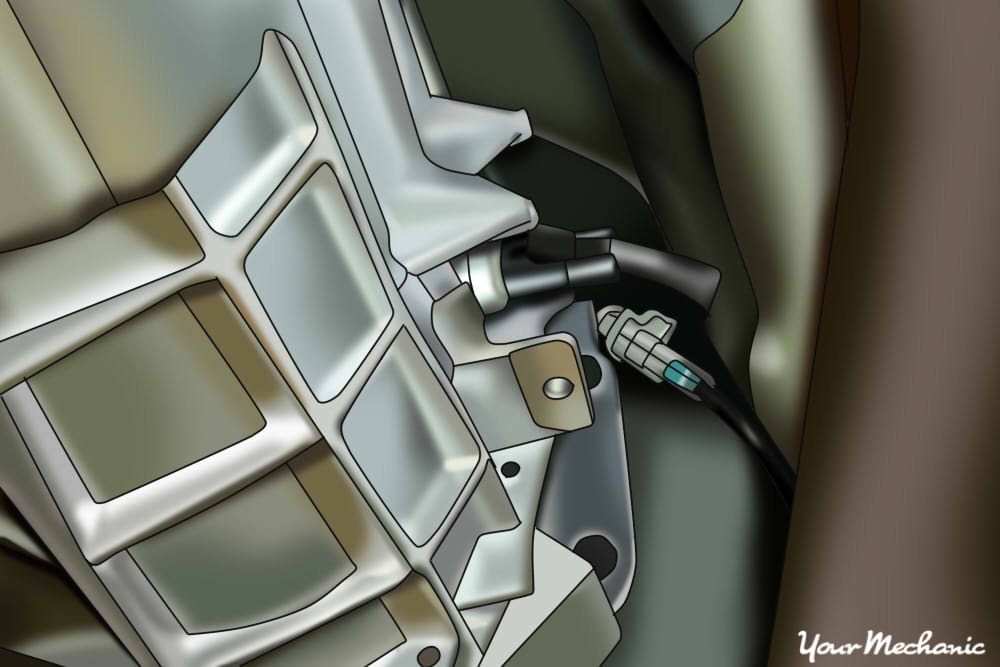
Find the switch near the transmission or gearbox. It usually screws into the transmission housing. Check your car manual if you are unsure about the exact spot.
Disconnect The Battery
Always disconnect the car battery before working on electrical parts. This step prevents short circuits and protects you from shocks.
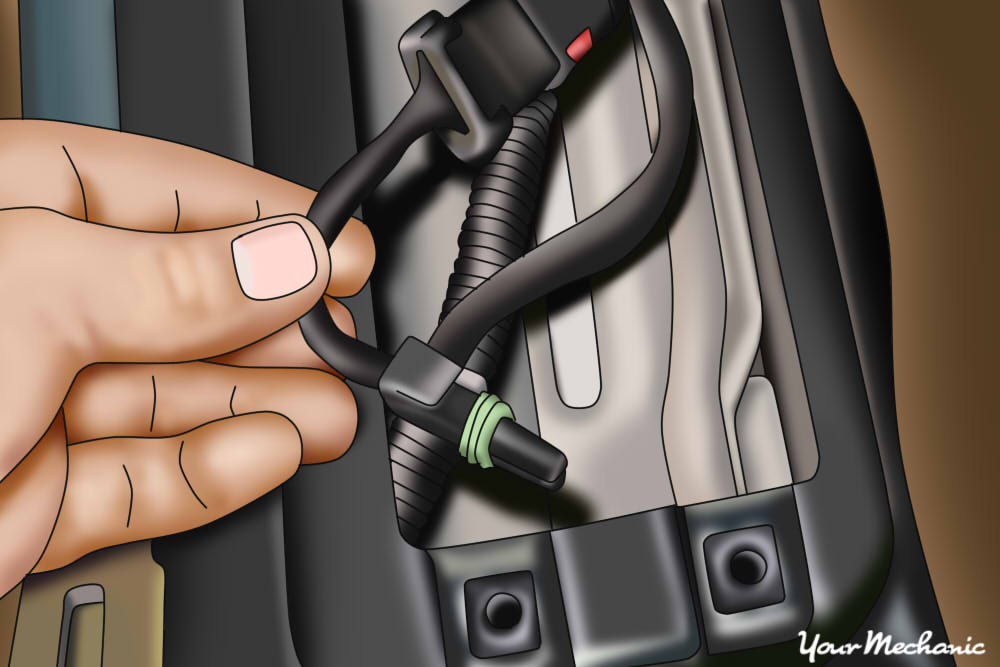
Unplug The Electrical Connector
Gently pull off the electrical connector attached to the switch. Avoid pulling on the wires themselves to prevent damage.
Use The Correct Tool To Unscrew The Switch
Use a wrench or socket that fits the switch size. Turn counterclockwise to loosen and remove the switch carefully.
Remove The Old Switch
Once unscrewed, pull the switch out slowly. Inspect the area for dirt or damage before installing the new switch.
Install The New Reverse Light Switch
Installing the new reverse light switch is a key step to restore your vehicle’s safety and function. This part signals when your car is in reverse, so others can see your intentions. Follow each step carefully to ensure the switch works properly.
Locate The Mounting Position
Find the exact spot where the old switch was removed. It is usually near the transmission or gear lever. Clean the area to remove dirt and oil. This makes installation easier and prevents leaks.
Thread The New Switch Carefully
Start screwing the new switch by hand. Avoid forcing it to prevent damage. Tighten it gently but firmly using a wrench. Check the manufacturer’s guide for the correct torque.
Reconnect The Electrical Connector
Attach the wiring plug to the new switch. Make sure the connection is secure and clicks in place. Loose connections can cause the light to fail.
Test The Switch Function
Turn the ignition on and shift to reverse. Check if the reverse lights illuminate. If they do not, recheck the wiring and switch installation.
Credit: www.gilgharda.com
Test The New Switch
Start by checking the new switch before installation. Make sure it works by testing the reverse light function. This step helps avoid any issues after replacement.
Prepare Your Vehicle
Start by putting the car in reverse gear. This action activates the reverse light circuit. Make sure the parking brake is on for safety. Keep the engine running or the ignition in the “on” position. This ensures power reaches the new switch.
Check The Reverse Lights
Look at the rear of your vehicle. The reverse lights should turn on immediately. If the lights glow bright and steady, the switch works correctly. Dim or flickering lights indicate a problem. No light means the switch or wiring may be faulty.
Use A Multimeter For Accuracy
Set your multimeter to measure voltage or continuity. Connect the probes to the switch terminals. When in reverse, the meter should show voltage or a closed circuit. No reading means the switch is defective. This step gives a clear test result.
Inspect For Proper Installation
Check the switch mounting and wiring connections. Loose wires cause intermittent light failure. Tighten all connections and secure the switch firmly. A well-installed switch prevents future issues. Double-check for any signs of damage or corrosion.
Troubleshooting Common Issues
Troubleshooting the reverse light switch helps fix common problems fast. Many car owners face issues with reverse lights not working. Identifying the cause saves time and money. Below are common problems and easy fixes to try before replacing the switch.
Check The Reverse Light Bulbs
First, inspect the reverse light bulbs. Sometimes, bulbs burn out and stop lighting. Remove the bulb and look for broken filaments or dark spots. Replace any faulty bulbs with new ones. This simple step often solves the problem.
Test The Reverse Light Switch
Next, test the reverse light switch itself. Use a multimeter to check for electrical continuity. When the car is in reverse, the switch should close the circuit. No reading means the switch is faulty. Replace the switch if needed.
Inspect The Wiring And Connections
Wiring issues can cause reverse lights to fail. Look for damaged wires, loose connectors, or corrosion. Clean the connectors and secure loose wires. Repair or replace damaged wiring to restore power flow.
Check The Fuse For The Reverse Lights
A blown fuse may stop reverse lights from working. Locate the fuse box and find the reverse light fuse. Check if the fuse is broken or burnt. Replace the fuse with one of the same rating if necessary.
Look For Transmission Linkage Problems
The reverse light switch often connects to the transmission. If the linkage is damaged, the switch might not activate. Inspect the linkage for wear or misalignment. Fixing linkage issues can restore proper switch function.

Credit: www.youtube.com
Credit: www.yourmechanic.com
Frequently Asked Questions
What Tools Are Needed To Change A Reverse Light Switch?
You need a wrench, screwdriver, and a new reverse light switch. Safety gloves and a multimeter help ensure safe, accurate work.
How Do I Locate The Reverse Light Switch?
The reverse light switch is usually near the transmission or gear selector. Consult your vehicle manual for the exact location.
How Long Does It Take To Replace A Reverse Light Switch?
Replacing a reverse light switch typically takes 15 to 30 minutes. It depends on your vehicle model and your experience level.
Can A Faulty Reverse Light Switch Cause Transmission Issues?
No, a faulty reverse light switch mainly affects reverse lights, not transmission operation or shifting performance.
Conclusion
Changing a reverse light switch is simple and quick. Follow the steps carefully to avoid mistakes. Use basic tools and take safety precautions. A working switch keeps your car safe and visible. Check the light after installation to ensure it works.
Regular car care helps prevent future problems. Now you can fix the reverse light switch yourself. Save time and money by doing it right at home. Trust your skills and take your time. You’ve got this!