Are you looking to add a plug to your light switch but don’t know where to start? Connecting a plug to a light switch might seem tricky, but with the right steps, you can do it yourself safely and easily.
Imagine controlling a lamp or device right from your switch without any hassle. In this guide, you’ll discover simple, clear instructions that anyone can follow—even if you’re not an expert. Keep reading, and by the end, you’ll feel confident to make this useful upgrade in your home.
Tools And Materials Needed
Connecting a plug to a light switch requires specific tools and materials. Having the right items ensures safety and a smooth process. Prepare everything before starting the project.
Using proper tools helps avoid damage to wires and devices. It also makes the work faster and easier. Below is a list of essential tools and materials needed for this task.
Basic Hand Tools
You will need a screwdriver set with flathead and Phillips tips. Wire strippers are necessary to remove insulation from wires. Needle-nose pliers help grip and bend wires accurately. A voltage tester ensures the power is off before working.
Electrical Materials
Get a light switch rated for your electrical load. A compatible plug or socket is required to connect properly. Use electrical wires of the correct gauge for safety. Wire nuts or connectors secure wire connections tightly.
Safety Equipment
Wear insulated gloves to protect from electric shocks. Safety goggles shield your eyes from debris. A flashlight or headlamp helps in low-light areas. Always have a fire extinguisher nearby for emergencies.
Safety First
Safety comes first when connecting a plug to a light switch. Working with electricity can be risky. Taking proper precautions helps avoid accidents and injuries. Always respect electrical safety rules to keep yourself and others safe.
Turn Off The Power
Always switch off the main power before starting. Use the circuit breaker to cut electricity to the area. Double-check that the power is off by testing the switch or plug with a voltage tester.
Use Proper Tools And Equipment
Choose tools made for electrical work. Insulated screwdrivers and wire strippers prevent electric shocks. Avoid makeshift tools that can slip or cause harm.
Wear Protective Gear
Wear rubber gloves and safety glasses. They protect your hands and eyes from sparks or sharp wires. Avoid loose clothing that could catch on wires or tools.
Work In A Dry Environment
Never work with electricity near water. Dry your hands and work area before starting. Water increases the risk of electric shock.
Follow Local Electrical Codes
Check local rules for wiring and electrical work. Following codes ensures safe and legal installation. It also helps avoid future problems or hazards.
Identify Wiring Types
Identifying wiring types is the first step to connect a plug to a light switch safely. Different wires serve different purposes. Knowing these wires helps avoid mistakes and electrical hazards.
Wires come in various colors and thicknesses. Each color shows its role in the circuit. Learning to recognize these colors is important for safe installation.
Understanding Live Wire
The live wire carries electricity from the power source. It is usually red or brown. This wire is dangerous to touch when the power is on. It connects to the switch to control the light.
Recognizing Neutral Wire
The neutral wire completes the electrical circuit. It usually has a blue or black color. It carries electricity back to the power source. This wire is not switched but must connect properly.
Identifying Earth Wire
The earth wire protects from electric shocks. It is green or green with yellow stripes. It does not carry current unless there is a fault. This wire connects to the metal parts for safety.
Checking Wire Thickness And Insulation
Wire thickness shows the current it can carry safely. Thicker wires handle more power. Insulation color also helps identify wire function. Always use wires with proper insulation to prevent accidents.
Turn Off Power Supply
Turning off the power supply is the first and most important step. It keeps you safe from electric shocks while working. Always treat electricity with respect. Even a small mistake can cause serious injury.
Before connecting a plug to a light switch, make sure no electricity flows. This step helps prevent accidents. It also protects your tools and devices from damage.
Locate The Circuit Breaker
Find the main circuit breaker box in your home. It is usually in the basement, garage, or utility room. The box controls electricity for the entire house.
Identify the switch that controls power to the area you will work on. The breakers are often labeled by room or device.
Switch Off The Correct Breaker
Flip the breaker switch to the “Off” position. This stops electricity from reaching the light switch and plug.
Double-check you switched off the right breaker. Turning off the wrong one can cause confusion and risk.
Test The Power Is Off
Use a non-contact voltage tester or a simple device. Touch the tester to the wires or terminals. No light or sound means no power.
Never skip this step. Confirming the power is off ensures your safety.
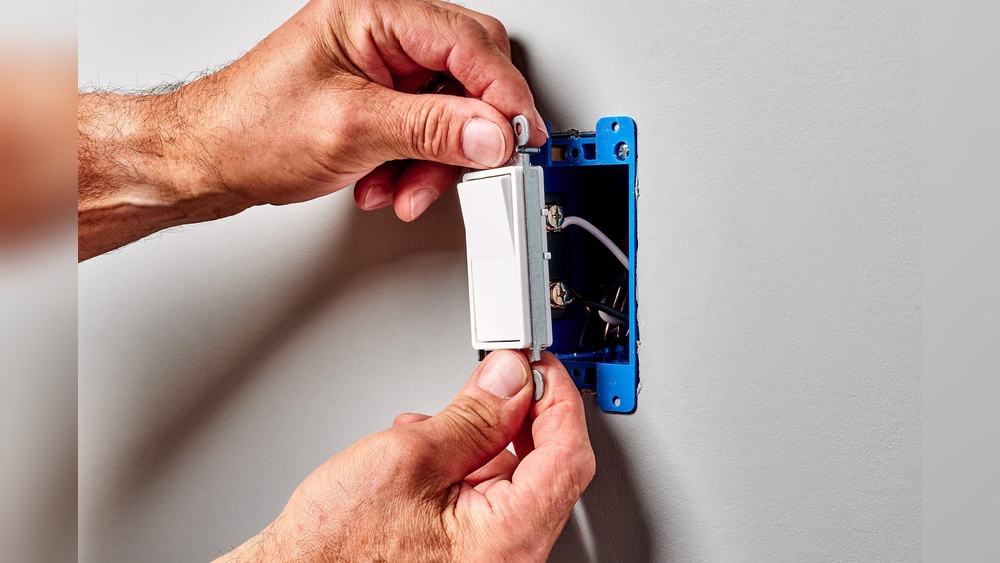
Remove Existing Switch Cover
Start by turning off the power at the circuit breaker for safety. Then, carefully unscrew and remove the switch cover to access the wires inside.
Gather Necessary Tools
Before removing the switch cover, prepare the right tools. A flathead screwdriver works best. You may also need a flashlight to see clearly.
Turn Off The Power
Safety first. Switch off the power at the breaker box. This prevents electric shocks during the process.
Unscrew The Switch Cover
Locate the screws holding the cover plate. Use the screwdriver to remove them carefully. Keep the screws safe for later use.
Remove The Cover Plate
Gently pull the cover plate away from the wall. Do not force it, as it may crack or damage the wall paint.
Inspect The Switch And Wiring
Look inside for any signs of damage or loose wires. This helps you understand the setup before connecting the plug.
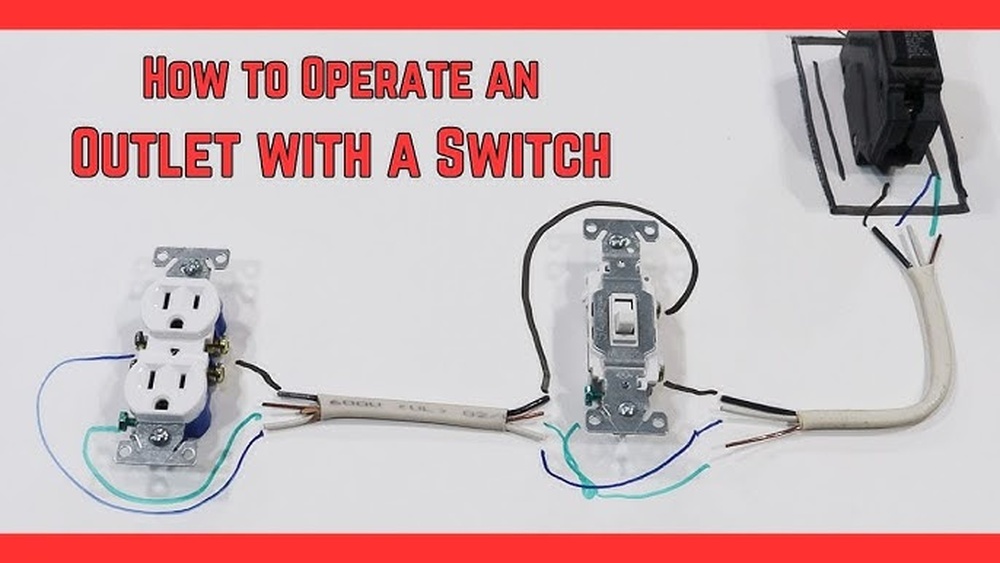
Connect The Plug To The Switch
Connecting a plug to a light switch is a basic electrical task. It allows you to control a light or device easily. This part focuses on how to join the plug wires to the switch safely.
Follow clear steps to ensure a strong and safe connection. Careful wiring prevents hazards and keeps your switch working well.
Match Wire Colors
Identify the wire colors on both the plug and the switch. Usually, black or red wires are live. White wires are neutral. Green or bare wires are ground.
Connect the same colors together. Live to live, neutral to neutral, and ground to ground. This keeps the circuit correct and safe.
Secure Wire Connections
Twist the wire ends tightly before connecting. Use wire nuts or terminal screws to hold wires firmly. Loose wires can cause sparks or failure.
After connecting, gently pull each wire to check. If it stays tight, the connection is good. Cover exposed wires with electrical tape for extra safety.
Test The Connection
Testing the connection ensures the plug works with the light switch properly. Check for power flow before finalizing the setup. This step helps avoid problems and keeps things safe.
Prepare For Testing
Before testing, ensure the power is back on. Switch on the main circuit breaker. This step is crucial for safety. Use a non-contact voltage tester to confirm power presence. Check that all wires are secured properly. Loose connections can cause faults or hazards.
Use A Voltage Tester
Touch the tester to the switch terminals. A light or beep means electricity flows correctly. No signal shows a wiring issue. Test both the live and neutral wires. This confirms the plug and switch are linked properly.
Check The Light Or Device
Plug a light or device into the socket. Turn the switch on. The device should work without flickering or delay. If it does not, double-check the wiring. Faulty connections may need tightening or correcting.
Inspect For Heat Or Sparks
Feel the plug and switch after use. They should stay cool to the touch. Watch carefully for any sparks or strange smells. These signs indicate unsafe wiring. Stop immediately and review your work.

Credit: projectsbypeter.com
Replace Switch Cover
Replacing the switch cover is the final step after connecting a plug to a light switch. It protects the wiring and gives a neat look. A properly installed cover keeps everything safe and secure.
Take your time with this step. A loose or broken cover can cause problems later. Follow these simple steps for a perfect fit.
Turn Off The Power
Before handling the switch cover, switch off the power at the breaker. This prevents electric shocks. Double-check by flipping the light switch to see if the light turns off.
Align The Cover Plate
Place the cover plate over the switch. Make sure the holes line up with the switch screws. The plate should sit flush against the wall without gaps.
Secure The Cover With Screws
Use a screwdriver to tighten the screws. Don’t overtighten, or the cover may crack. Tighten just enough to hold the plate firmly in place.
Check For Stability
Wiggle the cover gently. It should not move or feel loose. If it does, tighten the screws a bit more until stable.
Troubleshooting Tips
Troubleshooting tips help fix common problems when connecting a plug to a light switch. These tips save time and prevent damage. Follow them carefully for a safe and working connection.
Check The Power Supply
Make sure the main power is off before starting. Use a voltage tester to confirm no electricity flows to the wires. This step protects you from electric shocks.
Inspect Wire Connections
Look closely at all wire connections. Loose wires cause the switch or plug to fail. Tighten any loose screws and ensure wires are fully inserted.
Test The Light Switch
Use a multimeter to test the switch. Set it to continuity mode. Press the switch and check if the meter beeps, showing a good connection.
Verify The Plug Wiring
Check the plug’s wiring colors match the switch wires. Usually, live wires connect to the switch’s terminals. Neutral and ground wires must be in the right place.
Replace Faulty Parts
Find broken or worn parts like switches or plugs. These parts stop the circuit from working. Replace them with new, matching parts to restore function.
Check For Short Circuits
Look for signs of short circuits such as burnt smells or black marks. Short circuits cause the fuse to blow or breaker to trip. Fix or replace damaged wires immediately.

Credit: www.youtube.com

Credit: diy.stackexchange.com
Frequently Asked Questions
How Do I Safely Connect A Plug To A Light Switch?
Turn off the power at the breaker before starting. Use a voltage tester to confirm no power. Connect wires following the switch’s wiring diagram. Secure connections with wire nuts. Always follow electrical codes and consider professional help if unsure.
What Tools Are Needed To Connect A Plug To A Switch?
You will need a screwdriver, wire stripper, voltage tester, wire nuts, and electrical tape. These tools ensure safe and proper connections. A multimeter can help verify voltage. Having the right tools makes the job easier and safer.
Can I Connect Any Plug To A Light Switch?
No, not all plugs are suitable. Use plugs rated for the switch’s voltage and current. Check the manufacturer’s specifications. Using the wrong plug can cause damage or hazards. Always use compatible and certified components.
Why Connect A Plug To A Light Switch?
Connecting a plug to a switch allows control of devices from the switch. It adds convenience and energy efficiency. You can turn appliances on or off easily. This setup is useful for lamps or small electronics.
Conclusion
Connecting a plug to a light switch is simple with the right steps. Always turn off the power before starting any work. Use the correct tools and follow safety rules closely. Double-check all connections to avoid problems later. Taking your time helps prevent mistakes and keeps you safe.
Now, you can add or control power easily with your switch. Try these steps carefully and feel confident in your work. Safety first, always.