Are you ready to upgrade your home lighting with smart technology? Connecting a Z Wave light switch might sound tricky, but it’s easier than you think.
In this guide, you’ll learn simple steps to get your Z Wave switch up and running quickly. Imagine controlling your lights from anywhere, saving energy, and adding convenience—all with just a few clicks. Keep reading, and by the end, you’ll have the confidence to make your home smarter and more efficient.
Let’s get started!
What Is A Z Wave Light Switch
A Z Wave light switch is a smart device that controls your home lighting. It works with Z Wave technology, which lets devices communicate wirelessly. This switch replaces your regular light switch and connects to your smart home system.
With a Z Wave light switch, you can turn lights on or off remotely. You can also set schedules or automate lighting based on your needs. It helps save energy and adds convenience to your daily routine.
How Z Wave Technology Works
Z Wave technology uses low-energy radio waves. These waves create a mesh network between devices. Each device can send signals to another, extending the network’s range. This means your light switch stays connected even if it is far from the hub.
Benefits Of Using A Z Wave Light Switch
Z Wave light switches offer easy control over your lights. They improve home security by allowing remote monitoring. They also reduce energy waste by letting you schedule lights. Installation is simple and fits existing wiring.
Compatibility With Smart Home Systems
Z Wave light switches work with many smart home hubs. These include popular brands like Samsung SmartThings and Wink. This compatibility allows for integration with other smart devices. You get a unified system to manage your home easily.

Credit: community.smartthings.com
Tools Needed For Installation
Installing a Z Wave light switch requires a few basic tools. Having the right tools makes the job safer and easier. These tools help you handle wires and secure the switch properly.
Prepare everything before starting. This saves time and avoids frustration. Each tool plays a key role in the installation process.
Voltage TesterA voltage tester checks if wires carry electricity. It helps you avoid electric shocks. Always test the wires before touching them.
Screwdriver SetUse screwdrivers to remove old switches and fix the new one. Both flathead and Phillips screwdrivers are useful. Choose the right size to avoid damage.
Wire StrippersWire strippers remove insulation from wires without cutting them. Clean wire ends make good connections. Use the correct slot on the tool for your wire size.
Needle-Nose PliersNeedle-nose pliers help bend wires and hold small parts. They offer better control in tight spaces. Use them to twist wires together securely.
Electrical TapeWrap electrical tape around wire connections for safety. It prevents short circuits and protects wires. Use good quality tape that sticks well.
Wire NutsWire nuts connect two or more wires safely. They keep the wires from touching each other. Twist wires firmly before screwing on the nuts.
Preparing Your Existing Switch
Preparing your existing switch is the first step to connect a Z Wave light switch. This part is important to keep you safe and make sure the new switch works well. Follow each step carefully to avoid damage or injury.
Turn Off Power Safely
Start by turning off the power to the switch. Go to your home’s circuit breaker panel. Find the switch’s circuit and flip it off. Use a voltage tester to check the wires. Make sure no electricity is flowing before you touch anything.
Remove Old Switch
Unscrew the switch cover plate. Use a screwdriver to remove the switch from the wall box. Pull the switch gently out to see the wires. Keep track of the screws and plate for later use or disposal.
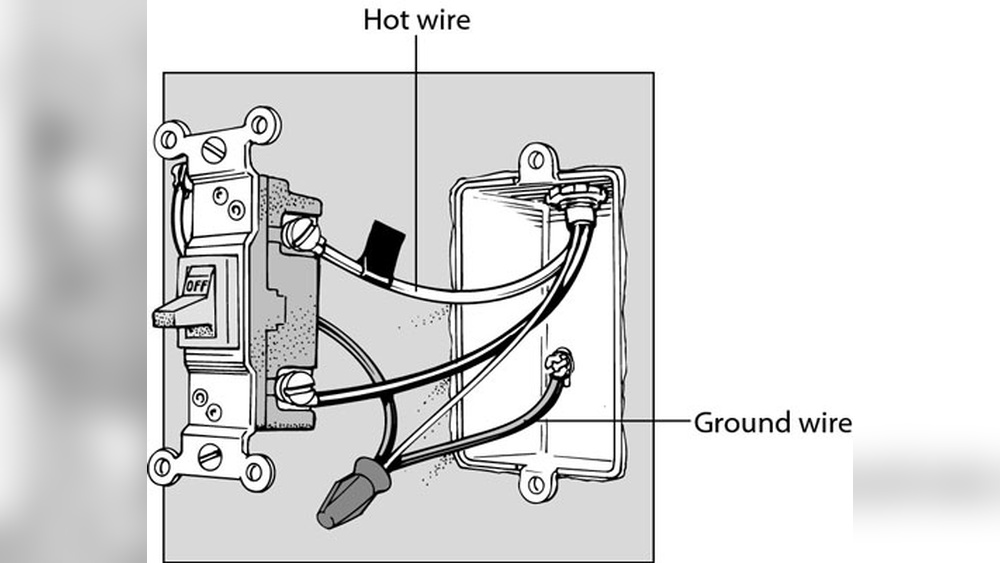
Identify Wiring
Look at the wires connected to the old switch. Usually, there are three types: live (hot), load, and ground. Use labels or take a photo to remember each wire’s position. This step helps to connect the new Z Wave switch correctly.
Wiring The Z Wave Switch
Wiring the Z Wave switch is a key step in setting up your smart home lighting. This process connects the switch to your home’s electrical system. Careful wiring ensures the switch works safely and correctly.
Follow clear steps to connect each wire. Small mistakes can cause problems or hazards. Use the right tools and check power is off before starting.
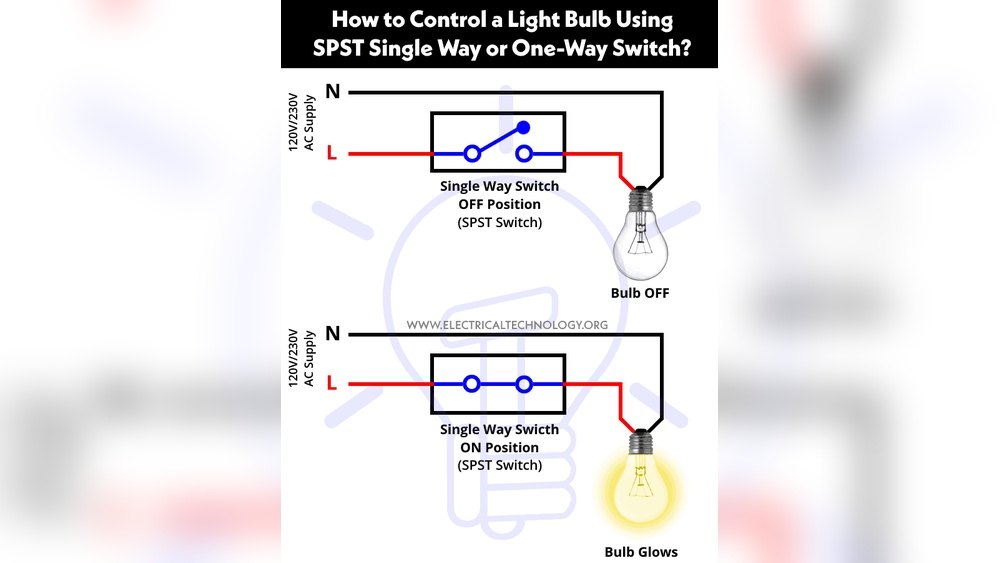
Connect Line And Load Wires
The line wire brings power from your electrical panel. The load wire sends power to the light fixture. Identify these wires carefully in your wall box.
Attach the line wire to the switch’s line terminal. Connect the load wire to the load terminal. Tighten screws firmly to prevent loose connections.
Attach Neutral Wire
The neutral wire completes the electrical circuit. Many older homes may not have this wire in the switch box. Check for a bundle of white wires in the box.
Connect the neutral wire to the switch’s neutral terminal. Use a wire nut if needed to join multiple neutral wires. This connection is critical for Z Wave switches.
Ground The Switch
The ground wire protects against electrical shocks. It usually has green or bare copper insulation. Locate the ground wire in your wall box.
Attach the ground wire to the green ground screw on the switch. Secure this connection tightly. Grounding is important for safety and device operation.
Mounting The Switch
Pairing your Z Wave light switch with a Z Wave hub is a key step. It connects your switch to the home network. This lets you control the switch remotely. The process is simple and fast if done right. Follow the steps carefully to ensure a smooth setup.
Activate Inclusion Mode
Start by turning on the inclusion mode on your Z Wave hub. This mode allows the hub to find new devices. Usually, this is done through the hub’s app or control panel. Look for “Add Device” or “Inclusion Mode.” Activate it to prepare the hub for pairing.
Add Switch To Network
Next, activate the pairing function on your Z Wave light switch. Press the switch’s button or follow the manual’s instructions. The switch sends a signal to the hub. The hub then confirms the switch is added to the network. Wait for a confirmation message or light indicator.

Credit: community.smartthings.com
Pairing With Z Wave Hub
Testing and troubleshooting your Z Wave light switch ensures it works properly. This step helps catch any issues early. It saves time and frustration later. Follow simple checks to confirm the switch operates well. Fix common problems fast with easy resets.
Verify Switch Operation
Start by turning the switch on and off manually. Check if the connected light responds right away. Listen for any unusual sounds from the switch. A quiet click usually means it works fine. If the light does not turn on, double-check wiring. Make sure the switch is mounted correctly.
Check Connectivity
Test the switch’s connection to your Z Wave network. Use your smart home app to see if the switch appears online. Try controlling the light through the app. If it does not respond, move closer to the hub. Weak signals can cause problems. Remove obstacles or interference near the switch.
Reset If Needed
Resetting the switch can solve many issues. Find the reset button or use the manual to reset. Hold the button for a few seconds until the indicator blinks. After reset, re-add the switch to your Z Wave network. This clears old settings and refreshes the device. Test the switch again after reset.
Testing And Troubleshooting
Optimizing smart control for your Z Wave light switch makes daily life easier. Simple changes can save energy and boost comfort. Smart control helps you manage lights from anywhere. Use these tips to get the most out of your smart switch.
Set Automation Rules
Create rules to control lights automatically. Schedule lights to turn on at sunset or off at bedtime. Use sensors to switch lights on when you enter a room. Automations reduce manual work and save electricity. Adjust rules anytime to fit your lifestyle.
Use Voice Commands
Connect your Z Wave switch with voice assistants. Commands like “turn on living room lights” work instantly. Voice control adds convenience, especially when your hands are full. Make sure your voice device is linked properly. Practice simple commands for quick responses.
Monitor Energy Usage
Track how much electricity your lights use. Many Z Wave switches provide energy reports. Use data to spot high usage times or wasted power. Lower energy bills by adjusting light schedules. Energy monitoring helps you live more sustainably.

Credit: www.youtube.com
Frequently Asked Questions
How Do I Pair A Z Wave Light Switch?
To pair, first reset the switch by pressing its button. Then, use your Z Wave hub’s app to add the device. Follow on-screen instructions to complete the connection. Make sure your hub is in inclusion mode during pairing.
What Tools Are Needed To Install Z Wave Switches?
You will need a screwdriver, voltage tester, wire stripper, and your Z Wave hub. Turn off power before installation. Proper tools ensure safe and efficient setup of your Z Wave light switch.
Can I Control Z Wave Switches Remotely?
Yes, Z Wave switches can be controlled remotely via your smart home hub’s app. You need an internet-connected hub or controller. This allows you to turn lights on or off from anywhere.
Are Z Wave Switches Compatible With Existing Wiring?
Most Z Wave switches require a neutral wire for installation. Check your home wiring before purchasing. Compatibility depends on your electrical setup and the switch model.
Conclusion
Connecting a Z Wave light switch can be simple and quick. Follow the steps carefully for safe installation. Test the switch to ensure it works properly. Enjoy the convenience of smart lighting in your home. With a little effort, you control your lights anytime.
This guide helps you make your home smarter today.