Have you ever needed an extra plug socket but only found a light switch where you want it? Changing a light switch to a plug socket can save you time and hassle, giving you the power access you really need.
It might sound tricky, but with the right steps, you can do it safely and quickly. In this guide, you’ll discover exactly how to transform that unused switch into a handy socket—no electrician required. Keep reading, and by the end, you’ll have the confidence to make this simple upgrade yourself.
Credit: www.truevalue.com
Tools And Materials Needed
Changing a light switch to a plug socket requires the right tools and materials. Having these ready makes the job easier and safer. Use good quality items to ensure a lasting result.
Below is a list of essential tools and materials for this project.
Basic Tools
- Screwdriver set – flathead and Phillips
- Wire stripper – to remove insulation
- Voltage tester – to check power is off
- Pliers – for gripping and bending wires
- Drill – for mounting the socket if needed
Electrical Materials
- New plug socket – suitable for your home’s voltage
- Electrical wires – matching the existing wire gauge
- Wire connectors – to join wires safely
- Insulation tape – for extra protection
- Wall box – if the socket requires one
Safety Equipment
- Insulated gloves – to protect against shocks
- Safety goggles – to guard eyes from debris
- Non-contact voltage detector – for extra safety check
Safety Precautions
Changing a light switch to a plug socket involves working with electricity. Safety must be your top priority. Taking the right precautions helps prevent accidents and injuries. Always prepare before starting any electrical work.
Turn Off The Power Supply
Switch off the main power at the circuit breaker. Double-check by testing the switch with a voltage tester. No power means no shock risk during work.
Use Proper Tools And Equipment
Use insulated tools designed for electrical work. Avoid using damaged or worn tools. Proper equipment reduces the chance of accidents.
Wear Safety Gear
Wear rubber-soled shoes to avoid electrical shocks. Use safety gloves to protect your hands. Safety gear adds a layer of protection.
Follow Wiring Codes And Standards
Check local electrical codes before starting. Use the correct wires and connectors for the socket. Proper wiring prevents electrical hazards and ensures safety.
Work In A Dry Environment
Avoid working in wet or damp areas. Water increases the risk of electric shock. Ensure the work area is dry and well-lit.
Turn Off Power Supply
Turning off the power supply is the first and most important step before changing a light switch to a plug socket. This step keeps you safe from electric shocks. Always treat electricity with respect and care.
Never start any electrical work without cutting the power. It stops current from flowing to the switch. This way, you avoid accidents and damage to your home wiring.
Locate The Main Circuit Breaker
Find the main circuit breaker box in your home. It is usually in the basement, garage, or utility room. Open the box carefully to see the switches inside.
Switch Off The Correct Breaker
Identify the breaker that controls the light switch you want to change. Flip it to the “off” position. If unsure, turn off the main breaker to cut power to the whole house.
Double Check The Power Is Off
Use a voltage tester or a non-contact tester near the switch. Confirm no electricity is flowing before starting work. This step ensures your safety.
Remove The Light Switch
Removing the light switch is the first step in changing it to a plug socket. This process requires care and attention to safety. You must turn off the power before touching any wires. This prevents electric shock and keeps you safe during the work.
Follow these steps to remove the light switch safely and correctly.
Turn Off The Power
Find the main electrical panel in your home. Switch off the circuit breaker that controls the light switch. Use a voltage tester to confirm that power is off. Never skip this step.
Remove The Switch Cover Plate
Use a screwdriver to remove the screws holding the cover plate. Take off the plate gently to avoid breaking it. Set the screws and plate aside for reuse or replacement.
Unscrew The Light Switch
Locate the screws fixing the switch to the wall box. Unscrew them carefully. Pull the switch out slowly to expose the wiring behind it.
Disconnect The Wires
Note the position of each wire before disconnecting. Use a screwdriver to loosen the terminal screws. Remove the wires one by one. Keep them straight to avoid damage.
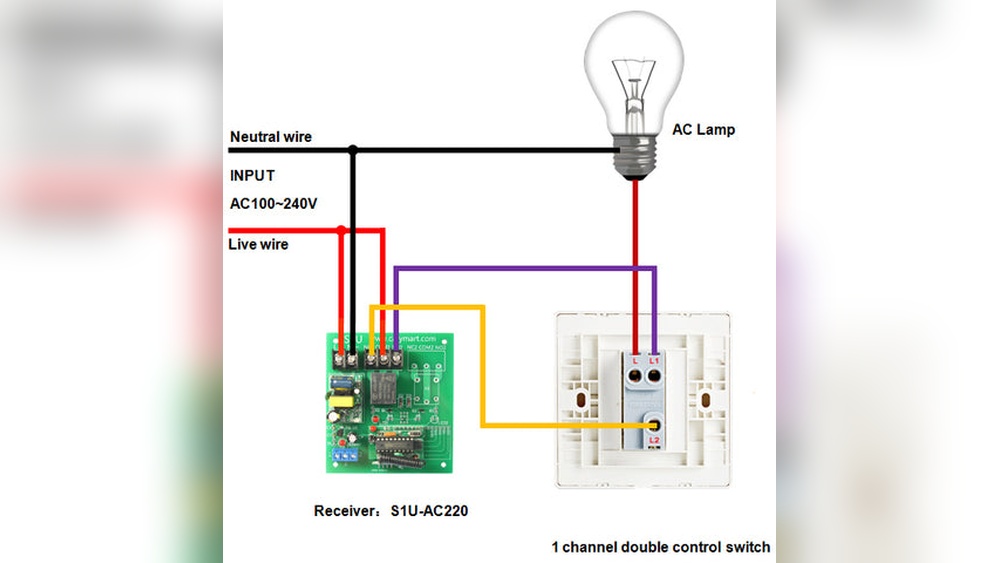
Check Wiring Compatibility
Before changing a light switch to a plug socket, check the wiring compatibility. This step is important to ensure safety and proper function. Different wiring setups can affect how you connect the new socket. Understanding the existing wiring saves time and prevents mistakes.
Check the wires inside the switch box carefully. Identify the live, neutral, and earth wires. Knowing these helps you connect the socket correctly. Not all switch boxes have a neutral wire, which is necessary for a plug socket.
Identify Live, Neutral, And Earth Wires
The live wire carries electricity to the device. It is usually brown or red. The neutral wire completes the circuit and is often blue or black. The earth wire is green or yellow-green and protects against electric shocks.
Use a voltage tester to confirm the live wire. This tool helps avoid confusion and ensures safety. Never guess the wires by color alone.
Confirm Neutral Wire Presence
Most plug sockets need a neutral wire to work. Some light switch boxes only have live and earth wires. Without a neutral wire, you cannot install a socket properly. Check for a neutral wire before starting the work.
If no neutral wire is present, consider running a new wire. Alternatively, consult an electrician for advice. Do not try to bypass wiring rules.
Check Wire Condition And Size
Wires should be in good condition without damage. Old or frayed wires can cause electrical faults. Also, check the wire size. Socket wiring usually requires thicker wires than switches.
Use wire strippers to prepare the wires for connection. Ensure wires fit securely in the socket terminals. Loose wires can cause sparks or failure.
Install The Plug Socket
Installing the plug socket is the next step after removing the light switch. This process requires care and attention to safety. The goal is to connect the wires correctly and fit the socket securely into the wall.
Follow the steps to install the plug socket safely and correctly. Proper installation ensures the socket works well and stays safe to use.
Prepare The Wiring For The Plug Socket
Start by checking the wires in the wall box. Strip about half an inch of insulation from each wire end. Make sure the wires are clean and not damaged. Separate the live, neutral, and earth wires clearly.
Connect The Wires To The Plug Socket
Identify the terminals on the socket: live, neutral, and earth. Connect the live wire to the live terminal. Attach the neutral wire to the neutral terminal. Finally, connect the earth wire to the earth terminal. Tighten the screws firmly to hold the wires in place.
Secure The Plug Socket In The Wall Box
Carefully push the wired socket into the wall box. Align the screw holes with the box holes. Use screws to fix the socket firmly to the wall. Avoid over-tightening to prevent damage to the socket.
Test The Plug Socket
Turn on the power supply. Use a socket tester to check the connection. Make sure the socket works correctly and safely. If there is any problem, switch off the power and check the wiring again.
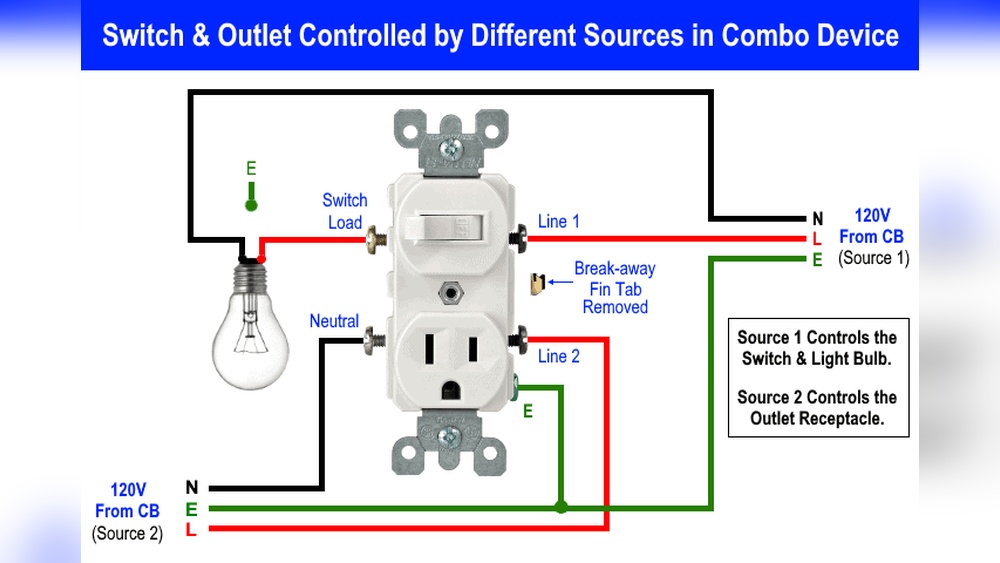
Connect The Wires Correctly
Connecting the wires correctly is the key step in changing a light switch to a plug socket. This task needs care and attention to avoid mistakes. Wrong connections can cause short circuits or electrical shocks.
Before starting, make sure the power is off. Use a tester to check. Safety first.
Identify The Wires
Look for the live, neutral, and earth wires. The live wire is usually brown or red. The neutral wire is blue or black. The earth wire is green and yellow. Knowing these helps you connect the socket properly.
Prepare The Wires
Strip about 1 cm of insulation from each wire end. This exposes the copper inside. Twist the copper strands tightly. It makes the connection strong and safe.
Connect The Live Wire
Attach the live wire to the terminal marked “L” on the socket. Secure it with a screwdriver. Make sure it is tight but not too tight to avoid damage.
Connect The Neutral Wire
Connect the neutral wire to the terminal marked “N.” Check the connection for firmness. A loose wire can cause problems later.
Connect The Earth Wire
Attach the earth wire to the terminal marked with the earth symbol or “E.” This wire protects against electric shocks. Do not skip this step.
Double Check All Connections
Review each wire connection carefully. Ensure no wires touch each other. Loose or crossed wires can cause short circuits. Safety is the priority.

Credit: community.smartthings.com
Secure The Socket And Test
After wiring the new socket, securing it properly is crucial. A loose socket can cause sparks or damage. Testing the socket ensures it works safely and correctly. Follow these steps carefully to finish the job well.
Secure The Socket To The Wall Box
Place the socket into the wall box gently. Align the screw holes with the box holes. Use a screwdriver to tighten the screws. Do not overtighten to avoid cracking the socket. The socket should sit flush and firm against the wall.
Attach The Socket Faceplate
Fix the faceplate over the socket. This protects the wiring inside. Line up the faceplate holes with the socket screws. Tighten the screws evenly until the plate is secure. Check for any gaps between the plate and wall.
Turn On Power And Test The Socket
Switch the circuit breaker back on. Use a voltage tester to check the socket. Plug in a small device, like a lamp. The device should turn on without flickering. This confirms the socket works properly and safely.
Check For Any Issues
Look for sparks or unusual sounds. Smell for burning or overheating signs. If any problem occurs, turn off the power immediately. Recheck your wiring connections. Safety always comes first with electrical work.
Troubleshooting Common Issues
Changing a light switch to a plug socket can bring convenience to your room. Sometimes, problems arise during or after the change. Knowing how to fix these common issues helps save time and effort. This section covers simple solutions for usual problems.
Check Power Supply
First, make sure the power is off before starting any work. Use a voltage tester to confirm no electricity flows to the wires. If the socket does not work, check the circuit breaker or fuse box. A tripped breaker or blown fuse can cut power to the socket.
Inspect Wiring Connections
Loose or wrong wiring causes many problems. Double-check all wires are connected tightly. Match wires by color and function: live, neutral, and earth. Wrong connections can make the socket unsafe or non-functional.
Test The Socket
Use a socket tester to ensure the plug socket works correctly. The tester shows if wiring is correct and the socket is safe. If the tester shows errors, recheck your wiring and connections.
Check Switch Box Size
Sometimes, the switch box is too small for a socket. A cramped box can cause wiring issues or overheating. Use a bigger box if needed to fit the socket and wires properly.
Verify Earth Connection
The earth wire protects against electric shocks. Confirm the earth wire is connected securely to the socket. If missing or loose, the socket can be dangerous to use.
When To Call A Professional
Changing a light switch to a plug socket involves dealing with electrical wiring. This task can be risky without proper knowledge. Safety should always be your top priority. Sometimes, calling a professional is the best choice.
Knowing when to call an electrician can save you from accidents and costly mistakes. Professionals have the right tools and experience. They ensure the work meets safety standards and local codes.
Complex Wiring Systems
If your home has old or complicated wiring, do not attempt this job. Professionals understand complex circuits and can handle them safely. Mistakes with complex wiring can cause short circuits or fires.
Uncertain Electrical Knowledge
Do not proceed if you are unsure about electrical basics. Understanding wiring colors, voltage, and safety rules is crucial. A professional will avoid errors that could harm you or your home.
Need For Permits And Inspections
Some areas require permits for electrical changes. Professionals know local laws and manage permits. They also arrange inspections to ensure the job is done correctly.
Signs Of Electrical Problems
If you notice flickering lights, sparks, or burning smells, stop immediately. These signs show underlying electrical issues. A professional can diagnose and fix problems safely.

Credit: www.youtube.com
Frequently Asked Questions
How Do I Safely Change A Light Switch To A Plug Socket?
First, turn off the power at the circuit breaker. Use a voltage tester to confirm no electricity flows. Remove the switch, connect the socket wires correctly, and secure the socket in place. Always follow local electrical codes or hire a professional if unsure.
What Tools Are Needed To Replace A Switch With A Socket?
You’ll need a screwdriver, wire stripper, voltage tester, and a new plug socket. Optional tools include pliers and electrical tape. These tools help safely remove the switch and install the socket with proper wiring and insulation.
Can I Convert Any Light Switch To A Plug Socket?
Not all switches can be converted. Ensure the wiring supports a socket and the circuit can handle additional load. Check local electrical codes and consult an electrician if unsure about compatibility or safety.
How Much Time Does It Take To Change A Switch To A Socket?
The process usually takes 30 to 60 minutes. Time depends on your experience and wiring complexity. Proper safety checks and careful wiring ensure the job is done correctly without rushing.
Conclusion
Changing a light switch to a plug socket can save space and add convenience. Always turn off the power before starting any work. Use the right tools and follow safety steps carefully. Double-check all connections to avoid problems later. Take your time and do not rush the process.
This simple change can improve your room’s functionality. Stay safe and enjoy your new socket once finished.