Are you tired of that old, flickering 2 gang light switch in your home? Changing it might seem tricky, but it’s easier than you think—and you don’t need to call an electrician.
Imagine controlling your lights smoothly and safely with a brand-new switch you installed yourself. In this guide, you’ll find simple steps that anyone can follow, even if you’ve never done electrical work before. Keep reading, and by the end, you’ll have the confidence to upgrade your light switch quickly and safely.
Your home deserves it, and you’re just a few steps away from making it happen.
Tools And Materials Needed
Changing a 2 gang light switch is a simple task with the right tools and materials. Prepare everything before starting. This saves time and keeps the work safe. Understanding the tools helps you avoid mistakes. Using the right materials ensures the switch works well.
Essential Tools For Changing A 2 Gang Light Switch
You need a screwdriver set with flathead and Phillips types. A voltage tester is important to check power is off. Wire strippers help remove insulation from wires. Needle-nose pliers make it easy to bend wires. A flashlight or headlamp is useful in dim spaces.
Materials Required For The Switch Replacement
Buy a new 2 gang light switch that fits your box. Use electrical tape to cover wire connections. Wire nuts secure the wire ends safely. If wires are damaged, extra wire of the same gauge is necessary. A switch cover plate finishes the look and protects the switch.
Safety Precautions
Changing a 2 gang light switch involves working with electricity. Safety is very important. Taking the right steps can prevent accidents and injuries. Before starting, prepare yourself with basic safety rules. These rules keep you safe and make the job easier.
Turn Off Power At The Circuit Breaker
Always switch off the power at the main circuit breaker. Do not rely on the wall switch alone. Use a tester to check that the power is really off. This step stops electric shocks during your work.
Use Insulated Tools
Choose tools with insulated handles. Insulated tools protect you from electric shocks. Avoid metal tools without insulation. This simple step adds a strong safety layer.
Wear Safety Gear
Wear rubber-soled shoes and safety goggles. Rubber shoes reduce shock risk from electric currents. Safety goggles protect your eyes from dust and debris. This gear keeps you safe and comfortable.
Work In A Dry Environment
Make sure the area is dry before starting. Water conducts electricity and raises shock risk. Avoid working in wet rooms or during rain. Dry hands and tools help keep you safe.
Understand The Wiring
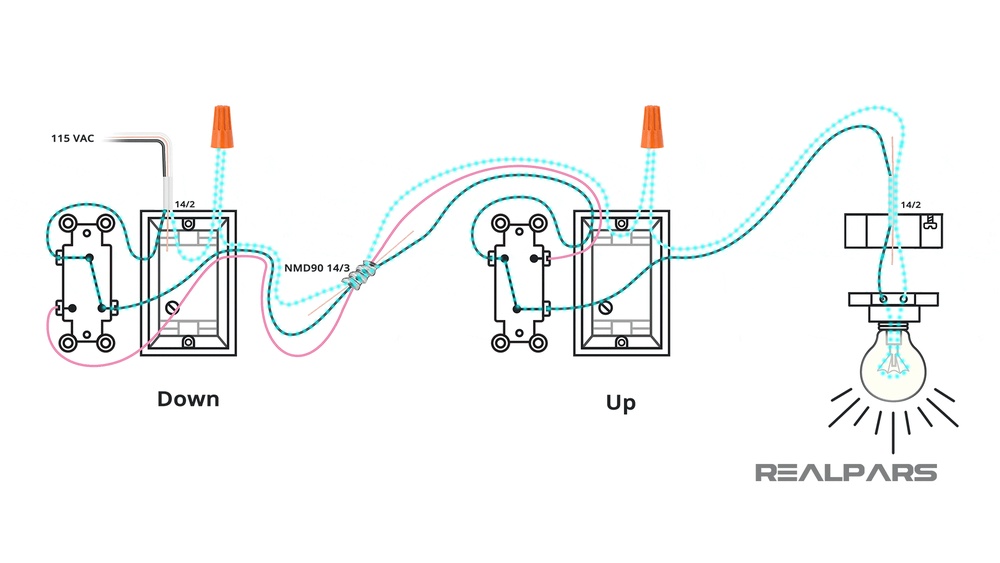
Learn the wiring layout before touching wires. Wrong connections can cause sparks or damage. Use a wiring diagram or take a photo before removal. Knowing the wires helps you work confidently and safely.
Turn Off Power
Turning off the power is the first and most important step before changing a 2 gang light switch. This step keeps you safe from electric shock. Always treat electricity with respect and caution.
Power must be completely off to work on any electrical switch. Even a small current can cause injury. Take your time to ensure the power is off.
Locate The Main Circuit Breaker
Find your home’s main circuit breaker box. It is usually in the basement, garage, or utility room. The box controls electricity for the entire house.
Identify The Correct Circuit
Look for the breaker that controls the light switch’s circuit. It may be labeled with the room or area name. If not labeled, turn off breakers one by one.
Switch Off The Breaker
Flip the breaker switch to the OFF position. This cuts power to the light switch. You should hear or feel a click when it turns off.
Test The Power Is Off
Use a non-contact voltage tester or a small light bulb tester. Place it near the switch wires or terminals. No reading or light means power is off.
Double Check Before Starting Work
Never trust the breaker alone. Always test the switch for power again. Safety first. Only start changing the switch after confirming no power flows.

Credit: www.youtube.com
Remove The Old Switch
Removing the old 2 gang light switch is the first step in changing it. Safety is very important before you start. Turn off the power at the circuit breaker to avoid electric shock.
Once the power is off, you can begin taking out the old switch carefully. This step needs patience and caution.
Turn Off The Power
Go to your home’s circuit breaker box. Find the switch that controls the light switch you want to change. Flip it to the off position. Use a tester to check if the power is really off.
Remove The Switch Cover Plate
Use a screwdriver to remove the screws holding the cover plate. Keep the screws safe for later use. Gently pull the cover plate away from the wall.
Unscrew The Old Switch
Loosen the screws that hold the switch to the electrical box. Pull the switch out slowly. Do not pull too hard to avoid damaging the wires.
Note The Wire Connections
Look closely at how the wires connect to the switch. Take a photo or make a note. This will help you connect the new switch correctly.
Disconnect The Wires
Use a screwdriver to loosen the terminal screws. Carefully remove the wires from the old switch. Keep the wires untangled and straight for the new switch.
Identify And Label Wires
Before changing a 2 gang light switch, identifying and labeling wires is crucial. It ensures safety and helps you reconnect wires correctly. Without clear labels, you may confuse wires and cause electrical problems.
Each wire has a specific role. Knowing which wire is which makes the process smooth and safe. Labeling wires saves time during reinstallation and avoids mistakes.
Turn Off The Power
Start by switching off the main power at the breaker box. Use a tester to confirm no electricity flows to the switch. Never touch wires without checking power first.
Remove The Switch Cover
Unscrew the switch plate carefully. Keep screws safe for reassembly. This exposes the wires connected to the switch.
Observe Wire Colors
Look at the wire colors inside the box. Usually, black or red are hot wires. White wires are neutral. Green or bare wires are ground wires.
Use A Marker Or Tape To Label
Write labels on masking tape or use colored tape. Mark each wire with its function: “Line,” “Load,” or “Ground.” Clear labels help during reassembly.
Take Photos For Reference
Snap clear photos of the wires and switch connections. Photos serve as a guide when putting everything back. They reduce confusion and errors.

Credit: diy.stackexchange.com
Connect The New Switch
Connecting the new 2 gang light switch is a key step. It ensures your lights work safely and correctly. This part needs care and clear steps.
Follow these simple instructions to connect the switch properly. Check each wire and terminal for the right fit. This helps avoid loose connections or electrical issues.
Identify The Wires
Start by recognizing each wire. Usually, you have a live wire, neutral wire, and ground wire. The live wire carries electricity, the neutral completes the circuit, and the ground protects from shocks.
Attach Wires To Terminals
Connect each wire to its matching terminal on the switch. The live wire goes to the terminal marked “L” or “Live.” The neutral wire connects to the “N” terminal. The ground wire attaches to the green or metal screw.
Secure The Connections
Tighten the screws firmly. Loose screws cause flickering lights or sparks. Use a screwdriver to ensure wires stay in place. Tug gently to check if wires are secure.
Check For Correct Wire Placement
Double-check wire positions before closing the switch box. Wrong connections can cause short circuits. Make sure no wires touch each other inside the box.
Secure And Test The Switch
Securing and testing the 2 gang light switch is a crucial step in the installation process. This step ensures the switch works safely and correctly. Properly securing the switch prevents loose connections and electrical hazards. Testing confirms that each switch controls its light properly. Follow these steps carefully for the best results.
Secure The Switch To The Wall Box
Align the switch with the wall box holes. Use screws to fix the switch firmly in place. Tighten screws evenly to avoid tilting the switch. Do not over-tighten, or you may damage the switch or wall. The switch should feel stable and not move.
Attach The Switch Cover Plate
Place the cover plate over the secured switch. Line up the screw holes with the switch frame. Insert and tighten the screws gently. The cover plate should sit flush against the wall. This protects the switch and improves appearance.
Turn The Power Back On
Go to your circuit breaker panel. Switch on the power to the light switch circuit. Double-check that the power is fully restored. Avoid touching wires or switch parts during this step. Safety first.
Test Each Switch
Press each switch in the 2 gang switch. Check that the corresponding light turns on or off. Confirm there is no flickering or buzzing sound. If the lights work smoothly, the installation is successful. If not, turn off power and recheck wiring.

Credit: www.youtube.com
Troubleshooting Common Issues
Troubleshooting common issues helps fix problems quickly when changing a 2 gang light switch. Simple checks can save time and avoid damage. Understanding common mistakes makes the process smoother and safer.
Below are frequent problems and how to solve them step-by-step. These tips help ensure the switch works properly after installation.
Checking For Loose Connections
Loose wires cause the switch to fail or flicker. Turn off the power first. Remove the switch cover and gently pull the switch out. Look for wires that are not tightly connected to terminals. Tighten screws or reinsert wires firmly. Test the switch before closing the box.
Verifying Power Supply
No power to the switch means no light. Use a voltage tester to check the power at the switch wires. Test both wires to confirm power is reaching the switch. If no power is found, check the circuit breaker or fuse box. Reset or replace as needed.
Identifying Wrong Wiring
Wrong wire connections cause the switch to not work or control the wrong light. Use the wiring diagram that came with the switch. Match each wire color to the correct terminal. Black is usually the live wire, white is neutral, and green or bare copper is ground. Correct the wiring before testing.
Dealing With Faulty Switches
A new switch can be faulty. If the switch does not work after proper wiring, try replacing it with another new one. Test the replacement switch to confirm the problem was the switch itself. Dispose of faulty switches safely.
Frequently Asked Questions
How Do I Turn Off Power Before Changing A 2 Gang Switch?
Always switch off the circuit breaker to cut power. Use a voltage tester to ensure no electricity flows. This step prevents shocks and keeps you safe during the replacement process.
What Tools Are Needed To Change A 2 Gang Light Switch?
You need a screwdriver, voltage tester, wire stripper, and electrical tape. These tools help safely remove the old switch and connect the new one efficiently.
How Do I Identify Live And Neutral Wires In A 2 Gang Switch?
Live wires are usually red or brown, and neutral wires are blue or black. Use a voltage tester to confirm live wires before disconnecting.
Can I Replace A 2 Gang Light Switch Myself?
Yes, if you follow safety steps carefully. Turn off power, use proper tools, and follow wiring instructions. If unsure, consult a professional electrician.
Conclusion
Changing a 2 gang light switch is a simple task anyone can do. Just follow safety steps and take your time. Double-check all wires before turning the power back on. This small fix can improve your home’s lighting control. Practice makes the process easier and faster.
Soon, you will feel more confident handling basic electrical jobs. Keep your tools ready for future projects. Stay safe and enjoy your updated switch!