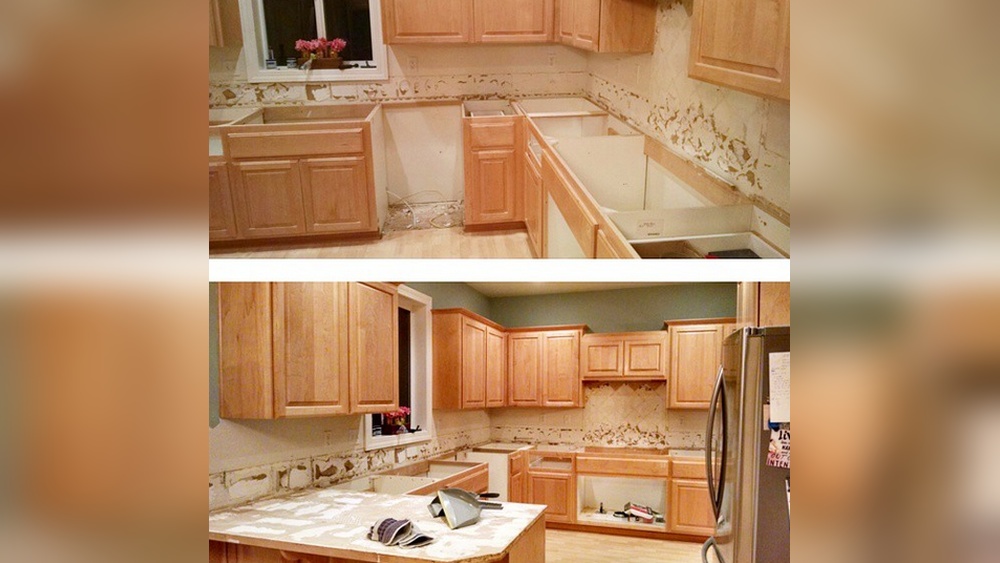
If you want to give your kitchen a fresh, stylish upgrade without a full remodel, adding hardware to your cabinets is one of the easiest and most impactful ways to do it. Imagine opening your cabinets with beautiful knobs or sleek pulls that fit your style perfectly—whether modern, classic, or somewhere in between.
You don’t need to be a pro to get it right. With just a few simple steps and the right tools, you can transform your kitchen’s look and feel in no time. You’ll learn exactly how to add hardware to your kitchen cabinets—making the process straightforward, fast, and even enjoyable.
Ready to elevate your kitchen? Let’s dive in!

Credit: www.homedepot.com
Choosing The Right Hardware
Choosing the right hardware can change the look of your kitchen cabinets. It adds style and makes cabinets easier to use. Hardware comes in many shapes, sizes, and finishes. Picking the best option needs some thought.
Think about how the hardware fits with your kitchen’s style. Also, consider how you use your cabinets daily. The right hardware should be both pretty and practical.
Knobs Vs Pulls
Knobs are small and round. They give a classic or vintage feel. Pulls are longer and easier to grip. They often suit modern or contemporary kitchens.
Knobs work well on upper cabinets and small drawers. Pulls fit better on larger drawers and lower cabinets. Choose based on your kitchen’s look and your comfort.
Matching Cabinet Style
Match hardware style with your cabinet design. Simple cabinets look good with sleek, minimal hardware. Ornate cabinets pair well with decorative knobs or pulls. Think about the color and shape of your cabinets too.
Traditional kitchens call for classic hardware designs. Modern kitchens shine with clean lines and bold shapes. Matching hardware creates a balanced and polished look.
Popular Finishes
Hardware finishes add extra style to your kitchen. Matte black is trendy and fits modern kitchens. Brushed nickel offers a soft, neutral look. Oil-rubbed bronze adds warmth and a vintage touch.
Mixed metal finishes combine two or more looks for a unique style. Polished chrome brings shine and brightness. Choose a finish that complements your cabinets and other kitchen fixtures.
Gathering Tools And Materials
Adding hardware to kitchen cabinets can transform the look of your kitchen. The first step is gathering all necessary tools and materials. Proper preparation helps avoid delays and mistakes. Having everything ready makes the installation process smoother and faster.
Essential Tools
Start with a drill to make holes for screws. A screwdriver is needed to secure the hardware. Measuring tape ensures accurate placement of handles or knobs. A pencil helps mark drilling spots precisely. A level keeps hardware straight and even. Clamps can hold templates or hardware in place. Safety glasses protect your eyes during drilling.
Hardware Selection Checklist
Choose the type of hardware: knobs or pulls. Pick a finish that matches your kitchen style. Check the size to fit your cabinet doors or drawers. Consider the shape and design for comfort and ease. Count how many pieces you need for all cabinets. Ensure screws included fit your cabinet thickness. Select hardware that is durable and easy to clean.
Measuring And Marking
Measuring and marking are the first steps to adding hardware to kitchen cabinets. Accuracy here ensures the hardware fits well and looks balanced. Take your time to measure carefully. Mark the spots clearly to avoid mistakes. This process saves effort and prevents misaligned hardware later on.
Using Templates
Templates help place hardware evenly and quickly. Use a paper or plastic template made for cabinet pulls or knobs. Align the template on the cabinet door or drawer front. Tape it down to keep it steady. Mark the holes through the template. This method reduces errors and speeds up the job.
Consistent Placement Tips
Keep hardware placement uniform across all cabinets. Measure from the same edges or corners for each piece. Use a ruler or measuring tape for exact distances. Mark lightly with a pencil so you can erase if needed. Consistency gives a neat, professional look to your kitchen cabinets.
Drilling Holes Safely
Drilling holes safely is crucial when adding hardware to kitchen cabinets. It ensures a neat finish and protects your cabinets from damage. Taking time to prepare and use the right tools will make the process smooth and successful.
Follow simple steps to avoid mistakes and keep your cabinets looking great. Safety and precision go hand in hand for a good result.
Choosing The Right Drill Bit
Select a drill bit that matches the hardware screw size. Use bits made for wood to avoid splintering. A sharp bit makes cleaner holes and reduces effort. Start with a small pilot hole to guide the screw accurately. This prevents cracking and keeps the cabinet surface smooth.
Preventing Cabinet Damage
Place masking tape over the drilling spot to protect the finish. Tape also helps reduce splintering around the hole edges. Drill slowly and keep the drill steady to avoid slipping. Use a drill stop or tape on the bit to control depth. Check behind the drilling area to avoid hitting hinges or shelves. These steps prevent cracks and dents, preserving cabinet quality.
Installing Hardware
Installing hardware on kitchen cabinets changes the look and feel instantly. It also improves cabinet function. Proper installation ensures hardware lasts and works well. Simple tools and clear steps make the process easy for anyone.
Attaching Knobs
Start by measuring the center of the cabinet door or drawer. Mark the spot with a pencil. Drill a small hole through the marked point. Insert the knob’s screw from inside the cabinet. Tighten the knob by turning it clockwise. Use a screwdriver to secure the screw firmly. Check that the knob is straight and stable before finishing.
Securing Pulls
Measure the pull’s length and mark two points on the cabinet. These marks show where to drill holes. Drill carefully to avoid splitting the wood. Insert screws through the holes from inside the cabinet. Align the pull with the screws and slide it into place. Tighten both screws using a screwdriver. Confirm the pull is level and tightly attached. This prevents wobbling and ensures smooth use.
Credit: orangefoodstuffdxb.com
Finishing Touches
Adding hardware to kitchen cabinets transforms their look and feel. The finishing touches bring the whole project together. Attention to detail at this stage ensures the hardware fits perfectly and lasts long. Follow these simple steps to complete your cabinet hardware installation with care and precision.
Checking Alignment
Start by checking if the hardware lines up correctly. Look at each handle or knob from different angles. Ensure they sit straight and match the cabinet edges. Misaligned hardware can spoil the cabinet’s appearance and make doors hard to open. Adjust the screws slightly if needed to get perfect alignment.
Tightening Screws
Secure the hardware by tightening all screws firmly. Use a screwdriver that fits well to avoid stripping the screws. Tight screws keep the handles stable and prevent wobbling. Check each screw twice to confirm it is snug but not overtightened. Over-tightening can damage the cabinet surface or the hardware.
Cleaning Up
Remove any dust or fingerprints from the hardware and cabinets. Use a soft, damp cloth to wipe the area gently. Avoid harsh cleaners that may damage the finish. Clean surfaces make the hardware shine and highlight your hard work. Final cleanup creates a fresh, polished look for your kitchen cabinets.
Trends In Kitchen Hardware
Updating kitchen cabinet hardware is a simple way to refresh your kitchen’s look. Trends in kitchen hardware show a move towards styles that blend form and function. Modern kitchens often feature hardware that is both stylish and practical. These trends include mixing metals, bold finishes, and smart technology. Each trend brings a unique touch to kitchen design.
Mixed Metals
Mixing metals in kitchen hardware adds depth and interest. Brass, chrome, and black finishes can appear together. This style breaks the monotony of matching hardware. It suits kitchens aiming for a personalized, eclectic look. Mixed metals pair well with different cabinet colors and styles.
Matte Black And Textured Finishes
Matte black hardware remains popular for its sleek, modern appeal. It contrasts beautifully with light and dark cabinets. Textured finishes, like hammered or brushed metal, add tactility. These finishes create a handcrafted feel. They work well in rustic and industrial kitchen designs.
Oversized And Minimalist Designs
Oversized pulls make a bold statement on cabinet doors. They offer easy grip and a contemporary vibe. Minimalist hardware focuses on clean lines and simple shapes. This design suits modern kitchens seeking understated elegance. Both styles emphasize function and style equally.
Smart And Integrated Hardware
Smart hardware includes touch-to-open and soft-close features. These innovations improve kitchen usability and comfort. Integrated handles blend seamlessly into cabinet doors. They create a smooth, streamlined appearance. Smart and integrated options suit tech-friendly, modern kitchens.
Maintaining Your Hardware
Maintaining your kitchen cabinet hardware keeps it looking fresh and working well. Clean hardware adds to the overall beauty of your kitchen. Simple care extends the life of knobs and pulls. Taking time to maintain hardware prevents costly repairs or replacements.
Cleaning Tips
Use a soft cloth to wipe down hardware regularly. Mild soap and warm water work well for most finishes. Avoid harsh chemicals that can damage the surface. Dry hardware completely to prevent water spots or rust. For tough grime, use a toothbrush to reach small crevices. Polish metal hardware occasionally with a suitable cleaner to restore shine.
Preventing Wear And Tear
Check screws and tighten them if loose. Loose hardware can cause damage or fall off. Avoid using excessive force when opening or closing cabinets. Use cabinet hardware gently to keep it in good shape. Replace worn or damaged parts early to avoid further issues. Consider applying a clear coat for extra protection on metal finishes.
:max_bytes(150000):strip_icc()/SPR-where-to-put-knobs-and-handles-on-kitchen-cabinets-6373984-hero-f2b94cb045354a5783a3d927f83b5d21.jpg)
Credit: www.thespruce.com
Frequently Asked Questions
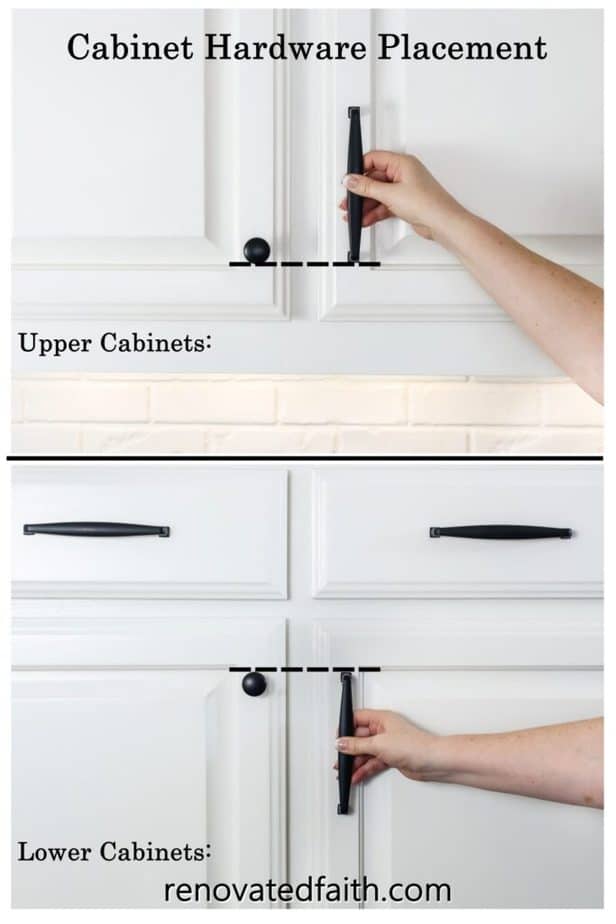
What Is The 1/3 Rule For Cabinet Hardware?
The 1/3 rule for cabinet hardware means placing handles or knobs one-third from the drawer or door edge. This ensures balanced, ergonomic, and visually pleasing hardware placement.
How Do You Add Hardware To Your Cabinets?
Mark hardware placement using a template. Tape the cabinet door to prevent damage. Drill holes at marked spots. Apply Loctite for secure grip. Screw the hardware firmly onto the cabinet.
What Is More Modern, Pulls Or Knobs?
Pulls are more modern than knobs, offering a sleek, contemporary look favored in current kitchen designs.
What Is The Current Trend For Kitchen Hardware?
Current kitchen hardware trends favor matte black, mixed metals, oversized pulls, textured finishes, aged brass, and sleek minimalist designs. Smart, touch-to-open technology also gains popularity for enhanced functionality.
Conclusion
Adding hardware to kitchen cabinets is a simple way to update your space. Measure and mark carefully for the best fit. Use the right tools to avoid mistakes or damage. Choose hardware that matches your kitchen style and needs. Enjoy the fresh look and improved function of your cabinets.
Small changes make a big difference in your kitchen’s feel. Take your time and have fun with the process. Your kitchen will look neat and stylish in no time.