
Are you thinking about upgrading your roof with a sleek, durable metal option? Hidden fastener metal roofing might be exactly what you need.
It offers a clean look without visible screws, making your roof not only stronger but also more attractive. But how do you install it yourself and get professional results? This guide will walk you through each step, showing you how to handle the panels and fasteners correctly to avoid leaks and ensure your roof lasts for years.
Keep reading to discover the simple yet effective process that can save you money and give your home a stylish, weatherproof finish.
Choosing Materials
Choosing the right materials is crucial for a successful hidden fastener metal roofing installation. The quality and compatibility of panels and fasteners affect the roof’s durability and appearance. Selecting proper tools ensures a smooth installation process. This section covers the essentials of picking panels, fasteners, and tools.
Selecting Panels And Fasteners
Metal roofing panels come in various metals like steel, aluminum, and copper. Steel panels offer strength and affordability. Aluminum resists rust and is lightweight. Copper adds a unique look but costs more. Choose panels suitable for your climate and budget.
Hidden fastener systems use clips or brackets under the panels. These fasteners provide a clean look by hiding screws. Select fasteners made from corrosion-resistant materials. Stainless steel or coated fasteners work well. Match fasteners with panel type for proper fit and performance.
Tools Needed
Gathering the right tools speeds up installation and ensures accuracy. A metal cutting tool like a circular saw with a metal blade is essential. Use a drill with screwdriver bits designed for metal fasteners. A tape measure and chalk line help mark straight panel lines.
Other handy tools include tin snips, gloves, and safety glasses. Use a rubber mallet to gently fit panels without damage. Having these tools ready prevents delays and keeps your project safe.
Preparing The Roof
Preparing the roof is a crucial step before installing hidden fastener metal roofing. This phase ensures the roof base is strong and ready to support the metal panels. Proper preparation prevents future issues like leaks or panel damage. Two important tasks in this stage are inspecting the roof deck and installing the underlayment.
Inspecting The Roof Deck
Start by checking the roof deck for any damage or rot. Replace any weak or soft wood to create a solid base. Make sure the deck is clean and free from debris. A flat and even surface helps the metal panels fit perfectly. Use a moisture meter to detect hidden damp spots. Fix any problems before moving forward. This step ensures the roof will last longer and perform well.
Installing Underlayment
Underlayment acts as a moisture barrier under the metal panels. Roll out a high-quality synthetic underlayment across the entire roof deck. Overlap the edges by several inches to avoid water seepage. Secure it with roofing nails or staples, keeping it tight and smooth. Pay special attention to valleys and edges for extra protection. Proper underlayment installation helps prevent leaks and enhances the roof’s durability.
Laying Starter Strips
Laying starter strips is the first step in installing hidden fastener metal roofing. These strips create a strong base for the metal panels. They help align the panels properly and secure the roof edges against wind and water. Properly installed starter strips prevent leaks and increase roof durability.
Start by measuring the roof edge to determine the length of the starter strips. Cut the strips to fit the roofline accurately. Make sure the strips are straight and flush with the roof edge for a neat installation.
Preparing The Roof Edge
Clear the roof edge of debris and old roofing material. Check for any damage or uneven spots. Smooth and repair any rough areas to ensure the starter strip lies flat. A clean, even surface improves strip adhesion and fastening.
Positioning The Starter Strips
Place the starter strips along the eave and rake edges. Align them to overhang the roof edge slightly. This overhang directs water away from the fascia and prevents water damage. Keep the strips straight and level for a professional finish.
Securing The Starter Strips
Use corrosion-resistant screws to fasten the strips. Space the screws evenly, about every 12 to 16 inches. Drive screws firmly but avoid overtightening. Proper fastening keeps the strips secure during strong winds and storms.
Checking Alignment And Fit
After securing, check the strips for straightness. Adjust any misaligned strips before continuing. Good alignment ensures the metal panels will fit perfectly. This step saves time and prevents roof issues later.

Credit: www.perfectsteelsolutions.com
Positioning Panels
Positioning panels correctly is key to a strong and lasting metal roof. Proper placement helps prevent leaks and ensures the roof looks neat. Each panel must fit well with the next to keep water out and hold up against wind.
Careful alignment and overlap make the roof durable. Take your time with this step to avoid problems later. Follow the manufacturer’s instructions closely for best results.
Aligning Panels Correctly
Start by placing the first panel at the edge of the roof. Use a straight edge or chalk line to keep it straight. Check that the panel is square to the roof’s edge. Misalignment can cause gaps and uneven seams.
Secure the panel lightly at first. This lets you adjust the position before final fastening. Make sure the panel sits flat without any twists or bends. Repeat the process for each panel, keeping them in line.
Ensuring Proper Overlap
Hidden fastener metal roofing panels need a specific overlap. This overlap seals the roof and hides the fasteners. Follow the panel’s design for the correct amount of overlap, usually one seam width.
Overlap the panels so that water flows smoothly over the seams. Avoid gaps where wind or rain could enter. Press the panels together firmly but without forcing them. Proper overlap keeps the roof tight and weatherproof.
Securing Panels
Securing panels is a vital step in installing hidden fastener metal roofing. Proper attachment ensures the roof stays strong and weatherproof. It also keeps the metal panels aligned and prevents damage from wind or rain. Careful fastening improves the roof’s lifespan and appearance.
Using the correct tools and techniques helps to avoid mistakes. The panels must be fastened firmly but without bending or warping the metal. This section explains how to secure panels using hidden fasteners and how to screw on the flat section properly.
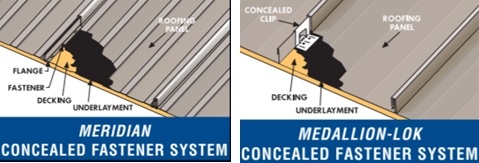
Using Hidden Fasteners
Hidden fasteners keep the screws out of sight. This creates a clean, smooth roof surface. To use hidden fasteners, slide the next panel over the clip attached to the previous panel. The clip holds the panel edges tightly together.
Secure each clip with screws into the roof deck. The screws should be tight but not overdriven. Over-tightening can damage the clip or metal panel. Check that each panel locks firmly before moving to the next one.
Screwing On The Flat Section
Some metal roofing panels have flat sections where screws must be placed. Use special trim screws with rubber washers for these areas. The washers create a water-tight seal around each screw.
Position screws in the panel’s flat sections at recommended intervals. Drive screws straight and flush with the panel surface. Avoid angling the screws, which can cause leaks or panel damage.
Inspect each screw to ensure it holds tight without denting the metal. Proper screw placement and tightness keep the roof secure and leak-free for years.
Seaming And Locking
Seaming and locking are key steps in installing hidden fastener metal roofing. They join panels tightly, keeping water out and wind from lifting the roof. Proper seaming ensures a strong, durable roof that lasts years without leaks or damage.
Each metal panel has edges designed to fit together. Locking these seams correctly creates a smooth, clean finish with no visible screws. This method protects the fasteners from weather and improves the roof’s look and performance.
Engaging Snap-lock Seams
Snap-lock seams connect metal panels without extra tools. The panels have a groove on one side and a raised rib on the other. You press the rib into the groove until it snaps tightly.
This locking action holds the panels firmly in place. It resists wind uplift and stops water entry. Snap-lock seams also speed up the installation process by reducing the need for screws or clips.
Make sure each panel aligns perfectly before snapping. Misalignment can cause gaps or damage the seam. Check each seam to confirm a secure, consistent lock.
Seam Tools And Techniques
Using the right tools makes seaming easier and safer. A hand seamer helps bend and shape panel edges for a snug fit. It is lightweight and simple to use for small adjustments.
For long seams, a mechanical seamer saves time and effort. It folds the metal edges together evenly, ensuring a strong lock along the full length. This tool reduces hand fatigue and improves seam quality.
Work slowly and steadily to avoid denting or scratching panels. Keep your tools clean and sharp for the best results. Proper technique and care ensure lasting, watertight seams on your metal roof.
Installing Flashing
Installing flashing is a crucial step in hidden fastener metal roofing. Flashing prevents water from entering the roof at joints and edges. Proper flashing protects your roof and home from leaks and damage. It seals areas where roof panels meet walls, chimneys, or valleys. Follow these tips to install flashing correctly for a strong, weather-tight roof.
Roof Edges And Valleys
Start by installing drip edges along roof edges. Drip edges guide water away from the roof deck. Secure them firmly with corrosion-resistant nails. For valleys, use metal valley flashing to channel water down. Lay the flashing flat and overlap it with roof panels. Seal all seams with roofing sealant to stop leaks. Make sure flashing extends past the edge to protect the fascia.
Around Chimneys And Vents
Cut flashing to fit snugly around chimneys and vents. Use step flashing for chimneys to overlap shingles and flashing layers. Apply sealant at all joints to block water entry. For vents, use vent flashing kits designed for metal roofs. Attach flashing securely without damaging the roof panels. Check for gaps and fill them with sealant for a complete seal.
Checking For Leaks
Checking for leaks is a crucial step after installing a hidden fastener metal roof. It ensures your roof stays dry and durable over time. Catching leaks early prevents costly repairs and protects your home. Take your time to carefully inspect every part of the roof. Focus on areas where water might enter.
Inspecting Seams And Fasteners
Start by examining all seams on the metal panels. These are common spots for leaks. Look for gaps, cracks, or any signs of rust. Also, check the hidden fasteners underneath the panels. Make sure they are tight and properly sealed. Loose fasteners can allow water to seep in. Use a flashlight for better visibility in shadowed areas. Pay attention to corners and edges where panels meet. These spots often face the most stress from wind and rain.
Water Testing Tips
Water testing helps confirm your roof’s leak resistance. Use a garden hose to spray water on the roof sections. Simulate heavy rain by focusing on seams and fastener areas. Watch for any water dripping inside the attic or ceiling. Have someone inside to check for leaks while you spray outside. Test each section for a few minutes to be sure. Repeat the test after fixing any problems. This method helps catch leaks missed during visual inspection.
Maintenance Tips
Proper maintenance keeps your hidden fastener metal roof strong and lasting. Regular care helps prevent damage and costly repairs. Follow simple steps to maintain its look and function.
Cleaning The Roof
Remove debris like leaves and branches often. Use a soft broom or leaf blower for gentle cleaning. Avoid harsh chemicals; water and mild soap work well. Clean gutters and downspouts to ensure good drainage. Check for dirt buildup on panels and rinse as needed.
Handling Repairs
Inspect the roof regularly for dents, scratches, or loose panels. Tighten any loose fasteners to keep panels secure. Replace damaged panels quickly to avoid leaks. Use matching paint to cover scratches and prevent rust. Call a professional for large repairs or if unsure.
Credit: blog.mcelroymetal.com
Credit: www.affordablemetalmfg.com
Frequently Asked Questions
What Is The Problem With Exposed Fastener Metal Roofs?
Exposed fastener metal roofs often leak due to water penetrating screw holes. Screws can loosen, causing damage and rust over time.
Do You Screw Metal Roofing On The Rib Or The Flat?
Screw metal roofing on the flat, not the rib. Screwing on the flat prevents leaks and improves roof durability by allowing water to flow away from screws.
Which Is Better Standing Seam Or Hidden Fastener Metal Roofing?
Standing seam roofing offers superior durability and leak resistance with hidden fasteners. Hidden fastener metal roofing provides easier installation but may be less durable. Choose standing seam for longevity and weather protection; select hidden fastener for cost-effectiveness and simpler installation.
What’s The Proper Way To Screw Down Metal Roofing?
Screw metal roofing into the flat panel area, not the ribs. Use rubber-washered screws to prevent leaks. Align screws straight and avoid over-tightening. Ensure panels overlap properly for water runoff. This method secures the roof and extends its lifespan.
Conclusion
Installing hidden fastener metal roofing improves durability and looks clean. Follow steps carefully for a secure fit. Use the right tools and materials for best results. Take your time to align panels correctly. This method protects against leaks and wind damage.
A well-installed roof lasts for many years. Keep safety in mind throughout the project. Enjoy your strong, weather-resistant metal roof once done.

