Are you tired of cabinet hardware that looks crooked or feels awkward to use? Getting the perfect mount for your cabinet handles and knobs can transform the look and function of your kitchen or bathroom.
But measuring and installing them just right can be tricky if you don’t know the simple steps. In this guide, you’ll discover easy tricks to measure accurately and install your cabinet hardware so it looks great and works smoothly every time.
Keep reading, and you’ll never worry about misaligned handles again!

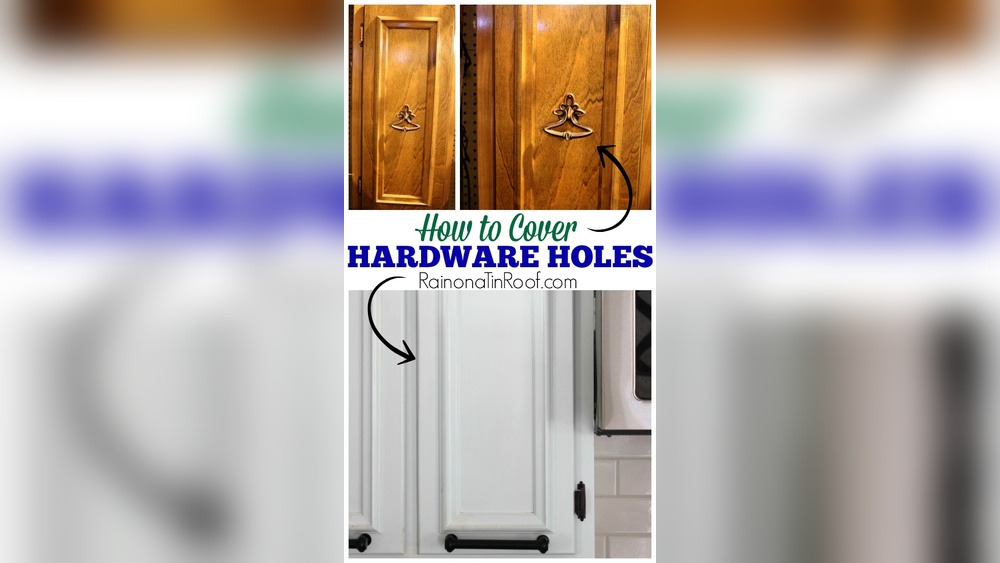
Credit: www.youtube.com
Choosing The Right Hardware
Choosing the right cabinet hardware is key to a perfect mount. It affects both the look and the use of your cabinets. Picking hardware that fits your style and needs makes your space more functional and attractive. This section breaks down how to choose hardware that matches your cabinets well.
Types Of Cabinet Hardware
There are many types of cabinet hardware. Knobs are small and easy to install. Pulls offer a better grip and come in different shapes. Handles are longer and give a modern look. Choose the type that feels comfortable and fits your cabinet design.
Selecting Styles And Finishes
Hardware style changes the room’s mood. Classic styles give a timeless look. Modern styles add a clean, simple touch. Finishes matter too. Chrome and stainless steel look shiny and bright. Matte black or bronze finishes add warmth. Match finishes to other fixtures for a balanced look.
Considering Functionality
Think about how you use your cabinets daily. Hardware should be easy to grasp and pull. Large pulls work well for heavy doors. Small knobs fit better on drawers. Also, check the hardware’s durability. Strong materials last longer and hold up well with use.
Tools And Materials Needed
Measuring and installing cabinet hardware needs the right tools and materials. Using proper tools helps you get perfect mounts. This section lists all you need for the job. It keeps the work neat and saves time.
Essential Measuring Tools
A good tape measure is a must. It helps you get exact distances. A ruler or a straight edge also helps with accuracy. A pencil marks spots for screws. A level makes sure your hardware is straight and even. These tools ensure your hardware fits well and looks good.
Installation Supplies
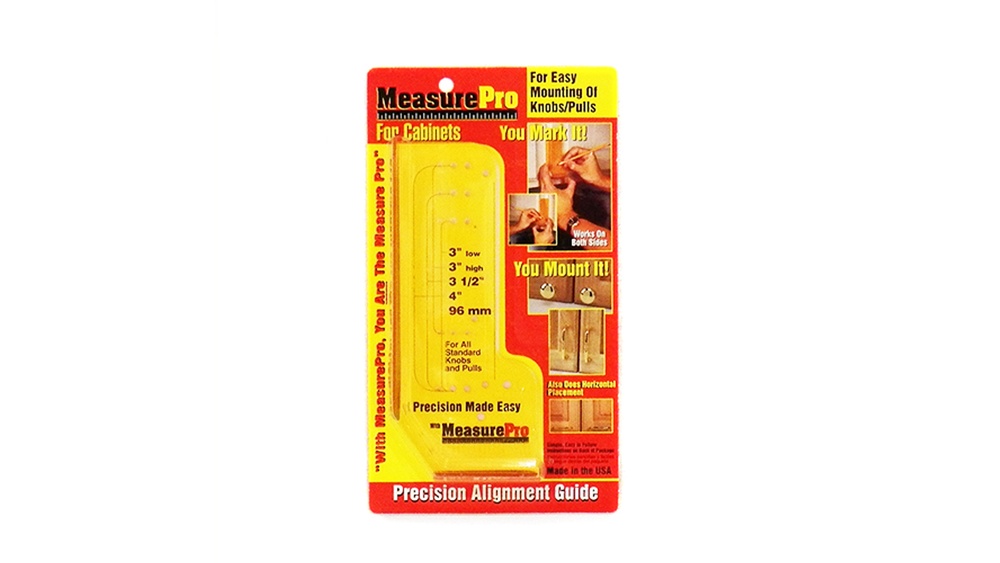
You need screws that match your hardware and cabinets. A drill or screwdriver makes screwing easier and faster. Drill bits for pilot holes help prevent wood splitting. A hardware template guides you to drill in the right spot. These supplies make the installation smooth and secure.
Safety Equipment
Safety glasses protect your eyes from dust and debris. Gloves guard your hands from sharp edges and tools. Ear protection helps if you use loud power tools. Safety gear keeps you safe while working on your cabinets.
Measuring For Hardware Placement
Measuring for hardware placement is a key step in cabinet installation. Proper measurements ensure handles and knobs fit well and look balanced. Taking accurate measurements avoids mistakes and saves time. Follow clear steps to measure hardware positions correctly. This will help create a neat and professional finish.
Determining Handle And Knob Positions
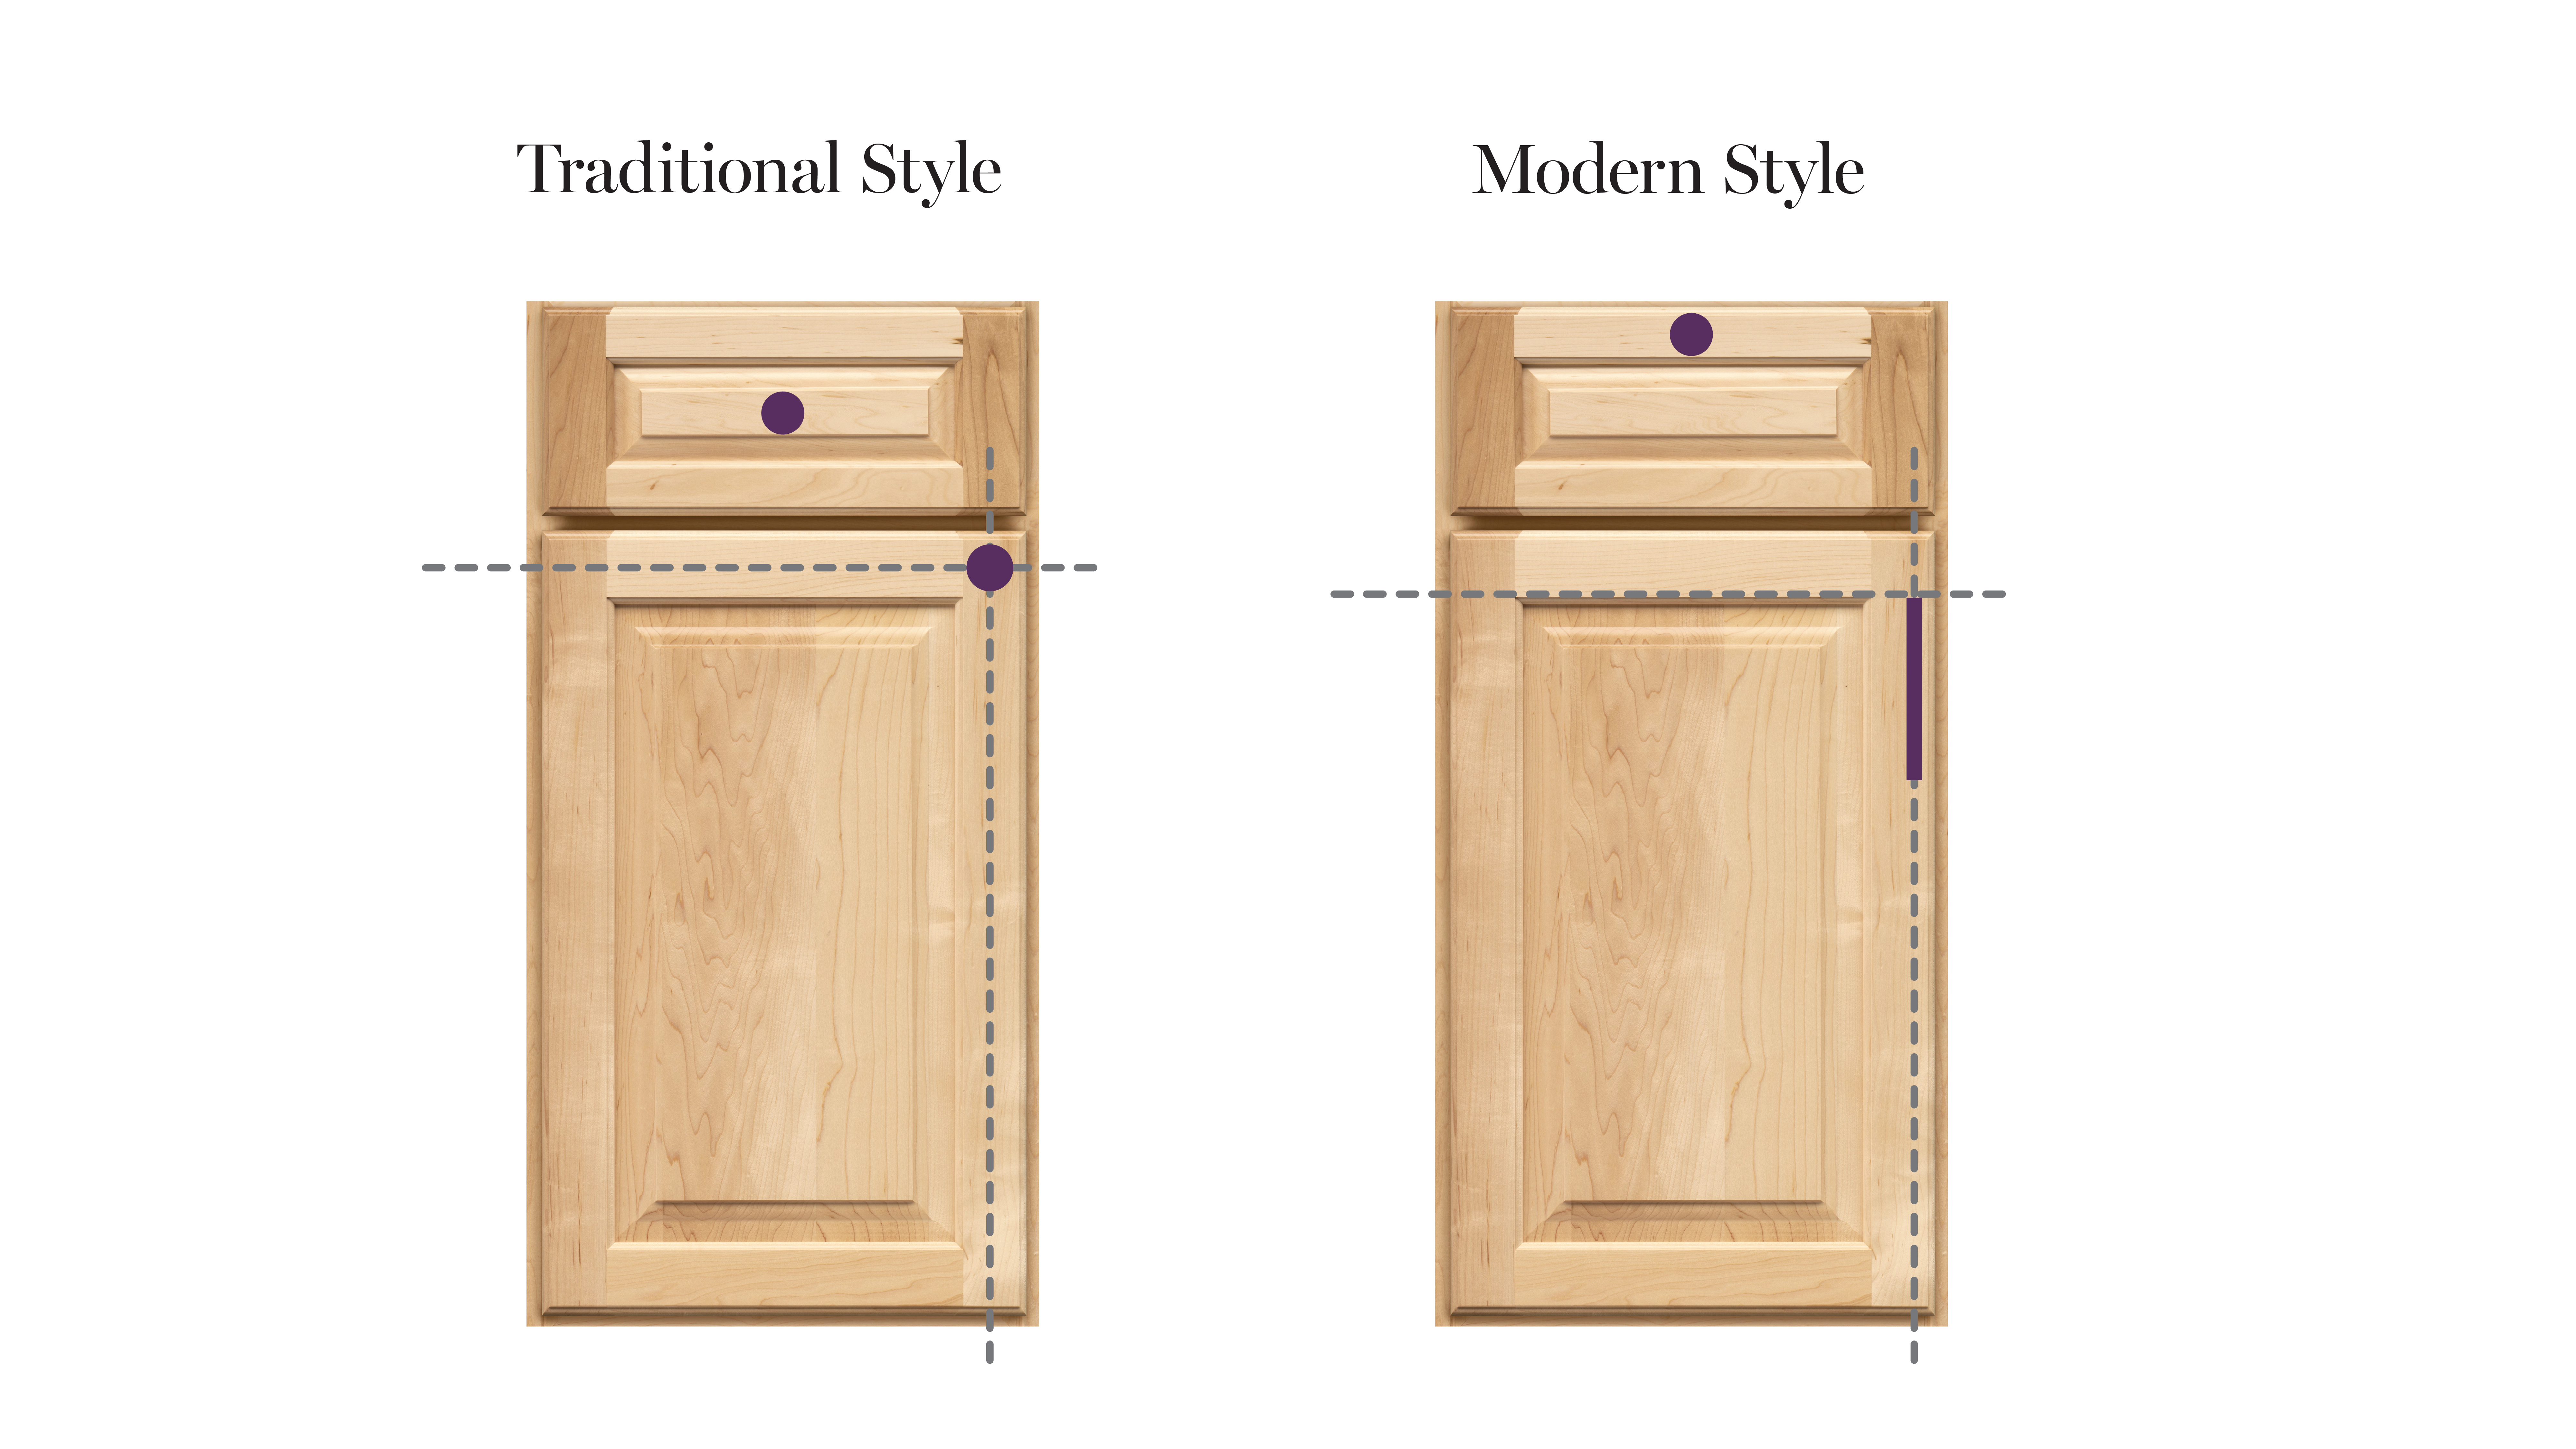
Start by deciding where handles or knobs should go. For drawers, place handles near the center or edges. For cabinet doors, position knobs in the corners or handles vertically along the edge. Keep a consistent height across similar cabinets. Use a ruler or tape measure to find exact spots. Mark lightly with a pencil for adjustments.
Using Templates For Accuracy
Templates make measuring faster and precise. Use a paper or plastic template with pre-marked holes. Align the template on the cabinet door or drawer front. Hold it steady and mark through the holes. This method reduces errors and keeps hardware placement uniform. Templates work well for multiple cabinets of the same size.
Marking Drill Points
After choosing the spot, mark drill points carefully. Use a sharp pencil or awl to make small indentations. These marks guide the drill bit and prevent slipping. Double-check measurements before drilling. Accurate drill points ensure screws fit well and hardware stays secure. Take your time marking to avoid damage.
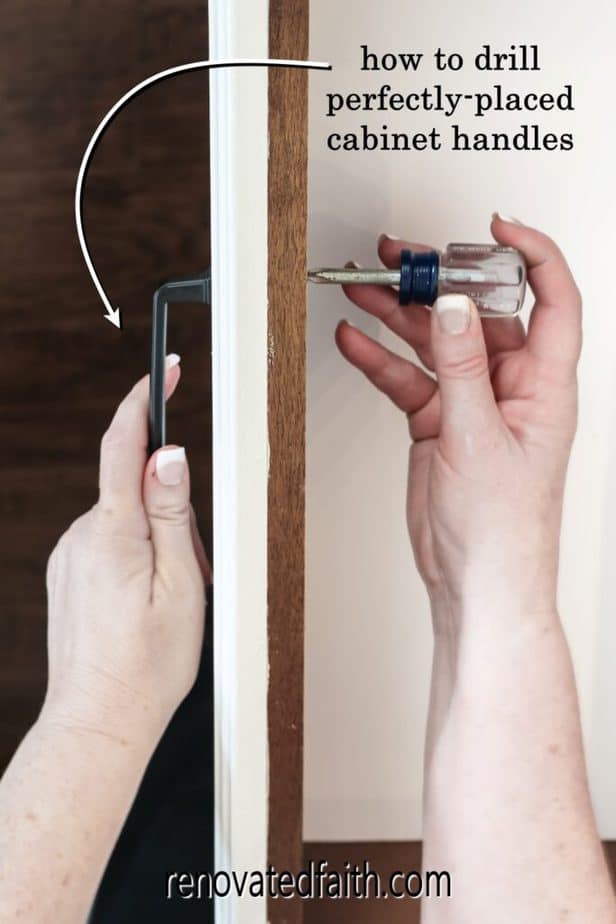
Credit: renovatedfaith.com
Preparing Cabinets For Installation
Preparing your cabinets before installing hardware is key to a smooth process. This step ensures that your hardware fits well and stays secure. Taking time here saves effort later. Follow these clear steps for the best results.
Cleaning And Clearing Surfaces
Start by cleaning the cabinet surfaces. Remove dirt, dust, and grease with a mild cleaner. Dry the area fully before moving on. Clear any objects around the cabinets to give yourself space.
Checking For Obstructions
Look inside and around the cabinet door or drawer. Check for nails, screws, or other blockages. Ensure the area behind is clear for drilling. Avoid hitting pipes or wires inside walls.
Drilling Pilot Holes
Mark the spots for your hardware carefully. Use a small drill bit to make pilot holes. This prevents the wood from splitting. Drill straight and steady for clean holes ready for screws.
Installing Cabinet Hardware
Installing cabinet hardware is a key step in upgrading your kitchen or bathroom. Proper installation ensures handles and knobs look great and work well. Take time to do it right for a neat, lasting finish.
Aligning Handles And Knobs
Start by marking where each handle or knob will go. Use a ruler or template for even spacing. Check alignment by measuring from edges or between holes. Straight handles look clean and help open doors easily.
Securing With Screws
Insert screws through the inside of the cabinet door or drawer. Hold the hardware firmly on the front side. Tighten screws gently with a screwdriver. Avoid overtightening to prevent damage to the hardware or wood.
Ensuring Tight Fits
Check that all screws are snug and the hardware does not wiggle. Test each handle and knob by pulling and pushing. Tighten loose screws as needed. A secure fit keeps hardware safe and comfortable to use.
Credit: www.kraftmaid.com
Adjusting And Finishing Touches
Adjusting and finishing touches are key steps for cabinet hardware installation. They ensure the hardware looks great and works well. Careful adjustments help avoid loose or crooked handles and knobs. These final steps bring a polished, professional look to your cabinets.
Checking Alignment And Symmetry
Start by standing back and looking at the hardware. Check if all handles and knobs line up straight. Make sure they sit at the same height on each door or drawer. Symmetry creates a balanced and neat appearance. Use a ruler or level to confirm measurements. Adjust screws slightly to fix any misalignment.
Tightening Hardware
Once alignment is perfect, tighten the screws firmly. Avoid over-tightening as it can damage the wood or hardware. Use a screwdriver that fits well to prevent slipping. Hold the hardware in place while tightening. Check each screw to ensure a secure fit. Loose hardware can cause wear or make the handle wobble.
Cleaning And Polishing
Finish by wiping the hardware with a soft cloth. Remove fingerprints, dust, or any installation residue. Use a gentle cleaner if needed, safe for your hardware’s material. Polishing enhances shine and protects the surface. Clean cabinets around the hardware too for a fresh look. This step highlights your hard work and detail.
Common Mistakes To Avoid
Installing cabinet hardware may seem simple but many make basic errors. These mistakes cause poor fit and weak mounts. Avoiding them saves time and effort. Understanding common errors helps achieve a perfect installation.
Misaligned Hardware
Placing hardware off-center looks unprofessional. It can also make doors hard to open. Measure twice before drilling any holes. Use a level to keep handles straight. Small shifts can ruin the overall look.
Incorrect Measurements
Wrong measurements lead to holes in the wrong spots. This wastes materials and weakens cabinets. Always use a ruler or tape measure. Mark your points clearly with a pencil. Double-check before making any cuts or holes.
Overtightening Screws
Too much force can strip screws or damage wood. Tighten screws just enough to hold hardware firmly. Use a screwdriver with good control. Stop as soon as the hardware feels secure.
Frequently Asked Questions
How Do I Measure Cabinet Hardware Accurately?
Use a ruler or tape measure to find the screw hole distance. Measure from hole center to center. Mark the spots precisely on your cabinet before drilling.
What Tools Are Needed To Install Cabinet Hardware?
You’ll need a drill, screwdriver, measuring tape, pencil, and a level. These tools ensure accurate placement and secure installation of your hardware.
How To Choose The Perfect Mount For Cabinet Hardware?
Consider cabinet style, handle size, and user comfort. Pick mounts that complement your decor and provide easy grip and functionality.
Can I Install Cabinet Hardware Without Professional Help?
Yes, with basic tools and careful measuring, you can install hardware yourself. Follow instructions closely for best results and avoid damage.
Conclusion
Measuring and installing cabinet hardware takes patience and care. Take your time to measure twice and mark clearly. Use the right tools for precise results. Follow the steps carefully to avoid mistakes. A well-installed handle or knob improves both look and function.
Small details make a big difference in your space. Keep practicing, and your skills will improve with each project. Enjoy your updated cabinets and the satisfaction of a job done well. Simple steps, great results.