Is your shutter hanging loose or won’t stay in place? Broken shutter fasteners can make your home look untidy and leave your shutters vulnerable to damage.
But don’t worry—you don’t need to call a professional or spend a fortune to fix it. You’ll learn simple, step-by-step tips to replace your broken shutter fasteners quickly and easily. By the end, your shutters will be secure and looking great again.
Ready to get started? Let’s dive in!

Credit: www.youtube.com
Identifying Broken Shutter Fasteners
Identifying broken shutter fasteners is the first step to fixing your shutters. Fasteners hold shutters in place and keep them functional. Over time, they can wear out or break due to weather or use. Spotting damage early helps prevent bigger problems. This section explains how to find broken fasteners and what to check for.
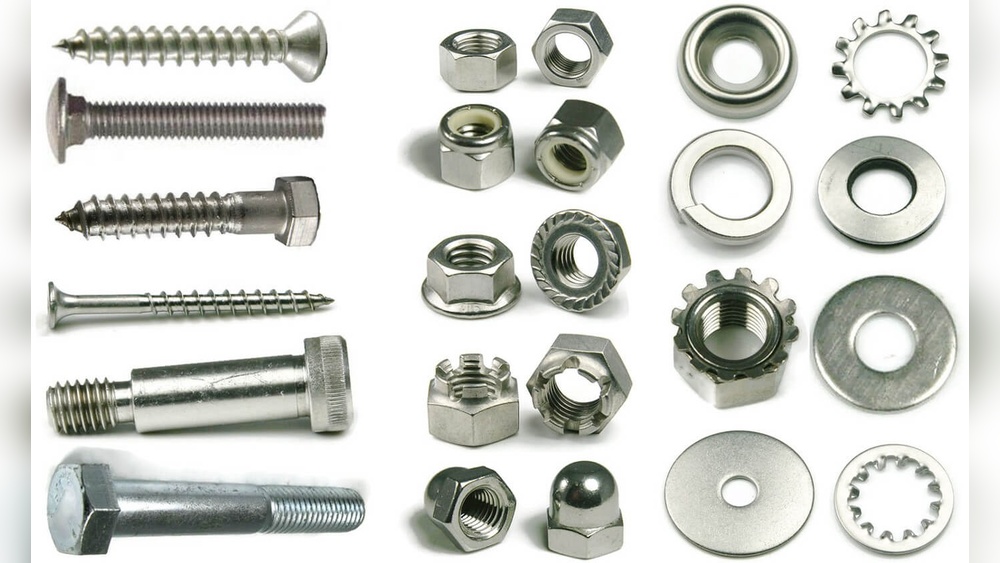
Common Types Of Shutter Fasteners
Shutter fasteners come in several types. The most common are screws, bolts, and clips. Screws are often used to attach shutters to the wall. Bolts provide strong support for heavier shutters. Clips hold shutters in place but allow easy removal. Knowing the type helps you understand what to inspect.
Signs Of Damage
Look for loose or missing fasteners. Rust or corrosion can weaken metal parts. Shutters that wobble or sag may have broken fasteners. Cracks around screw holes also show damage. Paint peeling near fasteners could mean moisture damage. Check both sides of the shutter carefully.
Tools Needed For Inspection
Use a flashlight to see hidden fasteners clearly. A screwdriver helps check if screws are tight. A wrench is useful for bolts. A magnifying glass can reveal small cracks or rust spots. Gloves protect your hands during inspection. Keep these tools handy for a thorough check.
Preparing For Replacement
Preparing to replace broken shutter fasteners is an important step. It ensures a smooth and safe repair process. Taking time to prepare helps avoid mistakes and saves effort later. Start by understanding the tools and parts needed. Follow safety tips to protect yourself. Clear your work area to keep everything organized and easy to reach.
Gathering Replacement Parts
Find the exact fasteners that match your shutters. Check the size, type, and material of the broken fasteners. Visit a hardware store or order online if needed. Keep extra parts on hand in case of mistakes. Having all parts ready avoids delays during the repair.
Safety Precautions
Wear safety gloves to protect your hands from sharp edges. Use safety glasses to shield your eyes from dust and debris. Work in a well-lit area to see clearly. Avoid loose clothing that can catch on tools. Keep children and pets away from the work zone for safety.
Clearing The Work Area
Remove furniture and obstacles near the shutters. Sweep the floor to prevent slips and falls. Organize your tools and parts on a small table or tray. Keep the area tidy to find what you need quickly. A clean workspace helps you focus and work faster.
Removing Old Fasteners
Removing old fasteners is the first step in replacing broken shutter fasteners. It requires patience and the right tools. You need to carefully remove screws and bolts without damaging the shutter or wall. Proper removal makes the installation of new fasteners easier and more secure.
Loosening Screws And Bolts
Start by selecting the correct screwdriver or wrench. Match the tool size to the fastener head. Turn screws or bolts slowly to avoid stripping them. Use steady pressure and work in small turns. If a screw feels tight, try spraying a lubricant to help.
Handling Rusted Or Stuck Fasteners
Rusted fasteners can be hard to remove. Apply a rust remover or penetrating oil and wait a few minutes. Tap the fastener gently with a hammer to loosen rust. Use pliers or locking pliers for better grip. Avoid forcing the fastener to prevent breakage.
Keeping Parts Organized
Keep screws, bolts, and washers in a small container. Label the parts if possible to remember their place. Organized parts save time during installation. Check each fastener for damage before reuse. Dispose of any broken or worn parts safely.

Credit: www.amazon.com
Installing New Fasteners
Installing new fasteners is a key step to fix broken shutter fasteners. It ensures shutters stay secure and work well. The process requires some care and the right tools. This guide helps you install new fasteners quickly and correctly.
Choosing The Right Fasteners
Select fasteners that match your shutter’s material and size. Use rust-resistant fasteners for outdoor shutters. Check the length and thickness to fit existing holes. Using proper fasteners prevents damage and improves durability.
Aligning Shutter Components
Place shutters in their correct position before fastening. Ensure holes in the shutter and frame line up. Keep shutters level to avoid uneven closing. Proper alignment makes the shutters functional and neat.
Securing Fasteners Properly
Insert fasteners straight into the holes to avoid splitting wood. Tighten screws firmly but do not over-tighten them. Over-tightening can strip the holes or break fasteners. Check each fastener after installation to confirm stability.
Testing And Adjusting
Testing and adjusting your shutter fasteners is key to ensure they work smoothly. This step helps avoid future problems and keeps your shutters secure. Take your time to check every part carefully.
Checking Shutter Movement
Open and close the shutter slowly. Watch for any sticking or wobbling. The shutter should move smoothly without resistance. Notice if it stays in place when opened. This shows the fasteners hold well.
Tightening Loose Fasteners
Look for screws or bolts that feel loose. Use a screwdriver or wrench to tighten them. Do not overtighten, or you may damage the shutter. Tight fasteners keep the shutter steady and safe.
Making Final Adjustments
Make small changes to the fastener positions if needed. Adjust until the shutter moves freely and stays put. Test again after each change. Proper adjustment means your shutters work like new.

Credit: www.reddit.com
Maintenance Tips
Maintaining shutter fasteners is key to keeping shutters strong and safe. Simple care steps can stop problems before they start. Follow these tips to extend the life of your fasteners.
Regular Inspection
Check fasteners every few months. Look for rust, cracks, or loose screws. Early signs can save you from big repairs. Tighten any loose parts carefully. Replace damaged fasteners right away to avoid shutter damage.
Lubrication Techniques
Use light oil or silicone spray on fasteners. This helps parts move smoothly and stops rust. Apply a small amount and wipe off extra oil. Lubricate twice a year for best results. Avoid heavy grease that attracts dirt and dust.
Preventing Future Damage
Avoid slamming shutters shut. Handle them gently to protect fasteners. Clean shutters regularly to remove dirt and moisture. Use weatherproof fasteners in wet areas. These steps reduce wear and extend fastener life.
Frequently Asked Questions
What Tools Are Needed To Replace Shutter Fasteners?
You need a screwdriver, pliers, replacement fasteners, and a drill. These tools help remove old fasteners and secure new ones properly.
How Do I Remove Broken Shutter Fasteners Safely?
First, unscrew or pry out the damaged fasteners gently. Use pliers for stubborn pieces. Avoid damaging the shutter or wall.
Can I Replace Shutter Fasteners Myself?
Yes, replacing shutter fasteners is a simple DIY task. With basic tools and careful handling, most homeowners can do it easily.
What Type Of Fasteners Work Best For Shutters?
Use rust-resistant screws or bolts designed for outdoor use. Stainless steel fasteners provide durability and prevent corrosion over time.
Conclusion
Replacing broken shutter fasteners can be simple and quick. Choose the right tools and parts before starting. Take your time to remove old fasteners carefully. Secure new fasteners tightly to keep shutters stable. Regular checks help avoid future damage or wear.
Small repairs save money and improve home safety. Try these steps for better-looking, functional shutters today.