Are your kitchen cabinets looking tired or outdated? Changing the hardware is one of the easiest and most affordable ways to give your kitchen a fresh new look.
You don’t need to be a handyman or spend hours on complicated projects. With just a few simple steps, you can replace your old cabinet knobs and pulls and instantly transform your space. Keep reading, and you’ll discover how to make your kitchen feel brand new without breaking the bank or wasting time.

Credit: www.amazon.com
Tools And Materials Needed
Replacing old kitchen cabinet hardware is a simple project. The right tools and materials make the job easier. Gather everything before you start. This saves time and avoids frustration.
Basic tools handle most cabinet hardware changes. Some materials help protect your cabinets during the work. Prepare your workspace with good lighting and a clean surface.
Essential Tools
- Screwdriver (Phillips and flathead) for removing screws
- Drill with drill bits for new holes
- Measuring tape to align hardware accurately
- Level to keep handles straight
- Pliers for gripping and pulling
- Masking tape to mark screw spots
Materials Needed
- New cabinet knobs or pulls matching your style
- Replacement screws if old ones are rusty or worn
- Wood filler to cover old holes
- Sandpaper for smoothing filled areas
- Painter’s tape to protect cabinet surfaces
Preparation Tips
- Remove old hardware carefully to avoid damage
- Clean cabinet surfaces before installing new pieces
- Double-check measurements for perfect placement
Removing Old Hardware
Removing old kitchen cabinet hardware is the first step to refreshing your kitchen’s look. It clears the way for new handles and knobs. This process is simple but requires care to avoid damaging your cabinets. Follow these steps to remove the hardware safely and efficiently.
Preparing The Cabinets
Start by clearing the cabinet doors and drawers. Remove any items inside to avoid spills or damage. Wipe the surfaces clean to remove dust and grease. This helps you see screws and hardware clearly. Lay down a cloth or towel to protect your countertop from scratches or dropped tools.
Unscrewing Handles And Knobs
Use a screwdriver that fits the screw heads well. Turn the screws counterclockwise to loosen them. Hold the handle or knob firmly as you unscrew. Keep the screws in a small container to avoid losing them. Gently pull off the hardware once the screws are removed.
Dealing With Stubborn Hardware
Some hardware may be stuck due to paint or rust. Spray a little lubricant on the screws and let it sit for a few minutes. Tap the handle lightly with a rubber mallet to loosen it. Use pliers carefully if the screws are stripped or hard to turn. Avoid forcing the hardware to prevent cabinet damage.
Choosing New Hardware
Choosing new hardware for your kitchen cabinets sets the tone for the entire space. The right knobs and pulls can refresh old cabinets and boost your kitchen’s style. Focus on style, finish, and size to get the best look and fit.
Matching Styles And Finishes
Pick hardware that matches your kitchen’s design. Traditional kitchens suit classic brass or bronze finishes. Modern kitchens look great with sleek chrome or matte black handles. Think about the cabinet color and countertop too. Choose finishes that complement these elements. Consistency in style keeps your kitchen looking balanced and neat.
Measuring For Proper Fit
Measure old hardware before buying new pieces. Check the distance between screw holes on your cabinet doors. This is called the center-to-center measurement. Buying hardware with the same measurement avoids drilling new holes. Use a ruler or tape measure for accuracy. Proper fit saves time and keeps cabinets intact.
Installing New Hardware
Installing new hardware on your kitchen cabinets can refresh the whole look. It is a simple task that anyone can do. Start by preparing your tools and new hardware. Take your time to work carefully. This will ensure the hardware fits well and looks great.
Follow clear steps to avoid mistakes. This helps make the process smooth and quick. Let’s dive into the key steps.
Aligning And Marking Holes
Hold the new hardware in place on the cabinet door or drawer. Check that it sits straight and in the right spot. Use a pencil to mark where the screws will go. Double-check these marks before drilling. Accurate marks save time and prevent damage.
Drilling And Securing Hardware
Choose a drill bit that matches the screw size. Drill small pilot holes on your marks. This helps the screws go in easily. Place the hardware back on the door or drawer. Use a screwdriver to tighten each screw firmly. Avoid over-tightening to prevent damage. Now, your new hardware is ready and secure.
Tips For A Professional Look
Replacing old kitchen cabinet hardware can refresh your kitchen’s look quickly. A professional finish depends on small details. Focus on cleaning, polishing, and precise placement. These tips ensure your cabinets look neat and well cared for.
Cleaning And Polishing Cabinets
Start by cleaning your cabinets before installing new hardware. Use a gentle cleaner and a soft cloth. Remove dirt, grease, and dust thoroughly. Polishing the surface can brighten the wood and hide minor scratches. This step helps the new hardware stand out and look sharp.
Clean cabinets also help screws grip better. Avoid harsh chemicals that damage the finish. Let the cabinets dry fully before you attach the hardware.
Consistent Placement Techniques
Place each handle or knob in the same spot on every cabinet door. Use a ruler or measuring tape to mark exact points. This keeps the look balanced and organized. Uneven hardware ruins the clean, professional feel.
Drill pilot holes to avoid splitting the wood. Double-check each hole for alignment before fixing the screws. Take your time; rushing leads to mistakes. A level tool can help keep all hardware straight. Consistent placement shows care and attention to detail.
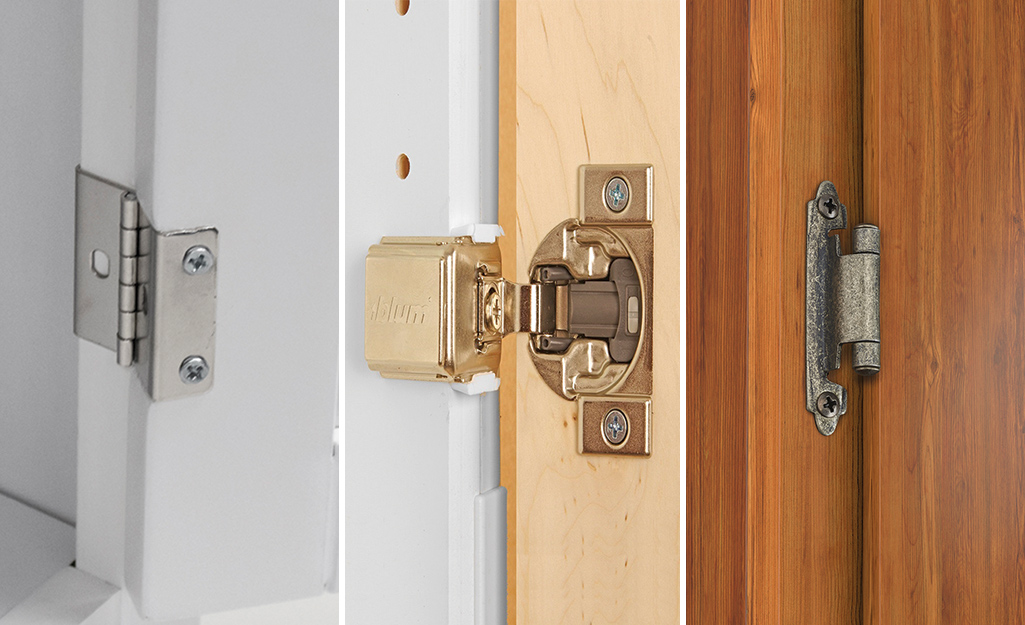
Credit: www.homedepot.com
Common Mistakes To Avoid
Replacing old kitchen cabinet hardware is a simple way to refresh your kitchen’s look. Many people try this project but make common mistakes. These errors can cause delays, extra costs, or a poor finish. Avoid these pitfalls to save time and effort.
Measuring Incorrectly
Not measuring the holes properly is a frequent mistake. New hardware must fit the existing holes. Measure the distance between screw holes carefully. Use a ruler or tape measure for accuracy. Wrong measurements mean drilling new holes, which can damage the cabinet.
Choosing The Wrong Style
Hardware should match your kitchen’s style and cabinet design. Picking a style that clashes with your cabinets looks odd. Think about the color and finish. Choose hardware that blends well with your kitchen’s theme. This keeps the look balanced and attractive.
Ignoring Screw Length
Using screws that are too long or too short causes problems. Long screws can damage the cabinet or get stuck. Short screws won’t hold the hardware firmly. Check the thickness of your cabinet doors. Select screws that fit properly for a secure hold.
Not Removing Old Hardware Carefully
Forcing old hardware off can damage the cabinet surface. Use the right tools like a screwdriver or drill. Remove screws gently to avoid scratches or dents. Clean the surface before installing new hardware for a neat finish.
Skipping The Cleaning Step
New hardware looks best on clean cabinets. Dust, grease, or old paint can block screws. Clean the area with a mild cleaner before installation. This helps hardware fit well and last longer.

Credit: www.youtube.com
Frequently Asked Questions
How Do I Remove Old Kitchen Cabinet Hardware Safely?
Start by unscrewing the old handles or knobs with a screwdriver. Use gentle force to avoid damaging the cabinet surface. If screws are stuck, apply a little lubricant and wait. Remove all hardware before cleaning the cabinet area for a smooth replacement process.
What Tools Are Needed To Replace Cabinet Hardware?
You will need a screwdriver, drill, measuring tape, and possibly a level. These tools help remove old hardware and install new pieces accurately. Having the right tools ensures a smooth and professional-looking update without damaging the cabinets.
How To Choose The Right Size For New Cabinet Hardware?
Measure the distance between existing screw holes on your cabinet doors or drawers. Choose new hardware that matches this measurement to avoid drilling new holes. Proper sizing ensures a perfect fit and saves time during installation.
Can I Reuse Old Screws For New Hardware?
Reusing screws is possible if they fit the new hardware securely. However, new hardware often comes with screws designed for that piece. Using the correct screws ensures stability and prevents damage or loosening over time.
Conclusion
Replacing old kitchen cabinet hardware can refresh your space quickly. Choose handles and knobs that match your style and needs. Take your time measuring and removing old pieces carefully. Installing new hardware improves both look and function. Small changes make a big difference in your kitchen.
Enjoy the updated feel and easy grip of new hardware. This simple project saves money and adds charm. Your kitchen will look cleaner and more modern. Try it yourself and see the great results.