Are you struggling to get your snap fasteners perfectly aligned every time? You’re not alone.
Whether you’re fixing a jacket, making a DIY project, or sewing your own clothes, lining up snap fasteners can be tricky. But it doesn’t have to be. Imagine how much easier your work will be when your snaps close smoothly and look neat every time.
You’ll discover simple, step-by-step tips to line up snap fasteners with confidence and precision. Keep reading—you’re about to master a skill that will save you time and frustration.

Credit: www.sailrite.com
Tools Needed
To line up snap fasteners correctly, you need the right tools. These tools help measure and mark the fabric for perfect placement. Choosing proper tools makes your work easier and results neater. Below are the main tools needed for this task.
Types Of Snap Fasteners
Snap fasteners come in different styles. Some are sew-on types, others are press-on or rivet types. Each type requires specific handling tools. Know your snap fastener type before starting your project. This knowledge helps you pick the right tools and technique.
Measuring Tools
Accurate measurement is key for snap fasteners. Use a ruler or measuring tape to find exact spots. A fabric gauge can help measure small distances precisely. These tools ensure snaps line up evenly on the fabric. Avoid guessing measurements to prevent mistakes.
Marking Instruments
Marking the fabric guides snap placement. Use tailor’s chalk or fabric markers for clear, removable marks. These marks fade or wash away without damaging fabric. Avoid permanent pens or pencils. Clean markings keep the fabric neat and professional.

Credit: www.buckleguy.com
Preparing The Fabric
Preparing the fabric is the first step to line up snap fasteners correctly. Proper preparation makes sure the fasteners hold well and look neat. This part is important for both beginners and experienced sewers. It helps avoid mistakes and saves time.
Choosing The Right Fabric
Pick fabric that suits your project and snap fasteners. Thick fabrics like denim or canvas hold snaps better. Thin fabrics may tear or stretch around the snaps. Cotton and polyester blends work well for most uses.
Stabilizing The Material
Use stabilizer or interfacing to strengthen the fabric. This stops the fabric from stretching or puckering. Iron-on stabilizers are easy to apply. Choose a stabilizer that matches your fabric weight.
Marking Placement Points
Mark where each snap will go with a fabric pencil or chalk. Measure carefully to keep snaps even and straight. Double-check marks before attaching snaps. Clear marks help line up snaps perfectly every time.
Measuring And Marking
Measuring and marking are key steps to line up snap fasteners correctly. Precise marks help place the snaps evenly. This process makes sure your project looks neat and professional. Taking time here saves frustration later.
Using A Ruler Or Tape Measure
Start by choosing a ruler or tape measure with clear numbers. Measure the distance between snaps carefully. Use small units like millimeters or eighths of an inch. Hold the ruler steady to avoid errors. Measure twice to confirm accuracy before marking.
Marking Matching Spots
Place marks on both fabric sides where snaps will go. Use a pencil or fabric chalk for light, removable marks. Make sure marks face each other for proper snap alignment. Double-check that marks match exactly on both sides.
Ensuring Symmetry
Symmetry gives your project a balanced look. Check that all marks line up straight across the fabric. Use a square or straight edge to verify even spacing. Adjust marks as needed to keep snaps perfectly aligned.
Aligning The Snap Fasteners
Aligning snap fasteners is a key step in making sure they work well. Proper alignment helps the fasteners close securely and last longer. Taking time to line up the parts carefully prevents problems like gaps or loose snaps. This section covers how to position, check, and adjust snap fasteners for the best fit.
Positioning The Male And Female Parts
Start by placing the male part on one side of the fabric. The female part goes on the opposite side. Make sure both parts face each other directly. The male part should line up with the center of the female part. This ensures the snap closes smoothly.
Double Checking Alignment
Look closely to confirm both parts match perfectly. Hold the fabric flat and press the snap gently. Check if the edges meet evenly. Misaligned parts can cause the snap to catch or not close fully. Adjust before attaching to avoid problems later.
Adjusting For Accuracy
Move the snap parts slightly if needed to improve fit. Use a ruler or measuring tape for precise spacing. Small shifts can make a big difference in snap performance. Secure the parts only after you are sure about their placement.
Attaching The Snaps
Attaching snap fasteners is a simple process that requires care and the right tools. Proper attachment keeps snaps secure and easy to use. Choose the best method for your project to get strong, neat results. Below are three common techniques to attach snap fasteners.
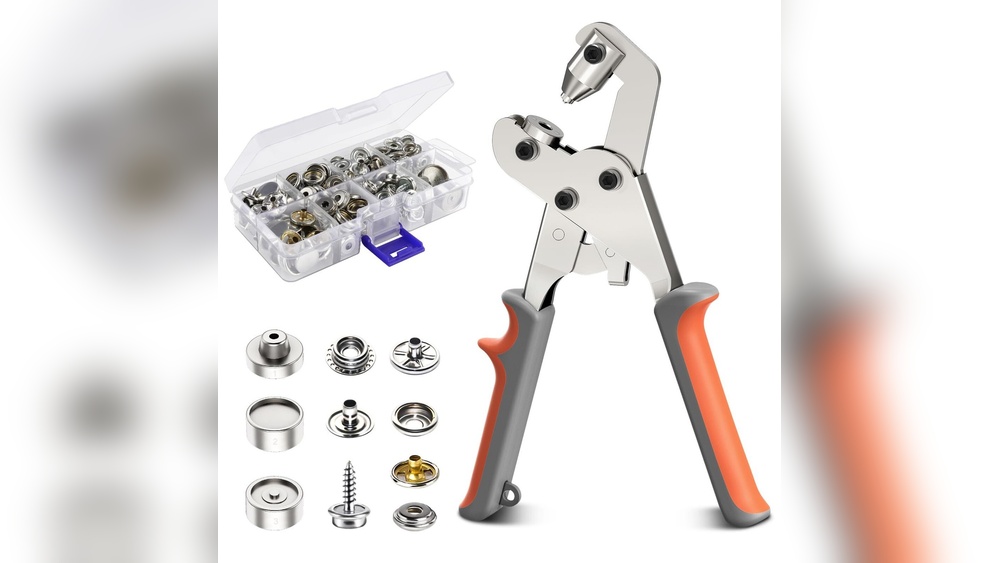
Using A Snap Pliers Tool
Snap pliers are made for quick and easy snap attachment. Place the snap parts in the pliers’ slots. Squeeze the handles firmly but gently. The pliers press the snap pieces together tightly. This method works well on light to medium fabrics. It saves time and gives a clean finish.
Hand Sewing Method
Hand sewing snaps is good for delicate or thick fabrics. Use a strong needle and thread that matches the fabric color. Sew through the holes on the snap’s base. Stitch tightly to keep the snap secure. This method takes more time but offers good control. It is perfect for repairs or detailed work.
Press Machine Technique
Using a press machine is best for large projects or heavy fabrics. Position the snap parts in the machine’s die. Press down firmly to attach the snap pieces. This method ensures strong and even pressure. It works well for denim, leather, and canvas. A press machine speeds up the process and gives durable results.
Testing The Alignment
Testing the alignment of snap fasteners is an important step. It ensures your snaps fit perfectly and work smoothly. This process helps catch any mistakes early. You can fix small errors before final sewing. Proper alignment makes your project look neat and professional.
Snapping And Unsapping
Try snapping the fasteners together gently. Feel the click or resistance. Then pull them apart carefully. Repeat this a few times. This shows how well they hold. It also reveals if they line up correctly. Snap and unsnap to check the ease of use.
Checking For Gaps Or Misfits
Look closely at the snap edges. Are there any gaps between parts? Check if the snaps sit flush with the fabric. Misfits cause the snaps to bend or pull. Small gaps mean the fasteners might not close fully. Fix any uneven spacing before moving on.
Making Final Adjustments
Shift the snap parts slightly if needed. Adjust their position to close gaps. Use a pin or small tool to help. Test snapping again after each move. Keep adjusting until snaps align perfectly. Secure them firmly once you are satisfied.
Tips For Best Results
Getting snap fasteners lined up right makes your project look neat. Small details matter a lot. Follow these tips for best results. They help you work fast and avoid mistakes.
Working On Multiple Snaps
Mark all snap positions before starting. Use a ruler or tape measure for even spacing. Attach snaps one by one to keep alignment. Check each snap’s position twice. This stops uneven gaps and crooked snaps.
Handling Thick Or Stretchy Fabrics
Use sharp tools to punch holes cleanly. Stretchy fabric needs extra care. Stretch fabric gently and hold it tight. For thick fabrics, press snaps firmly with strong pliers. Avoid bending fabric around the snap area.
Maintaining Tools
Clean snap fastener tools after each use. Remove dirt and fabric bits. Sharpen punches regularly for smooth cuts. Store tools in a dry place to prevent rust. Well-kept tools make snap fixing easier and last longer.

Credit: www.buckleguy.com
Frequently Asked Questions
How Do I Measure For Snap Fasteners Alignment?
Measure twice using a ruler or tape to mark exact snap positions. Use a fabric marker for clear, removable guidelines. Accurate measuring ensures perfect snap placement and avoids misalignment during installation.
What Tools Are Needed To Line Up Snap Fasteners?
You need a ruler, fabric marker, snap fastener pliers, and snaps. These tools help measure, mark, and securely attach snaps. Using the right tools guarantees precise alignment and a professional finish.
Can I Line Up Snap Fasteners Without Special Tools?
Yes, you can use a ruler and fabric marker for marking. For attaching snaps, use a hammer and snap setter as alternatives. While tools make it easier, careful measuring and steady hands are key.
How To Ensure Snap Fasteners Stay Securely Lined Up?
Mark positions accurately and double-check measurements before attaching snaps. Use proper snap fastener tools to apply even pressure. Secure snaps firmly to prevent shifting and ensure long-lasting alignment.
Conclusion
Lining up snap fasteners takes care and patience. Measure twice to get the right spots. Use simple tools to keep snaps straight. Check each snap before pressing it down. Practice makes perfect, so don’t rush. A neat job makes your project look great.
Keep these tips in mind for easy results. Snap fasteners hold better when aligned well. You can do this with a little effort. Stay calm, follow steps, and finish strong.