Have you ever tried to remove drywall anchors and ended up making a bigger mess on your wall? You’re not alone.
Drywall anchors can be tricky to take out without damaging your wall or leaving stubborn holes behind. But don’t worry—removing them doesn’t have to be stressful or complicated. You’ll discover simple, step-by-step methods that anyone can follow to get those anchors out cleanly and easily.
Ready to make your walls look flawless again? Keep reading to learn how.
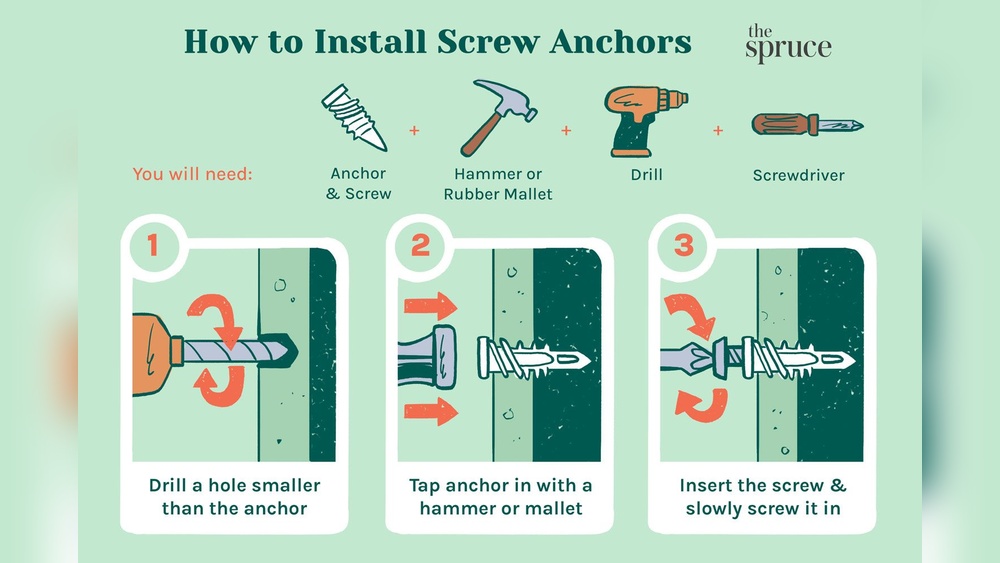
Types Of Drywall Anchors
Drywall anchors come in different types. Each type fits a certain need and wall strength. Knowing the types helps you remove them correctly. It also helps pick the right anchor for your project.
Plastic Expansion Anchors
Plastic expansion anchors are common and simple. They expand inside the wall when you insert a screw. These anchors hold light to medium weight items. Removing them may need pulling gently or pushing them inside the wall.
Self-drilling Anchors
Self-drilling anchors have sharp tips to screw directly into drywall. They do not need a pilot hole. These anchors are strong and hold medium weight. Unscrewing them carefully helps take them out without damage.
Toggle Bolts
Toggle bolts have metal wings that open behind the wall. They provide strong support for heavy items. Removing toggle bolts means unscrewing and pulling out the wings. Care is needed to avoid wall damage.
Molly Bolts
Molly bolts expand inside the wall like metal sleeves. They offer solid grip for medium to heavy loads. To remove molly bolts, unscrew the bolt and pull out the sleeve. Sometimes, pushing the sleeve into the wall works too.
:max_bytes(150000):strip_icc()/how-to-remove-drywall-anchors-7562285-02-c01abbfe63374ad3a7bc1e52d0c15bb2.JPG)
Credit: www.thespruce.com
Tools Needed For Removal
Removing drywall anchors requires the right tools to do the job safely and cleanly. Having these tools ready makes the process smoother and helps protect your walls from damage. Each tool plays a specific role in taking anchors out and fixing the holes they leave behind.
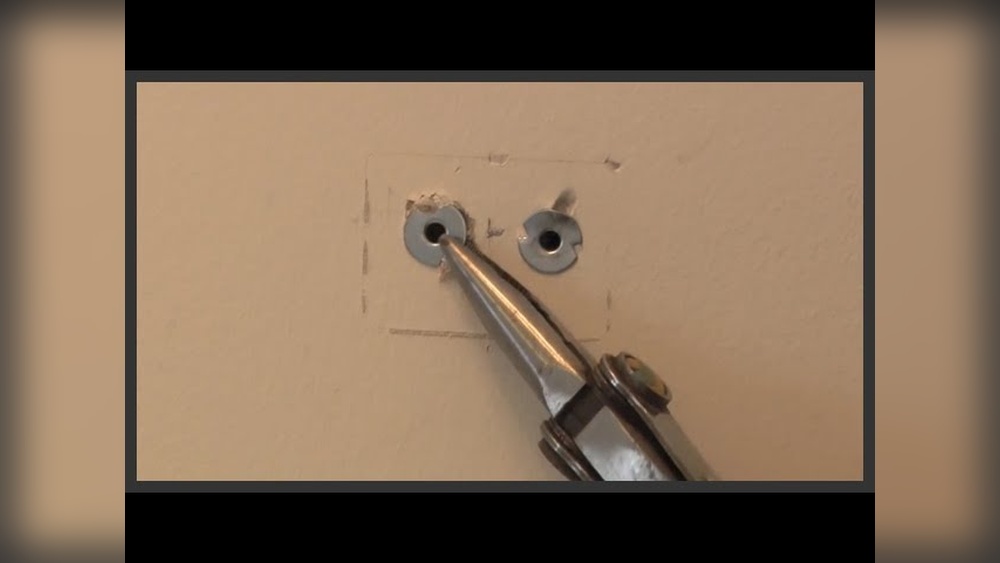
Pliers And Screwdrivers
Pliers help grip and pull out anchors stuck in the wall. Needle-nose pliers work best for small or tight spaces. Screwdrivers assist in loosening anchors by turning screws or prying edges gently. A flathead screwdriver can lift anchors without breaking the drywall.
Drill And Drill Bits
A drill speeds up anchor removal by drilling into the center of the anchor. This breaks its hold inside the drywall. Use drill bits slightly smaller than the anchor size to avoid wall damage. Drilling also clears space for patching the hole later.
Utility Knife
A utility knife cuts around the anchor to loosen it from the drywall surface. It helps remove any rough edges or paint around the hole. This tool prepares the wall for a clean repair after the anchor is out.
Patch Materials
Patch materials fill and smooth holes left by anchors. Common options include spackling paste or joint compound. Use a putty knife to apply and spread these materials evenly. Sandpaper helps finish the surface for painting.
Removing Plastic Expansion Anchors
Plastic expansion anchors hold screws tightly in drywall. Removing them can leave holes or damage if done wrong. Use simple methods to take them out cleanly. Two common ways work well for most plastic anchors.
Pulling Out With Pliers
Grip the anchor firmly with needle-nose pliers. Pull straight out slowly. Wiggle gently if it feels stuck. Avoid bending or breaking the anchor inside the wall. This method works best for anchors that stick out slightly.
Be patient and steady. Tugging too hard may tear the drywall. If the anchor does not come out, try the next method.
Pushing Through The Wall
Push the anchor into the wall cavity. Use a screwdriver or similar tool. Press firmly until the anchor falls behind the drywall. This leaves a small hole to patch later.
This method is quick and avoids drywall damage. Ideal for anchors flush with the wall surface. After pushing, fill the hole with spackle or putty for a smooth finish.

Credit: theturquoisehome.com
Taking Out Self-drilling Anchors
Removing self-drilling drywall anchors needs care. These anchors screw into the wall without a pre-drilled hole. They hold well but can be tricky to remove without damage. Follow simple steps to take them out safely.
Unscrewing The Anchor
Try to unscrew the anchor first. Use a screwdriver that fits the anchor head. Turn it counterclockwise slowly. The anchor may back out like a screw. Keep steady pressure to avoid stripping the head. If it turns smoothly, continue until it comes out completely.
Using Drill For Stubborn Anchors
Some anchors stick tight. Use a drill with a bit slightly smaller than the anchor. Set the drill to reverse mode. Carefully drill into the anchor head. This action helps loosen or break the anchor. Once loose, finish unscrewing by hand or pull gently with pliers.
Extracting Toggle Bolts
Extracting toggle bolts from a wall can feel tricky. These anchors hold strong because of their design. They use wings that open behind the drywall to spread the load. Removing them needs care to avoid wall damage. Follow clear steps to take out toggle bolts safely and cleanly.
Removing The Screw
Start by unscrewing the bolt with a screwdriver. Turn it counterclockwise. Keep steady pressure to avoid stripping the screw head. If the screw spins freely, it may be detached from the wings. In that case, push the screw fully into the wall cavity. This helps prepare for the next step.
Dealing With Toggle Wings
The toggle wings stay behind the drywall. They stay open to hold the anchor in place. Try to pull them out gently. Use needle-nose pliers to grab the folded wings. Squeeze them closed and pull slowly. If the wings resist, push them into the wall cavity. This lets the drywall close up naturally.
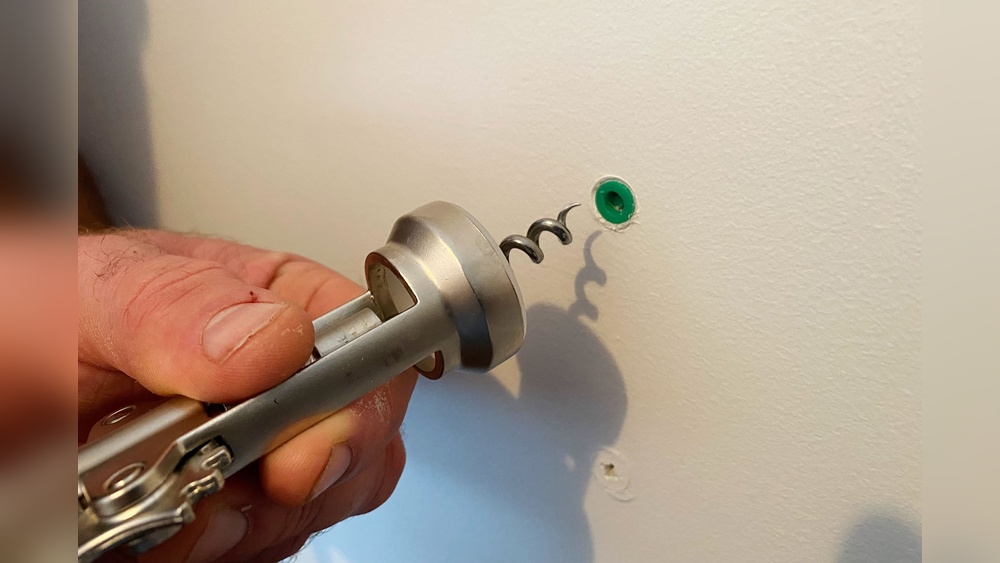
Removing Molly Bolts
Removing molly bolts from a drywall can be tricky but doable. Molly bolts hold strongly in walls, thanks to their expanding sleeves. You need to follow clear steps to remove them without damaging the wall.
This guide shows how to take molly bolts out safely and neatly. It splits into two simple parts: unscrewing the bolt and collapsing the sleeve. Each step helps you get the bolt out and prepare your wall for repairs or new anchors.
Unscrewing The Bolt
Start by turning the bolt counterclockwise. Use a screwdriver that fits the bolt head well. Turn slowly and steadily to avoid stripping the head.
Remove the bolt completely from the sleeve. Sometimes the bolt might be stuck. Tap the screwdriver gently or wiggle the bolt to loosen it.
Keep the bolt safe if you want to reuse it later. Removing the bolt first makes the next step easier.
Collapsing The Sleeve
After removing the bolt, the sleeve stays inside the wall. The sleeve expands behind the drywall to hold tight. You need to collapse it to pull it out.
Push the sleeve inward with a flat tool like a screwdriver blade. Press firmly to fold the metal tabs or legs inside.
Once collapsed, pull the sleeve out carefully with pliers. If it resists, push again until it moves freely. This avoids wall damage and clears the hole for patching.
Repairing The Wall After Anchor Removal
After removing drywall anchors, the wall often needs fixing. The holes left behind can make the wall look rough and unfinished. Repairing these holes is simple and helps your wall look smooth and clean again.
Fixing the wall involves a few easy steps. Start by cleaning the hole, then fill it with spackle or joint compound. Finally, sand and paint the area to match the rest of the wall. Each step improves the wall’s appearance and prepares it for painting.
Cleaning The Hole
Remove any loose debris or dust from the hole. Use a brush or cloth to clear dirt inside the hole. Cleaning helps the filler stick better to the wall. Make sure the hole is dry before moving on.
Applying Spackle Or Joint Compound
Use a putty knife to apply spackle or joint compound into the hole. Press firmly to fill the hole completely. Smooth the surface to blend with the wall. Let it dry according to the product instructions.
Sanding And Painting
After the filler dries, sand the area gently with fine-grit sandpaper. Make the surface smooth and even with the wall. Wipe away dust with a dry cloth. Paint the patched spot to match the wall color. Use thin coats for a natural look.

Credit: www.hgtv.com
Tips To Avoid Wall Damage
Removing drywall anchors can damage your wall if done carelessly. Protect the wall surface with careful steps. These tips help keep your wall smooth and intact after removal.
Gentle Removal Techniques
Start by loosening the anchor slowly. Avoid pulling hard as it can tear drywall. Use gentle back-and-forth motion to ease it out. If the anchor resists, try pushing it in slightly. This may break its grip inside the wall.
Using Proper Tools
Choose tools designed for drywall anchors. A flathead screwdriver or needle-nose pliers works well. Use a drill only if the anchor spins freely. Avoid large tools that can enlarge the hole. Small tools give better control and reduce damage.
When To Call A Professional
Some anchors are tricky or deeply set. If removal risks big wall damage, ask an expert. Professionals have tools to fix holes as they remove anchors. This saves time and prevents costly repairs.
Frequently Asked Questions
How Do You Remove Drywall Anchors Without Damage?
To remove drywall anchors without damage, first unscrew any visible screws. Gently pull the anchor out using pliers. If needed, push it through the wall and patch the hole afterward. This method minimizes wall damage and prepares for quick repairs.
What Tools Are Best For Taking Out Drywall Anchors?
The best tools for removing drywall anchors are needle-nose pliers, a screwdriver, and a utility knife. Pliers help grip and pull anchors. Screwdrivers assist in unscrewing any screws. A utility knife can clean around the anchor for easier removal and patching.
Can Drywall Anchors Be Reused After Removal?
Most drywall anchors cannot be reused after removal because they deform or lose grip. It’s better to replace them with new anchors for secure mounting. Using fresh anchors ensures stronger support and prevents future wall damage or fixture failure.
How To Fix Holes After Removing Drywall Anchors?
To fix holes after removing drywall anchors, clean the area, apply spackle or joint compound, then smooth it out. Let it dry completely and sand it for a flat finish. Finally, paint over the patch to match the wall color seamlessly.
Conclusion
Removing drywall anchors can be simple and quick. Use the right tools and take your time. Pull or twist anchors carefully to avoid wall damage. Small holes can be filled easily with spackle. Let the filler dry, then sand it smooth.
A clean wall looks neat and ready for new items. Practice makes the process easier each time. Now, you can fix your walls without stress.