Are you ready to give your kitchen a fresh, stylish look without spending a fortune? Changing or installing hardware on your kitchen cabinets is one of the easiest and most effective ways to do just that.
But before you start drilling holes or picking out knobs and pulls, knowing how to measure and install them correctly is key to a perfect fit and professional finish. In this guide, you’ll discover simple steps to measure your cabinets precisely and install hardware like a pro—even if you’ve never done it before.
Keep reading, and you’ll transform your kitchen with confidence and ease.
Tools And Materials Needed
Installing hardware on kitchen cabinets needs the right tools and materials. Proper preparation makes the job easier and ensures a neat finish. Knowing what to gather before starting saves time and frustration.
Essential Tools
Start with a tape measure to mark exact spots for hardware. A pencil helps to mark measurements clearly. A drill with drill bits fits screws quickly and precisely. A screwdriver, either manual or electric, tightens the screws securely. Use a level to keep handles straight and even. Clamps can hold cabinet doors steady during work. A ruler or a square ensures right angles for perfect alignment.
Choosing Cabinet Hardware
Select hardware that matches your kitchen style and cabinet type. Handles and knobs come in various sizes, shapes, and finishes. Consider durability and ease of use. Check if the hardware fits your cabinet doors or drawers. Measure the distance between screw holes for replacement hardware. Pick materials that resist moisture and grease in kitchens. Choose hardware that feels comfortable to grip and use daily.
:max_bytes(150000):strip_icc()/SPR-where-to-put-knobs-and-handles-on-kitchen-cabinets-6373984-hero-f2b94cb045354a5783a3d927f83b5d21.jpg)
Credit: www.thespruce.com
Measuring For Cabinet Hardware
Measuring for cabinet hardware is a key step for a neat kitchen look. Precise measuring helps the hardware fit perfectly. It also makes installation easier and faster. Taking your time to measure ensures handles and knobs line up well. This section covers how to find the center point and measure pulls and knobs accurately.
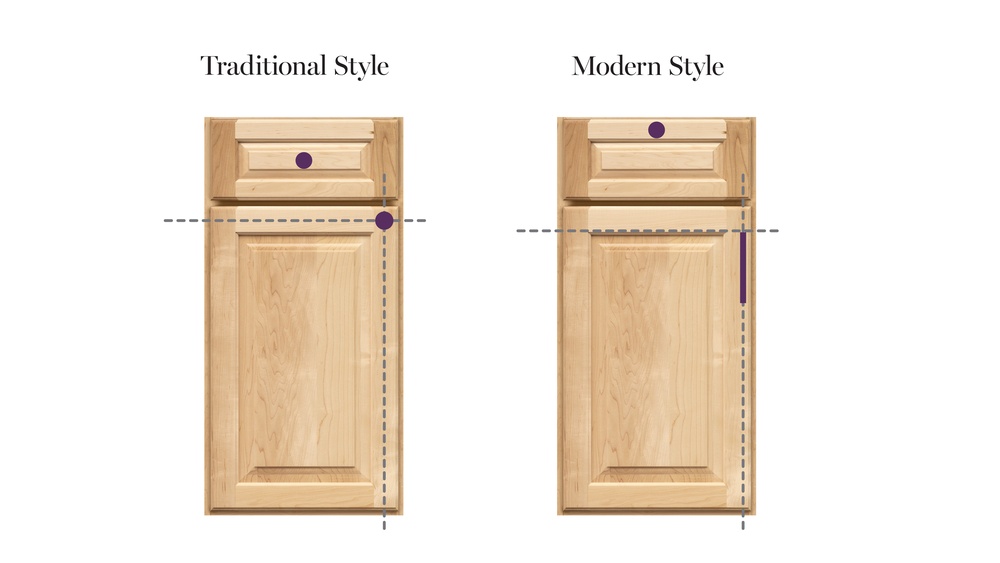
Finding The Center Point
Start by finding the exact center of the cabinet door or drawer front. Use a tape measure to measure the width and height. Divide these numbers by two to locate the midpoint. Mark the center lightly with a pencil. This mark guides where to place your hardware.
For tall cabinet doors, measure the height to find the vertical center. For wide drawers, focus on the horizontal center. Double-check your marks before drilling any holes. Correct center points ensure balanced and professional-looking hardware placement.
Measuring Drawer Pulls
Drawer pulls have two screw holes. Measure the distance between these holes carefully. This measurement is called the “center-to-center” or “CC” measurement. Use a ruler or tape measure for accuracy. Write down this number to match your hardware size.
Place the pull on the drawer front, aligning the holes with your marks. Make sure the pull sits straight and level. Accurate hole spacing prevents hardware from being crooked or loose. Repeat the process for each drawer to keep uniformity.
Measuring Door Knobs
Door knobs usually require only one hole. Find the center point on the door as your guide. Measure about 2 to 3 inches from the bottom edge for standard knob placement. Mark this spot clearly for drilling.
Confirm the mark is level with adjacent knobs. Use a level tool or measure from the top edge. Proper knob placement improves cabinet usability and appearance. Measure each door carefully to keep knobs consistent.
Marking Drill Holes
Marking drill holes is a key step in installing hardware on kitchen cabinets. Accurate marks ensure handles and knobs fit perfectly. Mistakes here cause misaligned hardware and extra work. Taking time to mark carefully saves effort later.
Use the right tools like a pencil and ruler. Mark on the cabinet surface where holes will go. Be clear and precise with each mark. The next steps focus on two important methods for marking drill holes.
Using A Template
Templates make marking drill holes simple and accurate. You can buy or create a template matching your hardware size. Place the template on the cabinet door or drawer front. Hold it steady to avoid slipping.
Mark through the template holes with a pencil. The marks will show where to drill. Templates help keep all hardware pieces aligned. This method reduces guesswork and speeds up the job.
Double-checking Measurements
Double-checking measurements stops errors before drilling. Measure twice with a tape or ruler. Compare marks with hardware instructions or your template. Check height, spacing, and distance from edges.
Have someone else verify your marks for a fresh view. Confirm all marks look even and balanced. Fix any mistakes before drilling holes. Careful checking protects your cabinets and saves time.
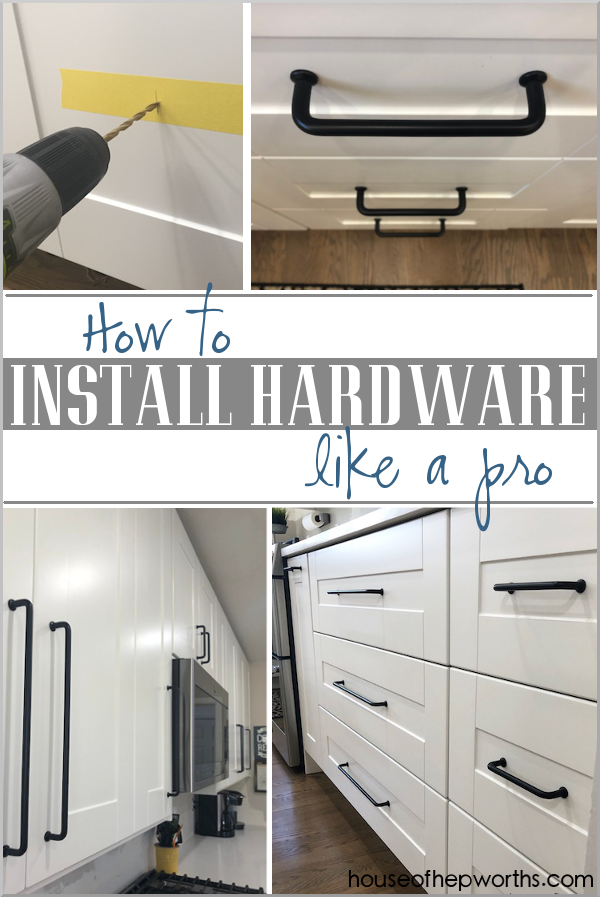
Credit: www.houseofhepworths.com
Drilling Holes Safely
Drilling holes safely is key to installing hardware on kitchen cabinets properly. It helps avoid damage to the wood and ensures the hardware fits well. Taking care while drilling also keeps the work neat and professional. Follow simple steps to protect your cabinets and get the best results.
Selecting The Right Drill Bit
Choose a drill bit that matches the screw size for the hardware. Use a bit designed for wood to make clean holes. Sharp bits reduce effort and prevent splintering around the hole. A bit that is too large will make the hole loose. Too small a bit can cause the wood to crack.
Preventing Wood Splitting
Drill slowly to avoid putting too much pressure on the wood. Stop once you break through the surface. Use a piece of scrap wood behind the cabinet to support the drill bit. This backing helps keep the wood from splitting. Pre-drilling pilot holes smaller than the screw size also protects the wood.
Installing Cabinet Hardware
Installing cabinet hardware is a key step in finishing your kitchen cabinets. It not only adds style but also makes cabinets easier to use. Proper installation ensures handles, pulls, knobs, and buttons stay secure and look great over time.
Careful measuring and steady hands help place hardware in the right spot. Follow each step to attach handles and knobs correctly. This process is simple with the right tools and clear instructions.
Attaching Handles And Pulls
Start by marking the exact points for screw holes. Use a ruler or measuring tape for accuracy. Drill small pilot holes to guide screws and prevent wood from splitting.
Place the handle or pull over the holes. Insert screws from the inside of the cabinet door or drawer. Tighten screws evenly to avoid crooked hardware. Check the handle feels sturdy and aligned before finishing.
Securing Knobs And Buttons
Mark the center of the cabinet door or drawer front. Drill a hole through the mark for the knob’s screw. Insert the screw through the back of the door.
Thread the knob onto the screw from the outside. Turn it until it fits snugly against the cabinet surface. Tighten the knob by hand or with a screwdriver carefully to avoid damage.
Test the knob for firm hold and smooth operation. Adjust if it feels loose or wobbly. Properly secured knobs add function and style to your kitchen cabinets.
Adjusting And Finishing Touches
Adjusting and finishing touches are key steps after installing cabinet hardware. These steps ensure that handles and knobs work smoothly and look great. Taking time to align and clean hardware gives your kitchen a neat, polished look. Small adjustments can make a big difference in both function and style.
Aligning Hardware Properly
Check if all handles and knobs sit straight and even. Use a level or ruler to help with alignment. Tighten screws carefully to avoid shifting the hardware. Adjust positions slightly until everything lines up well. Proper alignment prevents handles from feeling loose or catching on clothes. This step ensures your kitchen looks well-organized and professional.
Cleaning Up
Remove any dust, fingerprints, or smudges on the hardware. Use a soft cloth and gentle cleaner safe for your hardware finish. Clean cabinet surfaces around the hardware to remove dirt or debris. Keeping hardware spotless boosts the kitchen’s overall appeal. It also protects finishes from damage and keeps your cabinets looking new longer.
Tips For Common Challenges
Installing hardware on kitchen cabinets can be tricky. Many face common problems that slow down the process. Knowing how to handle these challenges saves time and avoids damage. Here are simple tips to deal with two frequent issues.
Dealing With Uneven Surfaces
Uneven cabinet surfaces cause hardware to sit crooked. This looks bad and can stop doors from closing well. Use thin shims behind handles or knobs to level them. Sand down rough spots gently before drilling holes. Check the cabinet surface with a level tool before starting. This ensures hardware fits flat and straight.
Fixing Misaligned Holes
Misaligned holes happen if measurements are off. Hardware won’t fit properly and looks sloppy. Fill wrong holes with wood filler and let it dry fully. Sand the area smooth before drilling new holes. Use a template or guide to mark spots accurately. Measure twice and drill once to avoid mistakes.

Credit: www.youtube.com
Frequently Asked Questions
How Do I Measure Cabinet Hardware Accurately?
Measure the cabinet door width and height first. Mark the center points for handle placement. Use a ruler or tape measure for precise hole spacing. Always double-check measurements before drilling to avoid mistakes.
What Tools Are Needed To Install Cabinet Hardware?
You will need a drill, drill bits, screwdriver, measuring tape, pencil, and level. These tools ensure accurate measurement, hole drilling, and secure hardware attachment. Using the right tools makes installation easier and precise.
Where Should Cabinet Handles Be Positioned?
Handles should be placed 2-3 inches from the cabinet edge or centered vertically. Consistency in placement across all cabinets improves aesthetics. Use a template or ruler to maintain uniform spacing and alignment.
How To Avoid Damaging Cabinets During Installation?
Use painter’s tape over drilling spots to prevent splintering. Drill slowly and steadily to avoid cracks. Always pre-drill pilot holes smaller than screw size. These precautions protect cabinet surfaces and ensure clean hardware installation.
Conclusion
Measuring and installing kitchen cabinet hardware is easier than it seems. Take your time to measure carefully and mark the spots clearly. Use the right tools to keep everything straight and secure. Small details make a big difference in the final look.
A good installation improves both style and function. With practice, this task becomes quick and satisfying. Enjoy your refreshed kitchen with hardware that fits perfectly and looks great.


