Are you looking to add eye hooks to your walls but don’t know where to start? Installing eye hooks is easier than you might think, and with the right steps, you can do it quickly and safely.
Whether you want to hang plants, pictures, or light fixtures, knowing how to install eye hooks correctly will save you time and frustration. Keep reading, and you’ll discover simple tips that make the job smooth and stress-free—so you can get your walls working for you in no time.
Choosing The Right Eye Hooks
Choosing the right eye hooks is key to a safe and strong installation. The right hook supports the weight and fits the wall type. This choice affects how well the hook holds over time. Knowing about different types, sizes, and materials helps pick the best eye hook for your project.
Types Of Eye Hooks
Eye hooks come in many shapes and uses. Some have a sharp screw end for wood walls. Others have a threaded end to fit into a wall anchor. Some eye hooks are closed loops, while others have a small opening for easy attachment. Choose the type based on your wall and what you want to hang.
Size And Weight Considerations
Eye hooks have size ratings based on how much weight they hold. Small hooks suit light items like picture frames. Larger hooks handle heavier objects like shelves or plants. Match the hook size to the weight of your item. Using a hook too small can cause it to bend or pull out.
Material And Finish Options
Eye hooks come in steel, brass, and stainless steel. Steel hooks are strong but can rust indoors. Stainless steel resists rust and suits moist areas. Brass hooks offer a decorative look but hold less weight. Finishes like zinc or chrome protect the metal and add shine. Pick a material and finish that fits your space and style.
Tools And Materials Needed
Before installing eye hooks in a wall, gather all the tools and materials needed. Having everything ready makes the job faster and easier. It also helps avoid mistakes during installation. Below is a list of what you need to get started.
Essential Tools
Start with a drill to make pilot holes for the eye hooks. Choose a drill bit slightly smaller than the hook’s shaft. A screwdriver helps tighten the hooks securely. Use a tape measure to mark the exact spot on the wall. A pencil is useful for marking these points clearly. A level ensures the hooks are straight and even. If the wall is drywall, wall anchors might be necessary to hold the hooks firmly. A pair of pliers can help twist the hooks if they are hard to turn by hand.
Safety Gear
Protect your eyes with safety goggles while drilling. Gloves protect your hands from sharp edges and splinters. Wear a dust mask if drilling creates dust or debris. Use ear protection if the drill is loud. Safety gear keeps you safe and comfortable during the task. Never skip wearing safety equipment to avoid injuries.
Preparing The Wall
Preparing the wall is the first important step before installing eye hooks. This step ensures your hooks are secure and safe to use. Proper preparation prevents damage to the wall and keeps your items stable. Follow these steps carefully to get the best results.
Locating Studs Or Anchors
Start by finding studs behind the wall. Studs are wooden beams that provide strong support. Use a stud finder tool to locate them easily. If no studs are available, choose wall anchors. Anchors help hold the hook firmly in drywall or plaster. This step is key for a secure fit.
Marking The Spot
After locating studs or anchors, mark the exact spot. Use a pencil for clear, light marks. Measure carefully to align the hooks properly. Double-check your marks before drilling or screwing. Accurate marking saves time and avoids mistakes.
Drilling Pilot Holes
Drilling pilot holes is a key step when installing eye hooks in a wall. These small holes guide the screw and prevent the wall from cracking. They make it easier to screw in the eye hook straight and secure. Taking time to drill pilot holes properly saves effort and avoids damage.
Choosing The Right Drill Bit
Pick a drill bit slightly smaller than the eye hook’s screw. This size allows the screw to grip tightly. Use a wood bit for wooden walls and a masonry bit for brick or concrete. The right bit ensures a clean hole and strong hold.
Drilling Techniques
Mark the spot with a pencil before drilling. Hold the drill steady and start at low speed. Drill straight into the wall at a right angle. Drill only as deep as the eye hook’s screw length. Remove the drill bit slowly to avoid splintering.
Installing The Eye Hooks
Installing eye hooks in a wall is a simple task that anyone can do. Eye hooks are useful for hanging items like plants, pictures, or lights. Proper installation ensures the hooks hold securely and last a long time.
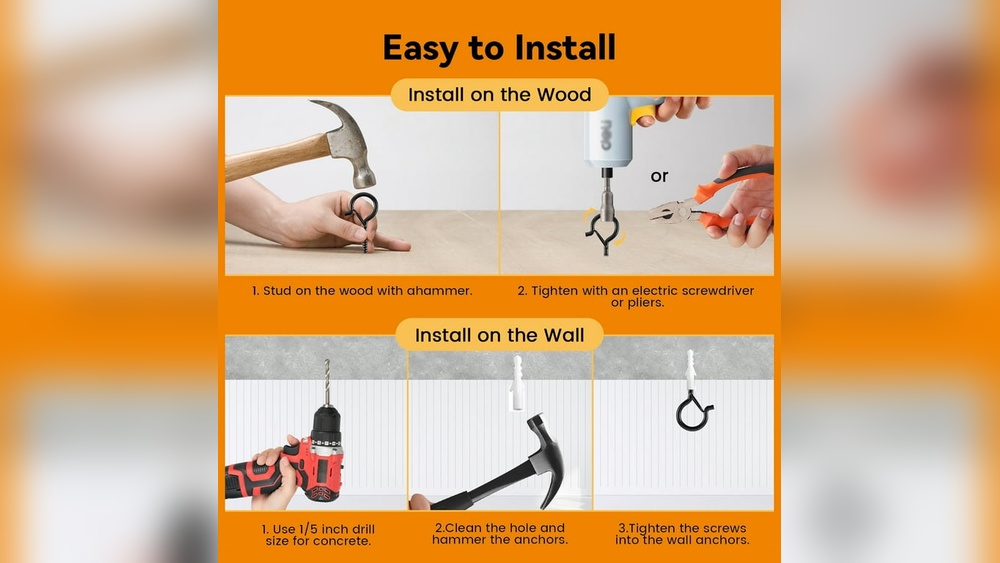
Before starting, choose the right size eye hook for your wall and item. Mark the spot where you want the hook. Use a drill or screwdriver to make a small pilot hole. This helps the eye hook go in easily and straight.
Hand-twisting Method
Hold the eye hook by its round loop. Place the tip into the pilot hole. Turn the hook slowly with your fingers. Keep twisting until the hook feels tight against the wall. Stop when it no longer turns easily. This method works well for soft walls like drywall or wood.
Using Pliers For Tightening
Sometimes hand twisting is not enough. Use pliers to get a firmer grip on the eye hook. Grip the loop with the pliers and turn the hook. Apply steady pressure to avoid bending the hook. Pliers help secure the hook deeply in harder surfaces. Check the hook is straight and tight after tightening.
Credit: www.velocitydiy.com
Testing Hook Stability
After installing eye hooks in a wall, checking their stability is crucial. This step ensures the hooks can hold weight safely. Poorly tested hooks may cause damage or accidents. Testing also helps find weak points early.
Use simple tests to confirm the hooks are secure. Focus on how much weight they can bear without moving or bending. Testing gives confidence in your installation.
Weight Testing Tips
Start with a light weight close to the hook’s limit. Hang it slowly and watch for any movement. If the hook shifts, it needs adjustment or reinstallation.
Increase the weight in small steps. Each time, check the hook and the wall for cracks or loosening. Stop immediately if you see any sign of failure.
Use objects with known weights like bags of sand or water bottles. This method helps measure exact load capacity safely.
Adjusting For Safety
If the hook feels loose, tighten it carefully. Use pliers or a screwdriver for a better grip. Avoid forcing the hook into the wall too hard.
Reinforce the area around the hook if needed. Use wall anchors or plugs for better support. This step prevents hooks from pulling out.
Retest the hook after adjustments. Confirm it holds the desired weight without moving. Safety is the top priority.
Tips For Different Wall Types
Installing eye hooks requires different methods for each wall type. Knowing the right approach helps secure the hook safely. Some walls need anchors, while others do not. Follow these tips for drywall, brick, and concrete walls.
Drywall Installation
Drywall is soft and needs support for heavy items. Use plastic or metal anchors with eye hooks. Drill a small hole first. Insert the anchor gently. Screw the eye hook into the anchor. This prevents damage and holds weight well.
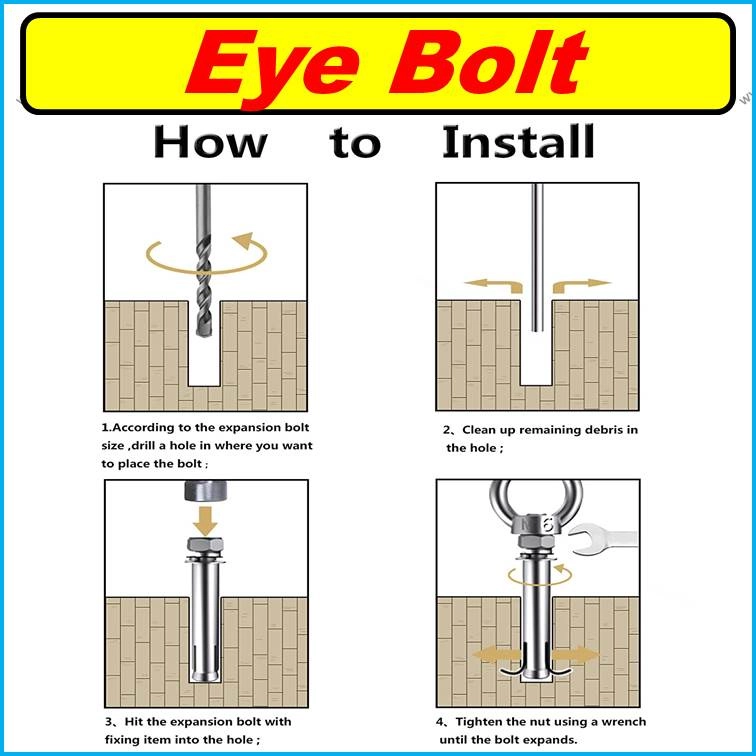
Brick And Masonry Walls
Brick walls are strong but need special tools. Use a masonry drill bit to make a hole. Insert a wall plug or anchor designed for brick. Screw the eye hook into the plug tightly. This keeps the hook secure and stable.
Concrete Surfaces
Concrete is hard and requires a strong drill bit. Drill a hole using a hammer drill for best results. Push in a concrete anchor or sleeve. Screw the eye hook into the anchor. This method ensures the hook stays fixed firmly.

Credit: www.reddit.com
Maintaining Eye Hooks
Maintaining eye hooks is important for safety and durability. Regular care keeps them strong and reliable. Neglect can cause damage or failure over time. Follow simple steps to keep your eye hooks in good shape.
Regular Inspections
Check eye hooks often for signs of wear or rust. Look for bends, cracks, or loose fittings. Tighten any screws or bolts if needed. Replace hooks that show damage immediately. Regular checks prevent accidents and prolong hook life.
Cleaning And Care
Clean eye hooks with a soft cloth to remove dust. Use mild soap and water for stubborn dirt. Avoid harsh chemicals that can weaken the metal. Dry hooks thoroughly after cleaning to stop rust. Apply a light oil layer for metal hooks to protect them.

Credit: www.youtube.com
Frequently Asked Questions
How Do I Install Eye Hooks In Drywall?
To install eye hooks in drywall, first drill a pilot hole. Insert a wall anchor if needed for support. Screw the eye hook firmly into the hole. Ensure it is secure before hanging any objects.
What Tools Are Needed To Install Eye Hooks?
You need a drill, a screwdriver, a pencil, and a measuring tape. Optionally, use wall anchors for extra support in drywall. These tools help ensure precise and secure eye hook installation.
Can Eye Hooks Hold Heavy Weights On Walls?
Eye hooks can hold heavy weights if installed properly. Use wall anchors or toggle bolts for drywall to increase load capacity. Always check the hook’s weight rating before hanging heavy items.
Should I Use Wall Anchors With Eye Hooks?
Use wall anchors when installing eye hooks in drywall or plaster. Anchors provide extra support and prevent the hook from pulling out. For studs or solid wood, anchors are usually unnecessary.
Conclusion
Installing eye hooks in your wall is easy with the right steps. Choose the correct spot and drill a small hole first. Then, screw the eye hook in by hand or with a tool. Make sure it feels tight and secure.
This simple process helps you hang items safely and neatly. Take your time and follow each step carefully. Your walls will hold hooks that last and work well. A little effort goes a long way. Ready to hang your pictures or plants?
You’ve got this!