Have you ever wished you could control a light from two different switches? Maybe a switch at the top and bottom of the stairs, or at both ends of a hallway?
Adding another switch to a light can make your daily routine easier and more convenient. It might sound tricky, but with the right steps, you can do it yourself without calling an electrician. In this guide, you’ll discover simple, clear instructions to help you add that extra switch quickly and safely.
Ready to take control of your lighting? Let’s get started!
Tools And Materials Needed
Adding another switch to a light requires the right tools and materials. Having these ready makes the work easier and safer. This section lists everything needed to complete the task efficiently.
Essential Tools
Start with a screwdriver set. Both flathead and Phillips screwdrivers are useful. A wire stripper helps remove insulation from wires cleanly. A voltage tester checks if wires carry current, ensuring safety. Needle-nose pliers assist in bending and holding wires. A drill might be needed to make holes for the new switch box. Measuring tape helps to measure wire length accurately. Electrical tape secures wire connections.
Required Materials
Get a new switch that matches the existing setup. Use electrical wire, usually 14 or 12 gauge, based on the circuit. A switch box holds the new switch safely inside the wall. Wire nuts connect wires securely without shorts. Wall plates cover the switch for a neat finish. Make sure all materials meet local electrical codes for safety.

Credit: www.youtube.com
Safety Tips Before Starting
Adding another switch to a light can improve your home’s lighting control. Safety must come first before starting any electrical work. Simple precautions reduce risks of shocks and accidents. Follow these key safety tips to protect yourself and your home.
Turn Off Power At The Circuit Breaker
Always switch off power at the main breaker box. Do not rely on the light switch alone. Use a voltage tester to confirm power is off. This prevents electric shocks while working.
Use Proper Tools And Equipment
Choose tools made for electrical work. Insulated screwdrivers and wire strippers protect against shocks. Avoid using damaged or worn tools. Good tools make the job safer and easier.
Wear Safety Gear
Wear rubber-soled shoes and safety glasses. Gloves help protect your hands from cuts and shocks. Safety gear adds a layer of protection during installation.
Understand Your Wiring
Know the wiring layout before starting. Label wires if needed to avoid confusion. Incorrect connections can cause short circuits or damage.
Work In A Dry Area
Never work on electrical wiring in wet or damp places. Moisture increases the risk of electric shock. Ensure your work area is dry and well-lit.
Have A Plan And Follow Instructions
Read instructions carefully before you begin. Plan your steps and double-check each connection. Patience and accuracy keep the project safe and successful.
Types Of Switches Explained
Choosing the right switch is important when adding another switch to a light. Switches come in different types. Each type has a specific use and wiring setup. Understanding these types helps you pick the best one for your project.
Here are the main types of switches used in home lighting. Each works differently and fits different control needs.
Single-pole Switch
The single-pole switch is the most common type. It controls a light from one location only. It has two terminals and a simple on/off function. This switch is easy to install and works well for basic lighting control.
Three-way Switch
A three-way switch allows control of one light from two places. It uses three terminals and special wiring. This switch is perfect for hallways or large rooms. It lets you turn the light on or off from different spots.
Four-way Switch
Four-way switches work with two three-way switches. They add a third or more control points to the light. Four-way switches have four terminals and complex wiring. Use them in big areas with multiple control locations.
Planning Your Wiring Layout
Planning your wiring layout is the first step to add another switch to a light. It helps you see where wires will run and how switches will connect. Good planning saves time and avoids mistakes during installation.
Knowing the wiring layout also ensures safety and proper function. It guides you in choosing the right materials and tools. Clear plans make the work easier and faster.
Understanding Existing Wiring
Start by examining the current wiring setup. Identify the type of wires used and their paths. Check how the light and switch are connected now. This helps to know where to add the new switch.
Choosing The Switch Type
Select the correct switch for your need. Common types are single-pole and three-way switches. A three-way switch lets you control the light from two places. Match the switch type with your wiring plan.
Mapping Wire Routes
Plan the path for new wires clearly. Avoid crossing electrical lines or obstacles. Keep wire routes short and direct. Mark the walls or ceiling where wires will go. This prevents confusion during installation.
Considering Power Source Location
Locate the power source for the switches. Check where the main power enters the circuit. Position new switches close to power or existing wiring. This reduces the need for extra wires.
Planning For Safety
Follow electrical codes and safety rules. Use proper insulation and wire gauges. Turn off power before starting any work. Double-check all connections before restoring power.
Turning Off The Power
Turning off the power is a key step before adding another switch to a light. It keeps you safe from electric shocks. It also prevents damage to your electrical system.
Always start by cutting the power supply to the light circuit. This simple action protects both you and your tools during the work.
Locate The Circuit Breaker
Find the main electrical panel in your home. Look for the breaker that controls the light you want to work on. It may be labeled for easy identification.
Switch Off The Correct Breaker
Flip the breaker switch to the OFF position. This stops electricity from flowing to the light and switches. Double-check to make sure it is off.
Test The Power Is Off
Use a voltage tester or a simple light bulb tester. Check the light switch or fixture to ensure no power is present. Never skip this safety test.

Credit: diy.stackexchange.com
Removing The Existing Switch
Removing the existing switch is the first step to adding another switch to your light. It helps create space and access for the new wiring. This process requires care and attention to avoid electrical hazards.
Always turn off the power at the circuit breaker before touching any wires. Double-check that the power is off using a voltage tester. Safety first.
Gather Necessary Tools
Prepare a screwdriver, voltage tester, wire cutters, and electrical tape. Having these ready makes the job smoother and safer.
Remove The Switch Cover Plate
Use a screwdriver to take off the cover plate. This exposes the switch and wiring inside the wall box.
Unscrew The Existing Switch
Loosen the screws holding the switch to the wall box. Pull the switch out gently to see the wires attached.
Identify And Label Wires
Look at the wires connected to the switch. Label each wire with tape and a marker. This helps when installing the new switch.
Disconnect The Wires
Use a screwdriver to loosen terminal screws. Carefully disconnect each wire from the switch. Avoid damaging the wire ends.
Wiring The New Switch
Wiring the new switch is an important step in adding another switch to control your light. It involves connecting wires correctly to ensure the switches work together. Take your time and follow each step carefully for safety and functionality.
Connecting The Traveler Wires
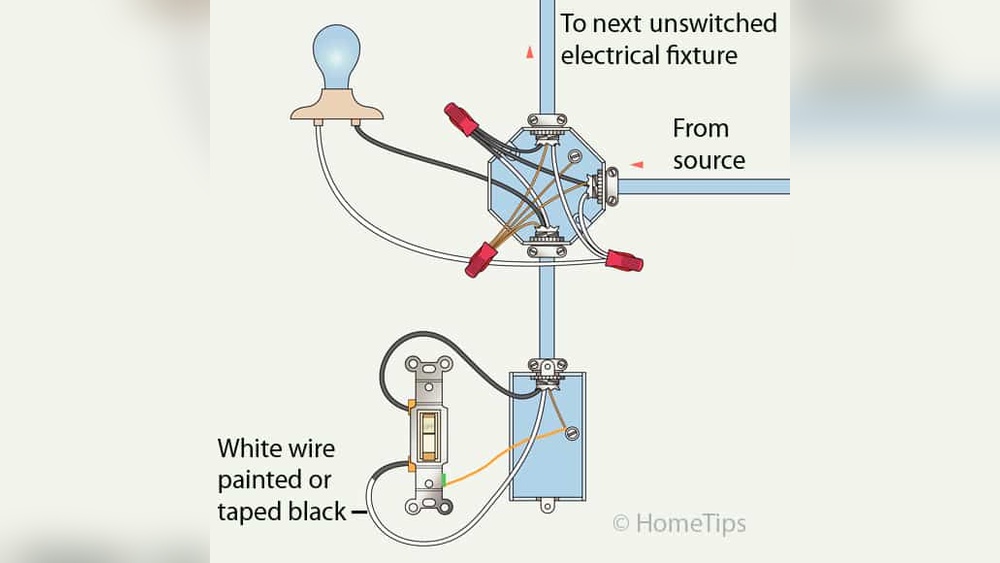
Traveler wires link the two switches. Identify the traveler wires in the existing switch box. Use a voltage tester to be sure the power is off. Connect the traveler wires from the new switch to the existing traveler wires. These wires usually have different colors, like red and black. Match them carefully to avoid mistakes.
Grounding The Switch
Grounding is essential for safety. Locate the ground wire, usually green or bare copper. Attach the ground wire to the green screw on the new switch. If there is a grounding wire in the box, connect it to the new switch’s ground wire. Secure all ground connections tightly to prevent shocks.
Securing Wire Connections
Proper connections keep your switch safe and working well. Use wire nuts to join wires firmly. Twist wires together before placing the wire nut. Tug gently on each wire to check the connection. Wrap electrical tape around the wire nuts for extra security. Push the wires neatly into the box to avoid damage.

Credit: www.youtube.com
Mounting The Switch And Testing
Mounting the switch and testing are the final steps in adding another switch to a light. These steps confirm the switch works correctly and is safely installed. Taking your time here ensures the setup will last and function well.
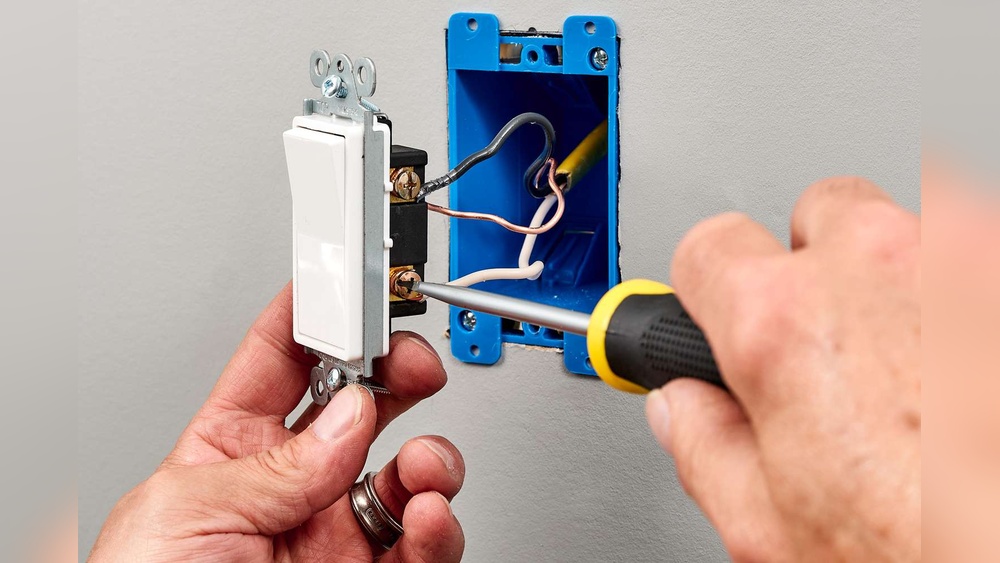
Mounting The Switch
Start by securing the switch into the electrical box. Align the switch with the box holes. Use screws to fasten the switch firmly. Avoid overtightening to prevent damage. Make sure wires are neatly inside the box. The switch should sit flush with the wall surface.
Connecting The Wall Plate
Place the wall plate over the mounted switch. Align it with the screw holes. Screw the plate gently to avoid cracking. The plate covers wires and gives a clean look. Check for any gaps or misalignment.
Testing The Switch
Turn the power back on at the circuit breaker. Flip the new switch to test the light. The light should turn on and off smoothly. Test both switches if adding a three-way setup. If the light does not respond, recheck connections.
Troubleshooting Common Issues
Adding another switch to a light can sometimes cause small problems. These issues often stop the light from working right. Understanding common problems helps fix them fast. This section will guide you through simple solutions to common troubles.
Check The Wiring Connections
Loose or wrong wires cause most switch problems. Make sure all wires are tight and in the right place. Look for any wires that may be swapped or disconnected. Use a tester to check if power flows through the wires correctly.
Inspect The Switch Type
Using the wrong switch type can stop the light from working. Two-way switches are needed to control one light from two spots. Confirm both switches are the correct kind for your setup. Replace any switch that looks different or damaged.
Test The Circuit Breaker
Sometimes the circuit breaker trips and cuts power to the light. Check your breaker box for any switches that are off or stuck in the middle. Reset the breaker if needed and test the light again. This step can solve many power issues quickly.
Look For Faulty Switches
Switches wear out over time and may fail. If the light flickers or does not turn on, try swapping the switch with a new one. A faulty switch can block the electric flow and cause problems. Replace any switch that feels loose or does not click properly.
Confirm Proper Grounding
Grounding keeps the system safe and working well. Check if the switches and wires are connected to a ground wire. Missing or loose grounding can cause shocks or switch failure. Add or fix grounding wires to improve safety and function.
Frequently Asked Questions
How Do I Wire A Second Switch To One Light?
To wire a second switch, use a three-way switch setup. Connect the traveler wires between switches and the common wire to the light. This allows control of the light from both switches safely and effectively.
What Tools Are Needed To Add Another Light Switch?
You need a voltage tester, wire stripper, screwdriver, electrical tape, and wire nuts. These tools help ensure a safe and proper installation when adding another switch.
Can I Add Another Switch Without Rewiring The Whole Circuit?
Yes, if you have accessible wiring, you can add a three-way switch. It requires connecting traveler wires between the existing and new switch, avoiding a full rewire.
Is It Safe To Install A Second Switch Myself?
It is safe if you follow electrical codes, turn off power, and use correct wiring. If unsure, consult a professional electrician to prevent hazards and ensure compliance.
Conclusion
Adding another switch to a light can make your home more convenient. It helps control lights from different spots easily. Remember to turn off power before starting any work. Follow safety steps carefully to avoid accidents. Using the right tools makes the job simpler and safer.
With patience, you can complete this task yourself. This small change can improve your daily routine a lot. Try it out and enjoy better lighting control today.