Are you wondering how to connect a plug to your light switch safely and easily? Whether you want to control a lamp with a switch or add convenience to your room, knowing the right steps can save you time and frustration.
In this guide, you’ll discover simple, clear instructions that anyone can follow—even if you’re not an expert. Keep reading to learn how to make this handy connection quickly and confidently, so your lighting works exactly the way you want.

Credit: www.youtube.com
Tools And Materials Needed
Connecting a plug to a light switch requires certain tools and materials. Having the right items helps make the process safe and smooth. This section lists the essential tools and explains common types of plugs and switches used in homes.
Essential Tools
Start with a flathead screwdriver to remove switch covers and secure wires. A Phillips screwdriver is often needed for screws on plugs and switches. Wire strippers help remove insulation without damaging wires. A voltage tester checks if wires carry current, ensuring safety before touching them. Needle-nose pliers allow easy bending and holding of wires. Electrical tape is useful for extra insulation. Lastly, a utility knife can cut cables carefully.
Types Of Plugs And Switches
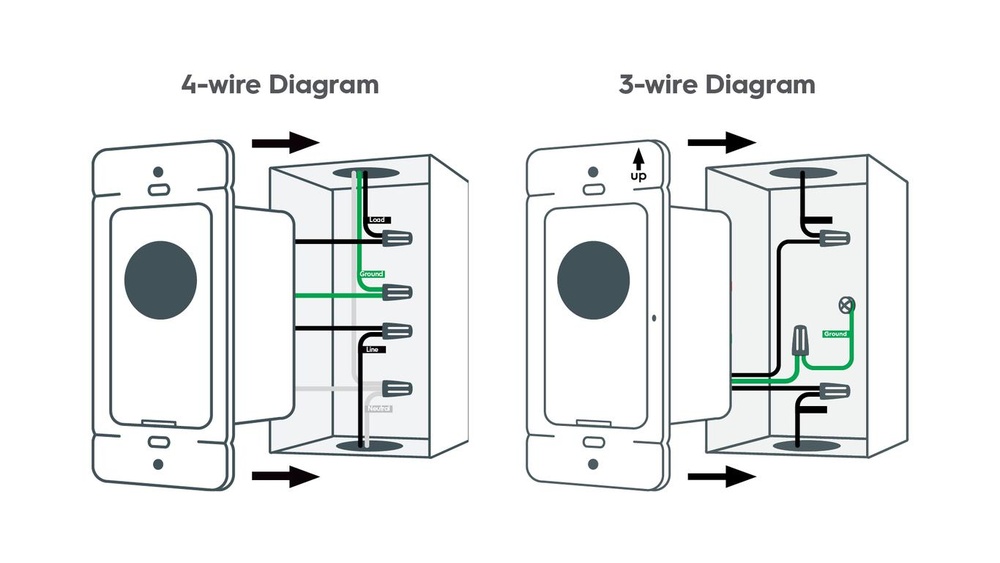
Standard plugs usually have two or three prongs. Two-prong plugs are common for simple devices. Three-prong plugs include a ground pin for safety. Light switches come in single-pole and three-way types. Single-pole switches control one light from one place. Three-way switches control a light from two places. Knowing these types helps pick the right parts for your project.
Safety Precautions
Safety is the top priority when connecting a plug to a light switch. Electricity can cause serious injury or damage. Taking the right safety steps protects you and your home.
Follow clear safety rules before starting any electrical work. Small actions can prevent big problems.
Power Off Procedures
Always switch off the power at the main circuit breaker. Confirm no electricity flows to the switch. Use a voltage tester to check wires before touching them. Never assume the power is off. Double-checking keeps you safe.
Using Protective Gear
Wear rubber-soled shoes to stop electric shocks. Use insulated gloves to handle wires safely. Protective goggles guard your eyes from sparks or debris. Avoid loose clothing that can catch on wires or tools. Safety gear reduces risks during the task.
Preparing The Wires
Preparing the wires is a key step in connecting a plug to a light switch. Proper wire preparation ensures safety and a solid connection. Take your time and handle each wire carefully.
Stripping Wire Insulation
Start by removing the outer insulation from the wires. Use a wire stripper tool to avoid damage. Strip about half an inch of insulation from each wire end. Expose the copper without cutting any strands. Clean, exposed wire helps create a strong electrical connection.
Identifying Wire Types
Next, identify each wire by color and type. Common wires include live (usually black or red), neutral (white), and ground (green or bare copper). Correct identification prevents wiring mistakes. Use a voltage tester to confirm live wires are off before working. Properly matched wires keep your setup safe and functional.

Credit: www.angi.com
Connecting The Plug To The Switch
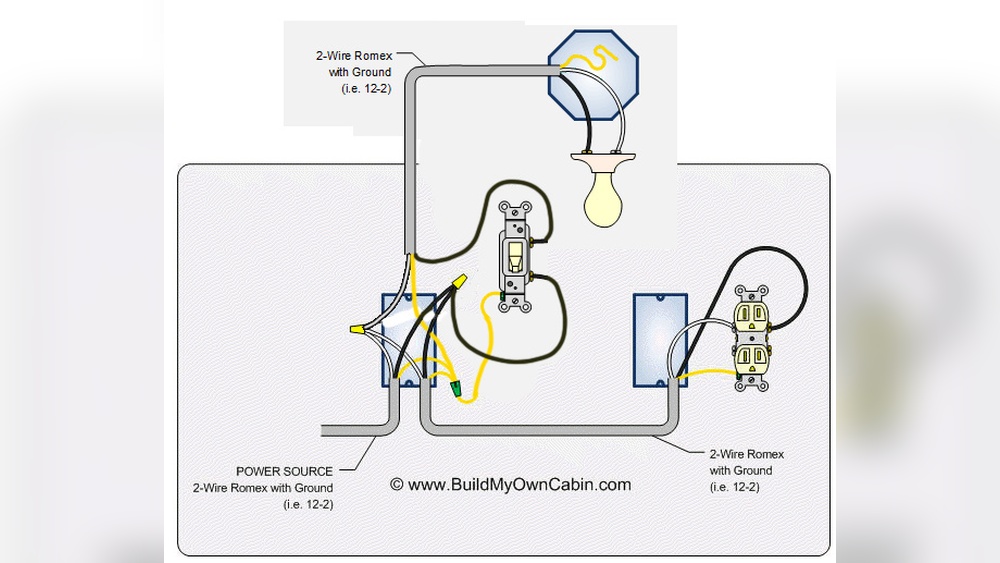
Connecting the plug to the light switch is a key step in setting up your electrical system. It allows you to control power flow to your devices safely. This process requires careful attention to each wire and its role. Follow these steps to ensure a secure connection.
Wiring The Live Wire
The live wire carries electricity from the power source. Identify the live wire, usually red or brown in color. Strip about half an inch of insulation from its end. Connect it firmly to the live terminal on the switch. Tighten the screw to hold the wire in place. A loose connection can cause sparks or failure.
Attaching The Neutral Wire
The neutral wire completes the circuit by carrying current back. It is typically blue or black. Strip the insulation carefully without damaging the wire strands. Attach it to the neutral terminal on the plug or switch. Make sure the connection is tight. This step ensures the device works correctly and safely.
Securing The Ground Wire
The ground wire protects against electric shocks. It is usually green or green with a yellow stripe. Strip the wire and connect it to the ground terminal. This terminal is often marked with a grounding symbol. Secure the wire firmly to avoid any loose connections. Grounding adds an important layer of safety to your setup.
Testing The Connection
Testing the connection after wiring a plug to a light switch is crucial. It ensures safety and proper operation. This step confirms that the electrical flow is correct and the switch controls the light as expected.
Skipping testing can cause electrical faults or damage. Take time to check everything carefully. Use the right tools and follow safety rules strictly.
Restoring Power Safely
First, turn the main power back on at the breaker box. Do this slowly to avoid sudden surges. Stand clear of the switch and wiring while turning on the power.
Check for any sparks or unusual sounds. If you see or hear anything strange, turn the power off immediately. Inspect the wiring again before trying to restore power.
Checking Switch Functionality
Flip the switch to see if the light turns on. Test it several times to confirm it works smoothly. The light should respond instantly each time.
Use a voltage tester to check the switch terminals. This confirms the electrical current flows only when the switch is on. No current should pass when the switch is off.
Ensure no wires are loose or touching each other. Loose connections can cause flickering or failure. Tighten any loose screws carefully.

Credit: www.youtube.com
Troubleshooting Common Issues
Troubleshooting common issues helps fix problems when connecting a plug to a light switch. Small mistakes can stop the switch from working properly. Checking these issues saves time and effort.
No Power At The Switch
First, check if power reaches the switch. Use a voltage tester to see if electricity flows. No power means a problem with the wiring or the circuit. Make sure the main power is on. Look for any tripped breakers or blown fuses.
Loose Connections
Loose wires cause poor contact and stop the switch from working. Turn off power before checking connections. Tighten any loose screws or wires. Make sure wires are properly connected to the terminals. Loose connections can cause sparks or damage.
Fuse Or Circuit Breaker Problems
A blown fuse or tripped breaker cuts off power to the switch. Check the fuse box or circuit breaker panel. Replace any blown fuses with the correct type. Reset any tripped breakers by switching them off and on. This often fixes the problem quickly.
Frequently Asked Questions
How Do I Connect A Plug To A Light Switch Safely?
To connect a plug to a light switch safely, turn off the power first. Use insulated tools and follow wiring diagrams. Connect wires securely to terminals. Double-check connections before restoring power. Always comply with local electrical codes to avoid hazards.
Can I Use A Regular Plug With A Light Switch?
Yes, you can use a regular plug with a light switch. Ensure the wiring matches the switch’s function. Use the correct plug type and rating. This setup allows control of the plugged device via the switch, adding convenience and safety.
What Tools Are Needed To Connect A Plug To A Switch?
You need a screwdriver, wire stripper, voltage tester, and electrical tape. These tools help strip wires, secure connections, and ensure safety. Always use insulated handles to prevent electric shock. Proper tools simplify installation and improve connection quality.
Is It Legal To Connect A Plug Directly To A Light Switch?
Legality depends on local electrical codes and regulations. In many areas, connecting a plug to a light switch is permitted if done correctly. Always consult local codes or a licensed electrician to ensure compliance and safety.
Conclusion
Connecting a plug to a light switch is simple and safe. Always turn off the power before starting work. Follow the steps carefully for the best results. Use the right tools and check your connections twice. A proper connection saves energy and avoids hazards.
Keep your home safe and your lights working well. Practice patience and double-check each step. Now, you can handle this small task with confidence.