Have you ever flipped a 3 way light switch only to find the light won’t turn on or off as expected? It’s frustrating, but the good news is you don’t need to call an electrician just yet.
Fixing a 3 way light switch is easier than you think, and with a few simple steps, you can get your lights working perfectly again. In this guide, you’ll learn exactly what to look for and how to make the repair yourself—saving time, money, and stress.
Ready to take control of your lighting? Let’s dive in.
Tools And Materials Needed
Fixing a 3 way light switch requires the right tools and materials. Having these ready saves time and keeps the job safe. Using proper tools helps avoid damage and errors. Below is a list of what you need before starting.
Essential Tools For The Job
A flathead screwdriver and a Phillips screwdriver are necessary. They help remove and tighten screws on the switch. A voltage tester checks if power is off. Wire strippers remove insulation without cutting wires. Needle-nose pliers bend and hold wires easily. Electrical tape insulates wire connections safely.
Materials Required
New 3 way switches match your existing ones. Use wire nuts to connect wires securely. Electrical wires may be needed if old ones are damaged. A switch box cover plate finishes the job neatly. Always choose materials rated for your home’s electrical system.
Safety Gear To Use
Safety glasses protect your eyes from debris. Insulated gloves reduce the risk of electric shock. A flashlight helps when working in dim areas. Wear closed-toe shoes for added protection. Always turn off power at the breaker before starting.
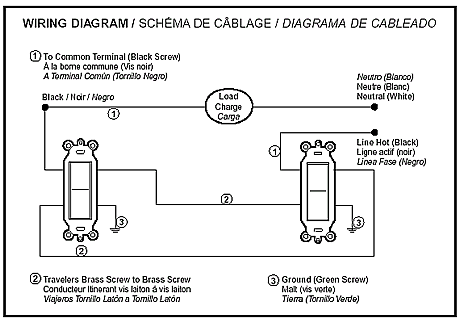
How A 3 Way Switch Works
A 3 way switch allows control of one light from two different locations. This is common in hallways, staircases, and large rooms. Understanding how a 3 way switch works makes fixing it easier.
Unlike a regular switch, a 3 way switch has three terminals. It does not have an on or off position like a normal switch. Instead, it changes the path of electricity between two wires.
Basic Components Of A 3 Way Switch
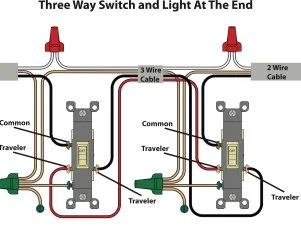
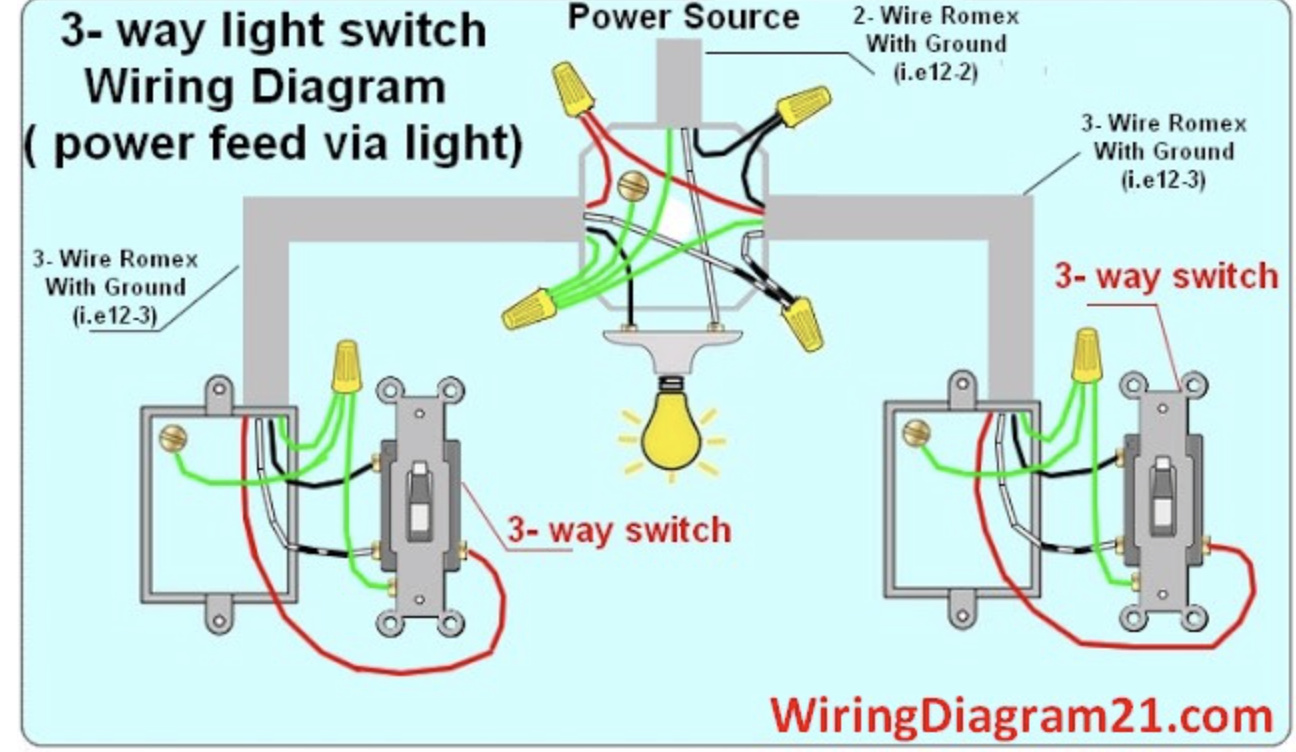
A 3 way switch has three main terminals: one common and two travelers. The common terminal connects to either the power source or the light fixture. The traveler terminals connect to another switch using traveler wires.
How Electricity Flows Through The Switch
Electricity flows through the common terminal. It then travels through one of the traveler wires. The switch flips the connection between the two traveler wires. This controls which path the current takes.
Controlling One Light From Two Places
Each switch can change the path of electricity. This allows the light to turn on or off from either location. Both switches work together to open or close the circuit.
Why 3 Way Switches Can Be Tricky
The traveler wires switch roles depending on switch position. This makes wiring and troubleshooting more complex. Knowing the role of each wire helps fix problems faster.
Safety Precautions
Working with electrical switches can be risky. Safety comes first. Taking the right precautions protects you from shocks and injuries. Before fixing a 3 way light switch, prepare carefully. Follow clear steps to stay safe.
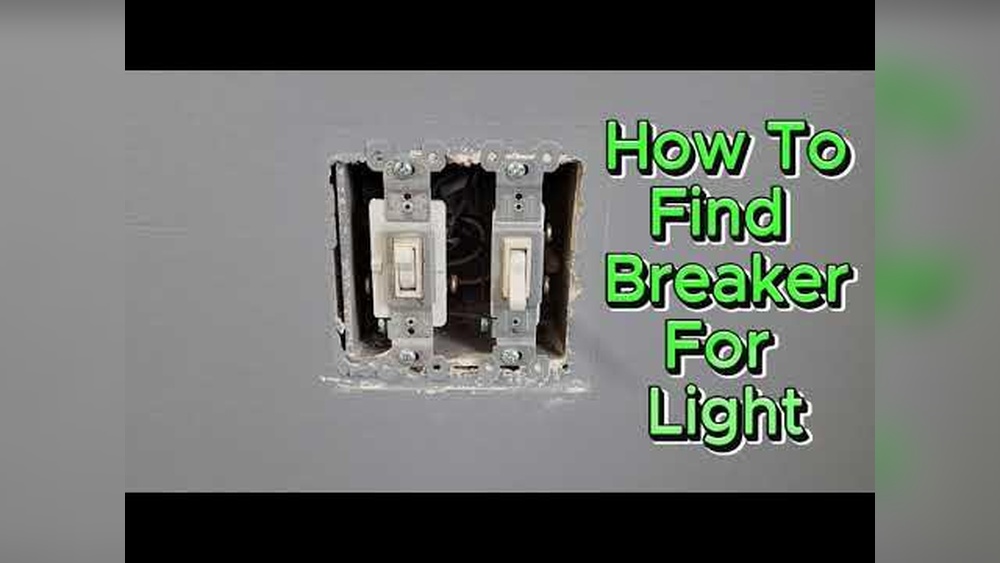
Turn Off Power At The Circuit Breaker
Always switch off the power from the main breaker panel. Do not rely on the wall switch alone. Use a circuit tester to confirm no electricity flows to the switch. This step prevents electric shock.
Use Insulated Tools
Choose tools with insulated handles. These tools reduce the risk of electric shock. Avoid metal or damaged tools. Keep your hands dry during the repair.
Wear Safety Gear
Wear rubber-soled shoes and safety glasses. Rubber shoes help avoid grounding yourself. Safety glasses protect your eyes from sparks or debris.
Check For Damaged Wires
Inspect all wires before touching them. Look for cracks, burns, or frays. Replace any damaged wires to prevent hazards.
Work In A Dry Environment
Do not work in wet or damp areas. Water increases the risk of electric shock. Keep your workspace dry and well-lit.
Follow Local Electrical Codes
Know the basic rules in your area. Use the correct wire types and sizes. Proper grounding is essential for safety. Follow these codes to avoid dangers.
Credit: www.naturalhandyman.com
Identifying The Problem
Fixing a 3 way light switch starts by finding the problem. This type of switch controls one light from two places. Problems often happen because of switches, wiring, or the circuit. Knowing how to identify the issue saves time and effort. It helps you fix the switch safely and correctly.
Checking The Switches
Begin by looking at both switches. Turn off the power first. Remove the switch covers and check for damage. Loose or broken switches cause many problems. Move the switch lever a few times to see if it feels loose or stuck. Replace any switch that looks worn or broken.
Inspecting The Wiring
Next, check the wiring connected to the switches. Wires should be tight and not frayed. Look for any signs of burning or damage on the wires. Make sure the wires are connected to the right terminals. Incorrect wiring often causes the light not to work properly.
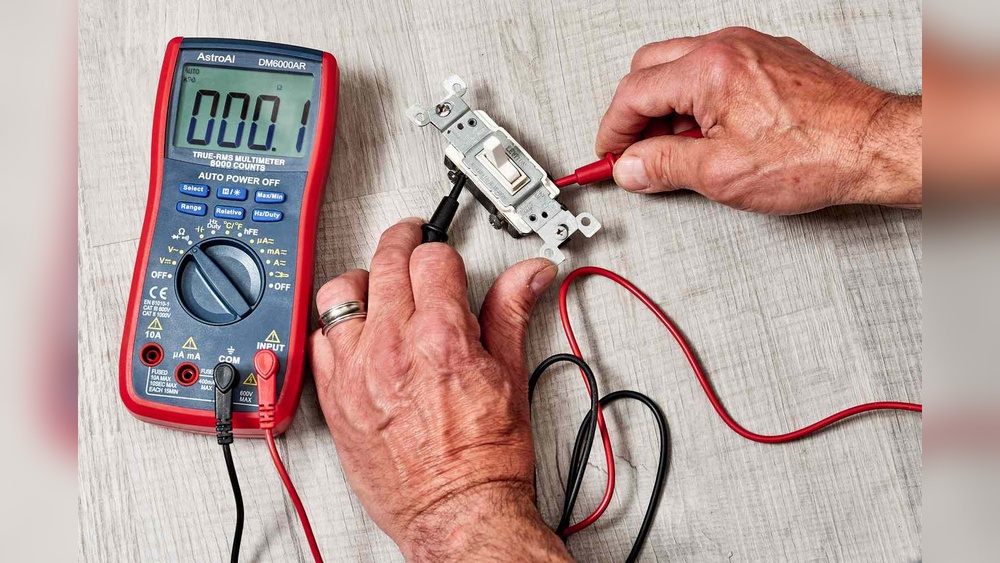
Testing The Circuit
Use a voltage tester to check the circuit. Test the power coming to each switch. If there is no power, the problem is in the circuit or breaker. If power is present, the switches or wiring may be faulty. Testing the circuit helps narrow down the cause quickly.
Step-by-step Repair Process
Fixing a 3 way light switch is simple with clear steps. Follow each carefully to avoid mistakes and stay safe. This guide helps you understand the process from start to finish. Read slowly and take your time with each step.
Turning Off Power
Start by switching off power at the main breaker. This stops electricity flow to the switch. Use a voltage tester to check if power is off. Safety first. Never skip this step.
Removing The Switch Covers
Use a screwdriver to remove the switch plate covers. Keep screws safe for later use. Gently pull the cover away from the wall. Be careful not to damage the wall or wires.
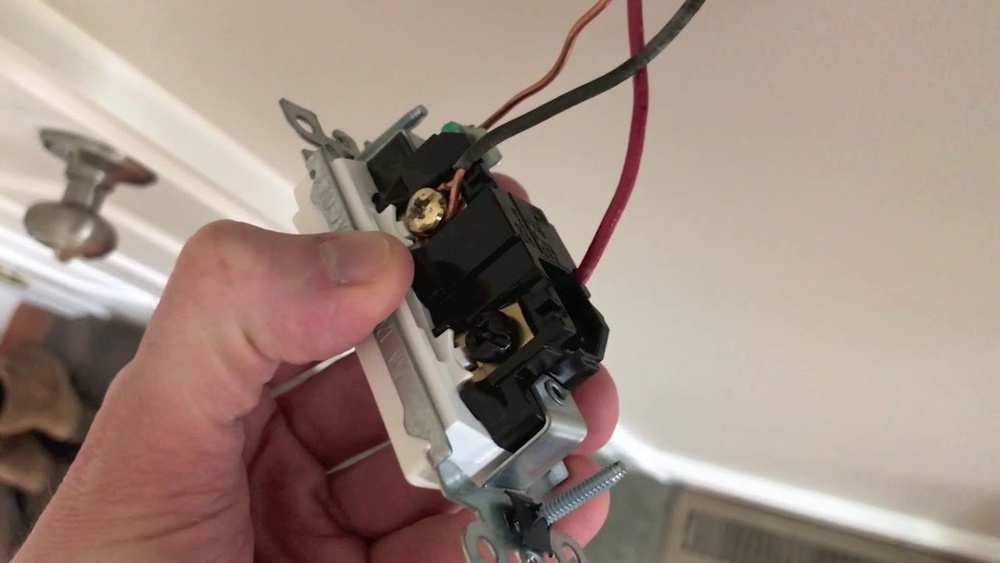
Disconnecting The Switches
Unscrew the switches from the electrical box. Slowly pull the switch out to see the wires. Note how wires connect to the switch terminals. Take a photo for reference if needed. Then, disconnect the wires carefully.
Replacing Or Repairing The Switch
Check the switch for damage or wear. Replace the switch if it looks broken. Use the same type of switch for replacement. Repair only if you know how. Always use a new switch to avoid problems.
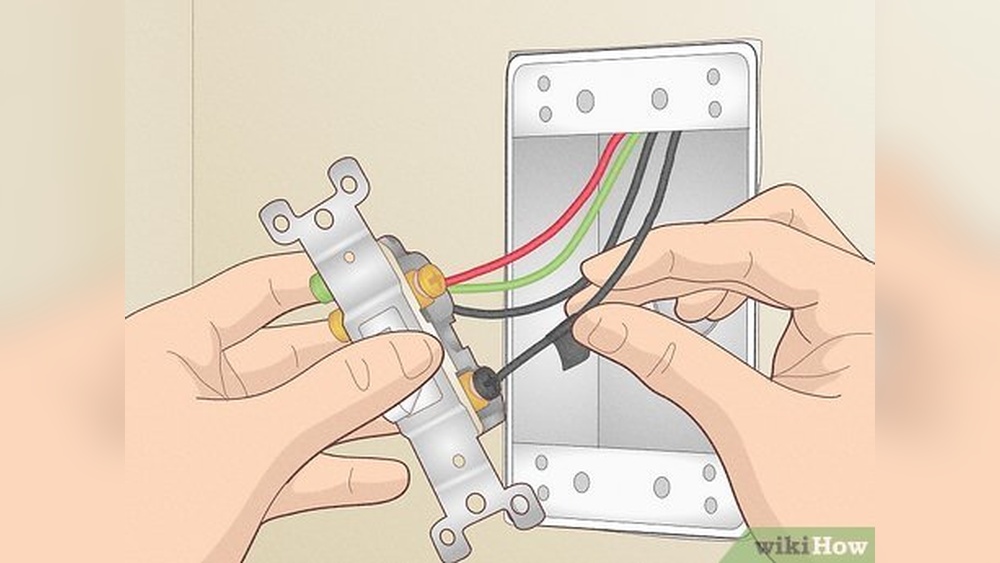
Reconnecting The Wiring
Attach wires to the new or repaired switch terminals. Match wire colors to the correct terminals. Tighten screws to hold wires firmly. Double-check all connections before moving forward. Loose wires cause switch failure.
Securing The Switches And Covers
Push the switch back into the electrical box. Screw it tightly but do not over-tighten. Place the switch cover over the switch. Screw the cover back on securely. Turn power back on and test the switch.
Testing The Repair
Testing the repair of a 3 way light switch is important to ensure it works properly. This step confirms that the wiring and connections are correct. It also helps catch any mistakes before finishing the job. Follow the steps below to test your repair safely and effectively.
Turn The Power Back On
Start by switching the power back on at the circuit breaker. Make sure the area is safe and dry. Never touch wires or switches with wet hands. Safety first.
Test Each Switch Position
Flip the first switch on and off. Watch the light carefully. Then do the same with the second switch. The light should turn on and off from both switches.
Check For Flickering Or Delays
Look closely for flickering or delays when switching. Flickering means a loose connection. Delays show wiring issues. Fix these problems before finalizing the repair.
Use A Voltage Tester
Use a voltage tester to check each terminal. This tool confirms power flow. It helps find hidden wiring errors. Test the switches and light fixture terminals.
Observe The Light’s Behavior Over Time
Turn the switches on and off several times. Watch for consistent light behavior. The light should respond instantly and reliably. Inconsistent response means more work is needed.
Common Mistakes To Avoid
Fixing a 3 way light switch can be tricky. Many people make common mistakes that cause frustration and wasted time. Avoiding these errors helps ensure a smooth repair process. Understanding what to watch out for saves effort and prevents damage.
Incorrect Wiring Connections
One of the biggest mistakes is mixing up the wires. The traveler wires must connect to the right terminals. Confusing the common and traveler screws causes the switch to fail. Use a tester to identify wires before connecting.
Not Turning Off Power
Working on live wires is dangerous. Many skip turning off the circuit breaker first. Always cut power at the breaker box. Test with a voltage detector to confirm wires are safe to touch.
Ignoring Wire Labels
Labels on wires help keep track of connections. Removing or ignoring these labels causes confusion. Mark wires before disconnecting. This simple step helps match wires correctly later.
Using The Wrong Switch Type
Using a standard single-pole switch instead of a 3 way switch is a common error. They look similar but work differently. Always buy a switch labeled for 3 way setups to avoid malfunction.
Failing To Tighten Screws Properly
Loose screws create poor electrical contact. This causes flickering or no light at all. Tighten all terminal screws firmly but avoid over-tightening to prevent damage.
Overlooking Ground Wire Connection
Some forget to connect the ground wire. This is a safety risk. Always connect the ground wire to the switch’s green screw or grounding system.
Credit: www.hgtv.com
When To Call A Professional
Fixing a 3 way light switch can sometimes be simple. Other times, it requires expert help. Knowing when to call a professional is important for safety and success.
Electrical work can be risky without the right tools and knowledge. A small mistake can cause shocks or fires. Professionals have training to handle complex wiring safely.
Signs Of Complex Wiring Issues
Some problems are too hard for beginners. If wires look tangled or damaged, call an electrician. Complex wiring can cause shorts or power loss.
Repeated Switch Failures
If the switch breaks often or does not work well, a pro can find the root cause. Replacing the switch may not fix the real issue.
Inconsistent Light Behavior
Lights flicker or turn on and off randomly? This may mean wiring problems inside walls. Only a professional should check this.
No Power Or Sparks
No power at the switch or sparks when flipping the switch are serious signs. Stop work immediately and contact an electrician.
Local Building Code Requirements
Some areas require licensed electricians for electrical repairs. Check local laws before starting any work.
Credit: community.inovelli.com
Frequently Asked Questions
How Do You Identify A 3 Way Light Switch?
A 3 way switch has three terminal screws and no ON/OFF markings. It controls one light from two locations. It works with another 3 way switch connected by traveler wires.
What Tools Are Needed To Fix A 3 Way Switch?
You need a voltage tester, screwdriver, wire stripper, and electrical tape. These tools help safely identify wires and replace or tighten switch connections.
Why Does My 3 Way Switch Click But Not Work?
A clicking sound means the switch mechanism works, but wiring may be loose or damaged. Check connections and ensure traveler wires are properly attached.
Can I Fix A 3 Way Switch Without Turning Off Power?
No. Always turn off the circuit breaker before working on electrical switches. This prevents shocks and ensures safe repair.
Conclusion
Fixing a 3 way light switch can save time and money. Follow the steps carefully to avoid mistakes. Always turn off power before starting any work. Double-check connections for safety and proper function. Taking your time helps you fix the switch right.
With patience, you can make your lights work smoothly. This simple fix improves your home lighting easily. Give it a try and feel confident in your skills.