Have you ever wondered if your light switch is working properly, but don’t know how to check it? Testing a light switch with a multimeter is simpler than you might think.
With just a few easy steps, you can find out if your switch is faulty or ready to use. By learning this quick skill, you’ll save time, avoid unnecessary repairs, and feel confident handling basic electrical tasks. Keep reading, and you’ll discover exactly how to test your light switch safely and accurately.
Tools Needed
Testing a light switch with a multimeter requires the right tools. Having the proper equipment makes the process safe and accurate. This section covers the essential tools you need before starting.
Choosing The Right Multimeter
Select a multimeter that measures voltage, resistance, and continuity. A digital multimeter is easier to read and more precise. Look for one with clear markings and a backlight for low light conditions. Ensure it can measure AC voltage since household wiring uses AC power. A compact and durable model suits most home tasks.
Safety Gear And Precautions
Wear insulated gloves to protect against electric shock. Use safety glasses to guard your eyes from sparks or debris. Make sure the switch and wiring are not live before testing. Turn off the power at the circuit breaker panel. Work in a dry area to avoid slipping or electric hazards. Follow safety rules strictly to prevent accidents.
Preparing The Light Switch
Preparing the light switch is the first step before testing it with a multimeter. Safety and proper access are essential. Follow simple steps to get ready without risks.
Turning off power and removing the switch cover allows safe and clear testing. These steps help you avoid electric shock and see the wires clearly.
Turning Off Power
Always turn off the power before touching the switch. Go to your home’s circuit breaker panel. Find the breaker that controls the light switch. Flip the switch to the off position. Use a non-contact voltage tester to confirm no power flows to the switch. This step protects you from electric shock.
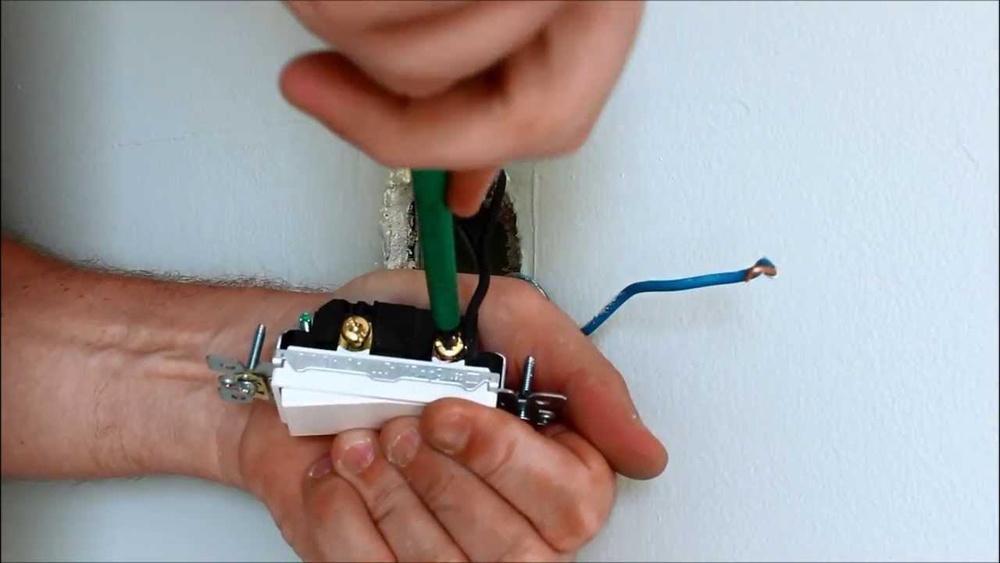
Removing The Switch Cover
Use a screwdriver to remove the screws holding the switch cover. Gently pull off the cover plate to expose the switch and wires. Check for any visible damage or loose wires. Keep the screws safe for reinstallation. Now, the switch is ready for testing with your multimeter.
Setting Up The Multimeter
Setting up the multimeter correctly is the first step to test a light switch. This ensures accurate and safe readings. A well-prepared multimeter helps you find electrical issues quickly. Understanding the setup process is simple and important.
Selecting The Correct Mode
Turn the dial on your multimeter to the right mode. For testing a light switch, choose the continuity or resistance mode. Continuity mode checks if the circuit is complete. Resistance mode measures how much the switch resists electrical flow. Picking the correct mode gives clear results.
Calibrating The Device
Calibrate your multimeter before testing. Touch the two probe tips together. The device should read zero or beep in continuity mode. If not, adjust the dial or use the calibration button. Calibration removes errors from the readings. This step makes your test reliable and safe.
Testing Procedures
Testing a light switch with a multimeter requires careful steps. These steps help find if the switch works or has a fault. Following the right procedures ensures safety and accuracy. Below are the key testing methods to check your light switch.
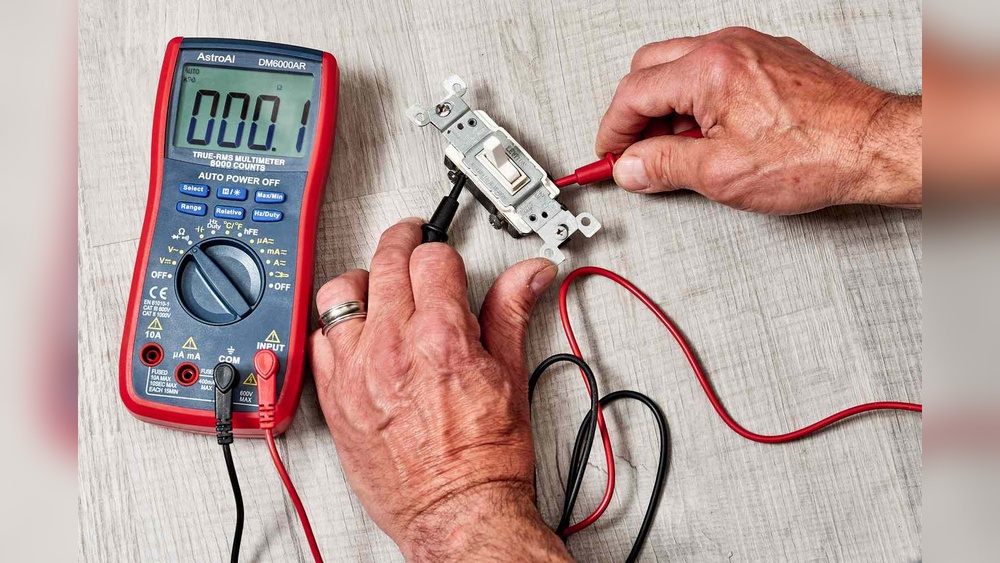
Checking For Continuity
Continuity test shows if the switch allows electricity to flow. Set your multimeter to the continuity mode. Touch the probes to the switch terminals. When the switch is ON, the multimeter should beep. No beep means no connection inside the switch. Turn the switch OFF and test again. This helps confirm the switch opens and closes the circuit.
Measuring Voltage
Voltage test measures the power reaching the switch. Set the multimeter to AC voltage mode. Carefully place the probes on the input terminals. The reading shows if power is present at the switch. A low or no voltage reading could mean a wiring issue. Always keep hands away from live wires while testing.
Testing Resistance
Resistance test checks the switch’s internal electrical resistance. Set the multimeter to the ohms (Ω) setting. Touch the probes to the switch terminals with the switch OFF. A very high resistance means the switch is open. When ON, resistance should be near zero. This test helps find broken or damaged contacts inside the switch.
Interpreting Results
Interpreting the results of a multimeter test on a light switch is crucial. It helps you know if the switch works or if it has a problem. Understanding the readings tells you what to do next. The process is simple but important for safety and function.
Identifying A Faulty Switch
Start by checking the multimeter reading in the ON position. A good switch shows continuity, meaning the meter beeps or shows a low resistance. No beep or a very high resistance means the switch might be faulty. Test again in the OFF position. The meter should show no continuity, meaning no beep or infinite resistance. If the switch shows continuity in the OFF state, it is likely broken.
When To Replace The Switch
Replace the switch if it fails the continuity test in either position. Also, if the switch feels loose or does not click properly, consider replacing it. Old switches often wear out and cause flickering or no power. Buying a new switch is inexpensive and improves safety. Always turn off power before replacing a switch to avoid shocks.
:max_bytes(150000):strip_icc()/testing-single-pole-switches-1152811-03-8b89394a236d499ebee520df31a0ce27.jpg)
Credit: www.thespruce.com
Common Issues And Fixes
Testing a light switch with a multimeter can reveal common problems. These issues often stop the switch from working well. Knowing these problems helps you fix the switch quickly. Below are two frequent issues and how to solve them.
Loose Connections
Loose connections cause flickering lights or no power. Wires may become loose over time. Use a screwdriver to tighten the screws on the switch terminals. Check if the wires are firmly attached. A secure connection allows electricity to flow properly. Retest the switch with the multimeter after tightening.
Corroded Contacts
Corrosion builds up on the switch contacts. It stops the electric current from passing through. Look for green or white powder on the metal parts. Clean the contacts gently with fine sandpaper or a small brush. Be careful not to damage the switch. After cleaning, test the switch again with the multimeter.
Safety Tips
Testing a light switch with a multimeter requires care and attention. Safety should be the top priority before starting any electrical work. Following simple safety tips can prevent accidents and injuries. These tips help you stay safe while handling electrical tools and equipment.
Avoiding Electrical Shocks
Turn off the power at the circuit breaker before testing the switch. Double-check that the power is off by using a non-contact voltage tester. Never touch exposed wires or terminals with your bare hands. Wear insulated gloves for extra protection against shocks. Keep your hands dry and avoid standing on wet surfaces. Work in a well-lit area to see clearly and avoid mistakes.
Handling Tools Properly
Use a multimeter that is rated for the voltage you are testing. Hold the multimeter probes by the insulated handles only. Do not use damaged or worn-out tools, as they can cause accidents. Keep your tools organized and within reach to avoid unnecessary movements. Store your multimeter safely after use to prevent damage. Always read and follow the multimeter user manual for safe operation.

Credit: www.youtube.com

Credit: www.youtube.com
Frequently Asked Questions
How Do You Check A Light Switch With A Multimeter?
Set the multimeter to continuity mode. Remove the switch cover and test terminals. A beep indicates the switch works properly. No beep means the switch is faulty.
What Multimeter Setting Tests A Light Switch?
Use the continuity or resistance setting on your multimeter. Continuity mode beeps when the circuit is complete. Resistance mode shows near zero ohms for a working switch.
Can You Test A Light Switch Without Removing It?
No, it’s best to remove the switch cover. This exposes terminals for accurate testing. Testing without access may give false or incomplete results.
What Safety Precautions Are Needed When Testing Switches?
Always turn off power at the breaker before testing. Use insulated tools and avoid wet conditions. Verify power is off with a non-contact tester.
Conclusion
Testing a light switch with a multimeter is simple and safe. Follow the steps carefully to check for power and continuity. This helps find problems before calling an electrician. Always turn off the power before starting any test. With practice, you can spot faulty switches quickly.
Stay patient and focused during the process. This skill saves time and money on repairs. Keep your multimeter handy for future electrical checks. Now, you can test light switches with confidence and ease.