
Have you ever needed to rekey your Kwikset deadbolt but didn’t know where to start? Changing your lock’s key can save you money and give you peace of mind when moving into a new home or after losing a key.
In this guide, you’ll learn simple, step-by-step instructions to rekey your Kwikset deadbolt quickly and easily. By the end, you’ll feel confident handling your own lock without calling a locksmith. Ready to take control of your home security? Let’s get started.
Credit: www.kwikset.com
Choosing The Right Key
Choosing the right key for your Kwikset deadbolt is important for security and convenience. The key must fit perfectly to work smoothly. Using the wrong key can cause damage or make the lock hard to open. Knowing the types of keys and how to match them to your lock model helps you select the correct key easily.
Types Of Kwikset Deadbolt Keys
Kwikset deadbolts use different key types. The most common is the standard Kwikset key. It has a unique shape with grooves on the edges. Some Kwikset locks use SmartKey technology keys. These keys have a special design that lets you rekey the lock yourself. Another key type is the Kwikset Titan key, which is stronger and made for extra security.
Matching Keys To Your Lock Model
Each Kwikset lock model needs a specific key type. Check your lock model number before choosing a key. Standard Kwikset keys fit most common deadbolts. SmartKey locks need SmartKey keys only. Titan locks require Titan keys. Using the right key model ensures smooth locking and unlocking. Always match the key type with your lock model for best results.
Gathering Necessary Tools
Gathering the right tools is the first step to key a Kwikset deadbolt successfully. Using proper tools makes the job easier and prevents damage. Prepare everything before you begin to save time and effort.
Some tools are essential for the keying process. Others are optional but help improve your work speed and accuracy.
Essential Tools For Keying
A key gauge or key decoder is crucial. It helps you read the lock’s pin depths accurately. A Kwikset key blank fits the lock and is needed to cut a new key.
A small screwdriver or tension wrench helps you open the lock cylinder. Needle-nose pliers assist in handling tiny parts inside the lock. A pinning kit with different pins lets you customize the lock pins.
Optional Tools For Efficiency
A pinning tray keeps pins organized and stops them from rolling away. A magnifying glass helps you see small parts clearly. A key cutting machine speeds up making new keys but is not required.
Using these tools can make the process smoother and reduce mistakes. Choose what fits your budget and skill level.
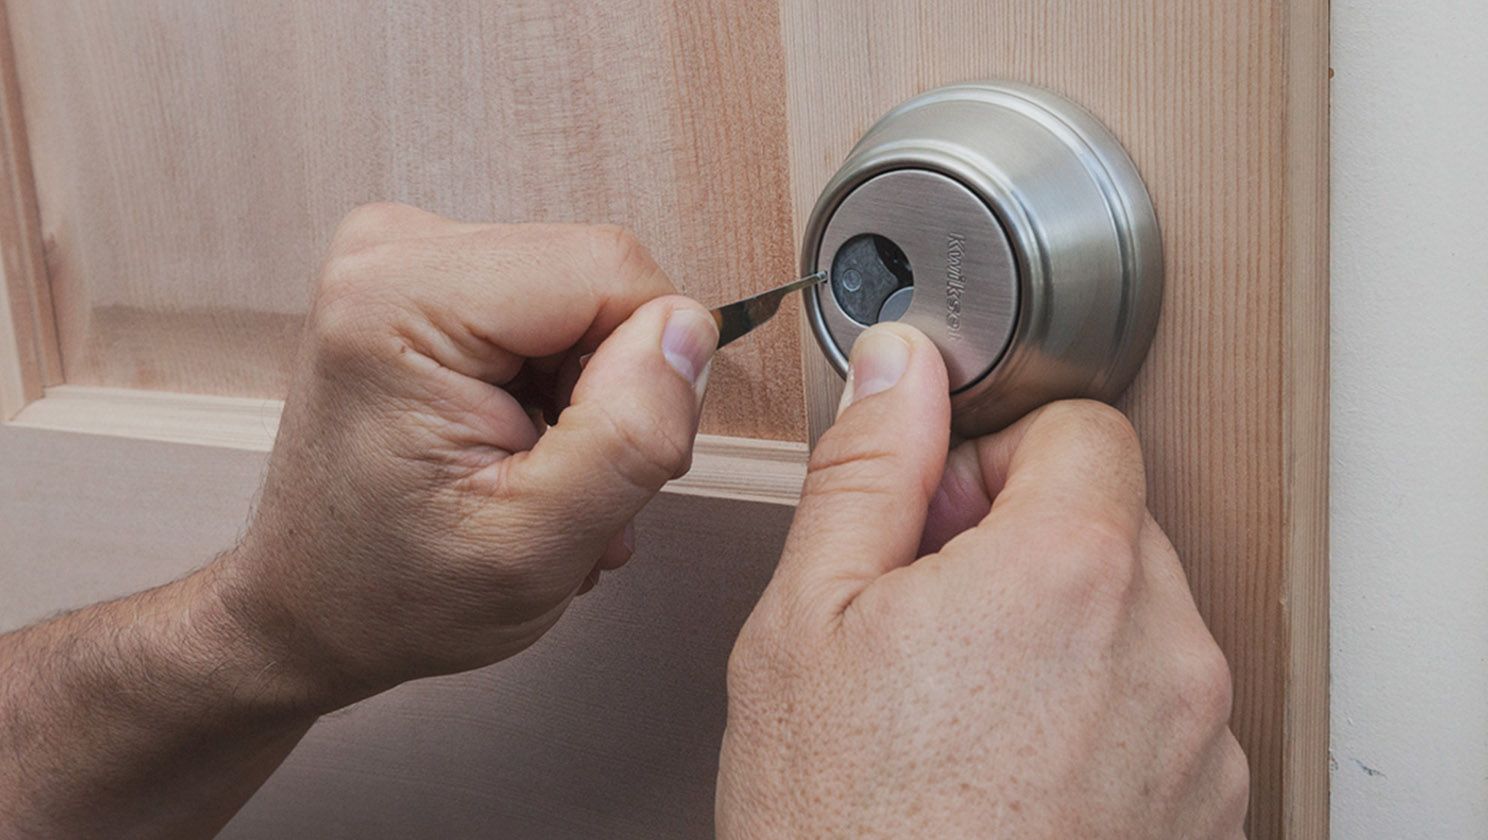
Removing The Existing Lock Cylinder
Removing the existing lock cylinder is the first step to key a Kwikset deadbolt. This part holds the key and controls the lock mechanism. Taking it out carefully helps you replace or rekey the lock quickly. Follow clear steps to avoid damage and make the process smooth.
Locating The Retaining Screw
Find the retaining screw on the side of the deadbolt. This screw holds the cylinder in place. Use a screwdriver to remove it. Sometimes, this screw is hidden under a small cover. Check the edge of the lock for a small hole or slot. Removing this screw frees the cylinder from the lock.
Safely Extracting The Cylinder
After removing the screw, gently pull the cylinder out. Use steady force without twisting too hard. The cylinder should slide out easily if the screw is removed. If stuck, wiggle it slightly to loosen. Keep the cylinder straight to avoid damage. Place it on a soft surface to protect it.

Credit: www.youtube.com
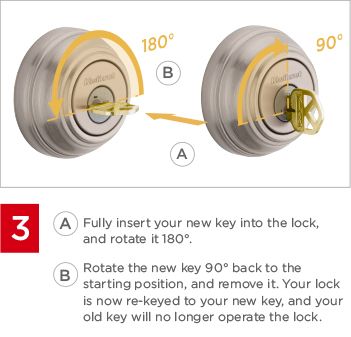
Rekeying The Lock Cylinder
Rekeying the lock cylinder is an important step in changing the keys for your Kwikset deadbolt. This process lets you use a new key without replacing the entire lock. It saves money and keeps your home secure. Understanding each part of rekeying helps you do the job right.
Inserting The New Key
Start by placing the new key into the lock cylinder. Insert it gently to avoid damaging the pins inside. The key must fit fully into the cylinder for the next steps. This step helps you test if the new key matches the lock.
Adjusting Pins To Fit The New Key
Remove the cylinder plug carefully from the housing. Inside, you will see small pins that control the lock’s movement. Replace or adjust these pins to match the cuts on your new key. The pins must sit at the right height for smooth turning. After adjusting, reinsert the plug and test the key’s fit. Proper pin alignment is crucial for your lock to work correctly.
Reassembling The Deadbolt
Reassembling the deadbolt is a key step after keying your Kwikset lock. This process puts all parts back together securely. Careful assembly ensures your deadbolt works smoothly and keeps your door safe.
Keep parts organized and follow the steps closely. Take your time to avoid mistakes. A well-assembled lock lasts longer and functions better.
Reinserting The Cylinder
Start by sliding the cylinder back into the lock housing. Align it carefully with the keyway. The cylinder must fit snugly without forcing it. Check that the key turns smoothly inside the cylinder. If it sticks, adjust the position slightly. Proper alignment prevents lock jams and wear.
Securing The Lock Components
Next, fasten the screws that hold the lock parts together. Use a screwdriver that fits each screw well. Tighten screws evenly to avoid bending the lock. Do not overtighten, as this can damage the lock. Test the deadbolt by turning the key and the thumb turn. Ensure the bolt slides out and retracts fully. Secure parts make the deadbolt reliable and strong.
Credit: www.kwikset.com
Testing Your New Key
Testing your new key is an important step after keying a Kwikset deadbolt. This ensures the lock works properly and keeps your home safe. Take your time to check every function carefully. Doing this helps avoid problems later.
Checking Smooth Operation
Insert the new key into the deadbolt. Turn it slowly to lock and unlock the door. The key should move easily without sticking or jamming. Try this several times on both sides of the lock. Make sure the bolt slides fully in and out with no resistance. Smooth operation means the key fits well and the lock works correctly.
Troubleshooting Common Issues
If the key feels stiff or hard to turn, try these steps. First, clean the lock with a spray of graphite lubricant. Avoid oil-based lubricants that can gum up the lock. Next, check that the key cuts match the lock pins. Misaligned cuts can cause jamming. If problems continue, recheck your keying process or consult a locksmith. Small adjustments often fix most issues quickly.
Maintaining Your Kwikset Deadbolt
Maintaining your Kwikset deadbolt helps keep it working smoothly for years. Simple care steps prevent problems and save you time. Regular attention ensures your lock stays secure and reliable.
Regular Cleaning Tips
Clean your deadbolt every few months. Use a soft cloth to wipe dust and dirt. Avoid harsh chemicals that can damage the finish. Lubricate the lock with graphite powder or a silicone spray. This helps the key turn easily and stops sticking. Do not use oil-based lubricants, as they attract dust.
When To Rekey Again
Rekey your deadbolt if you lose your keys. Change keys when moving to a new home. Rekey after a break-in or lost key incident. If many people have copies, rekey for safety. Check your lock’s performance; sticky keys or trouble locking means it may need rekeying. Regular rekeying keeps your home secure and under your control.
Frequently Asked Questions
How Do I Rekey A Kwikset Deadbolt?
To rekey a Kwikset deadbolt, remove the lock cylinder first. Use a rekeying kit to change the pins inside. Follow the kit instructions carefully for precise pin placement. This process allows your lock to work with a new key without replacing the entire deadbolt.
What Tools Are Needed To Key A Kwikset Deadbolt?
You need a Kwikset rekeying kit, a screwdriver, and a follower tool. The kit includes new pins and keys. A pinning tray helps organize pins. These tools make rekeying efficient and prevent damage to the lock cylinder.
Can I Rekey Kwikset Deadbolt Without Removing It?
No, you must remove the lock cylinder to rekey it. Removing the cylinder gives access to the pins inside. Attempting to rekey without removal can damage the lock and void warranties.
How Long Does It Take To Rekey A Kwikset Deadbolt?
Rekeying a Kwikset deadbolt takes about 15 to 30 minutes. Time varies based on experience and tools used. Following step-by-step instructions speeds up the process and ensures accuracy.
Conclusion
Keying a Kwikset deadbolt is easier than it seems. Follow each step with care and patience. Having the right tools makes the job smoother. Take your time to avoid mistakes. This skill saves money and gives you control. Practice helps you get better and faster.
Keep your keys organized to prevent confusion. Now, you can handle your lock needs confidently. Try it yourself and see how simple it is.


