Are you struggling with your Kwikset deadbolt and need to remove the cylinder? Whether you’re fixing a jammed lock, upgrading your security, or just doing some routine maintenance, knowing how to remove the cylinder is a crucial first step.
In this guide, you’ll get clear, simple instructions that anyone can follow—no locksmith experience needed. Keep reading, and by the end, you’ll have the confidence to take apart your Kwikset deadbolt quickly and safely. Let’s get started!
Tools Needed
Removing the cylinder from a Kwikset deadbolt requires a few simple tools. Having the right tools makes the job easier and faster. These tools help you work safely and avoid damage.
Flathead Screwdriver
A flathead screwdriver helps to remove screws holding the cylinder. It fits into the screw slots and turns them easily. Choose a screwdriver with a handle that feels comfortable.
Phillips Screwdriver
Some Kwikset deadbolts use Phillips screws. This screwdriver has a cross-shaped tip. It fits into the screw head and helps to turn it without slipping.
Allen Wrench (hex Key)
Some models require an Allen wrench to loosen small set screws. These screws hold parts in place securely. Use the right size wrench for a good fit.
Pliers
Pliers help to grip and pull out the cylinder if it is stuck. They also assist in turning small parts during removal. Use pliers carefully to avoid scratches.
Flashlight
A flashlight helps you see inside the lock clearly. Good lighting prevents mistakes and speeds up the process. Use a bright, focused light source.
Locate The Cylinder
Start by finding the cylinder on the Kwikset deadbolt. It is usually located in the middle of the lock. Look for screws or clips that hold it in place.
Understanding The Cylinder Location
The cylinder is the key part of the Kwikset deadbolt. It holds the keyhole and controls the lock mechanism. Finding it is the first step to removing it safely.
Typically, the cylinder is on the exterior side of the door. It is the round piece where you insert your key. Knowing its position helps in planning the removal process.
Check The Exterior Side Of The Door
Look closely at the outside part of your door. The cylinder is the round metal piece sticking out. It usually has a key slot in the center. This side is where you will focus first.
Identify The Retaining Screw
Find the small screw holding the cylinder in place. It is often located on the edge of the door, near the cylinder. Removing this screw allows the cylinder to slide out.
Prepare Your Tools
Gather a screwdriver that fits the retaining screw. A Phillips head screwdriver is common for Kwikset deadbolts. Having the right tool makes the removal easier and safer.
Remove The Interior Cover
Removing the interior cover is the first step to access the Kwikset deadbolt cylinder. This cover protects the lock’s inner parts. Taking it off carefully helps avoid damage. The process is simple and requires only a few tools.
Follow each step to remove the cover safely. Keep track of small screws and parts. This makes reassembly easier later.
Locate The Screws On The Interior Cover
Start by finding the screws on the inside cover. They are usually near the edges. Use a flashlight if the area is dark. These screws hold the cover firmly in place.
Use A Screwdriver To Remove The Screws
Choose the right screwdriver for the screws. Turn each screw counterclockwise to loosen. Place the screws somewhere safe to avoid losing them. Do not force the screws if they feel stuck.
Gently Pry Off The Interior Cover
After removing all screws, gently lift the cover. Use your fingers or a flat tool to pry it. Avoid bending or breaking the cover. The cover may stick slightly, so take your time.
Set The Interior Cover Aside Safely
Place the cover on a clean surface. Keep it with the screws for easy access. This helps prevent damage or loss during the cylinder removal.

Credit: www.youtube.com
Identify The Cylinder Retaining Screw
Start by locating the cylinder retaining screw on the side of the Kwikset deadbolt. This small screw holds the cylinder firmly in place. Removing it is the key step to take the cylinder out safely.
Locate The Cylinder Retaining Screw
The cylinder retaining screw holds the Kwikset deadbolt cylinder in place. It is essential to find this screw before removing the cylinder. Usually, it sits on the edge of the door, near the keyhole.
Check the side of the door where the deadbolt is installed. Look for a long screw that goes through the edge of the door. This screw is different from the ones holding the lock assembly together.
Tools Needed To Remove The Retaining Screw
A screwdriver is required to remove the retaining screw. Most Kwikset deadbolts use a Phillips head screw. Use a screwdriver that fits the screw head well to avoid stripping it.
Keep the screwdriver steady and apply gentle pressure. Turn the screw counterclockwise to loosen it. If the screw is tight, try turning it slowly to prevent damage.
Confirming The Screw’s Role Before Removal
Double-check that the screw is indeed the cylinder retaining screw. It should be the only screw that secures the cylinder. Removing other screws might cause damage.
Test gently by loosening the screw slightly. If the cylinder starts to move, this is the correct screw. Stop turning and prepare to remove the cylinder carefully.
Unscrew The Retaining Screw
Unscrewing the retaining screw is a key step to remove the cylinder from a Kwikset deadbolt. This small screw holds the cylinder firmly in place. Removing it frees the cylinder for easy extraction.
Before starting, gather a screwdriver that fits the screw head. Most Kwikset deadbolts use a Phillips-head screw. A good fit helps avoid stripping the screw.
Locate The Retaining Screw
Open the door to access the edge where the deadbolt sits. Look closely at the side of the lock. The retaining screw is visible on the faceplate of the deadbolt.
It is usually in the middle of the lock’s edge. Identify it clearly before proceeding. Sometimes, it blends with the metal finish but remains distinguishable.
Unscrew Carefully
Place the screwdriver tip firmly into the retaining screw. Turn the screwdriver counterclockwise slowly. Apply steady pressure to avoid slipping.
Stop when the screw loosens completely. Do not force the screw as it may get stuck or damaged. If it feels stuck, adjust your angle slightly.
Keep The Screw Safe
After removing the retaining screw, place it somewhere safe. Use a small container or magnetic tray to hold it. Losing this screw can delay reassembly.
Keep it close while you work on the cylinder removal. This small part is essential for putting the lock back together.

Credit: www.youtube.com
Extract The Cylinder
Extracting the cylinder from a Kwikset deadbolt is a key step in lock repair or replacement. This process allows access to the inner parts of the lock. It requires simple tools and careful handling. Follow clear steps to remove the cylinder safely and smoothly.
Remove The Retaining Clip
First, locate the small retaining clip on the cylinder’s side. Use a flathead screwdriver or needle-nose pliers to pry it off gently. This clip holds the cylinder in place, so removing it frees the cylinder for extraction.
Turn The Key To Align The Cam
Insert the key into the lock and turn it slightly. This action aligns the cam inside the cylinder. Proper alignment is crucial for pulling the cylinder out without damage.
Pull The Cylinder Out
Grip the cylinder firmly and pull it straight out from the lock housing. Use steady force to avoid bending or breaking parts. If the cylinder feels stuck, double-check the clip removal and cam alignment.
Tips For Reinstallation
Reinstalling the cylinder in a Kwikset deadbolt needs care and attention. A proper fit ensures the lock works smoothly and keeps your home secure. Small steps can make the process easier and faster. Follow these tips for a smooth reinstallation and avoid common mistakes.
Prepare All Parts Before Starting
Lay out the cylinder and screws on a clean surface. Check for any dirt or damage. Clean parts if needed. Having everything ready saves time and avoids frustration during reassembly.
Align The Cylinder Correctly
Insert the cylinder with the key in place. Align it so the tailpiece fits into the cam inside the lock. Misalignment can cause the lock to jam or not turn properly. Take your time to position it right.
Tighten Screws Evenly
Use a screwdriver to tighten screws slowly. Alternate between screws to keep pressure balanced. Over-tightening one screw can misalign the cylinder or damage the lock. Stop when screws feel firm but not too tight.
Test The Lock Before Final Assembly
Turn the key to check if the cylinder moves smoothly. Test locking and unlocking a few times. If it feels stiff or stuck, loosen screws slightly and realign. Confirm smooth operation before securing everything.
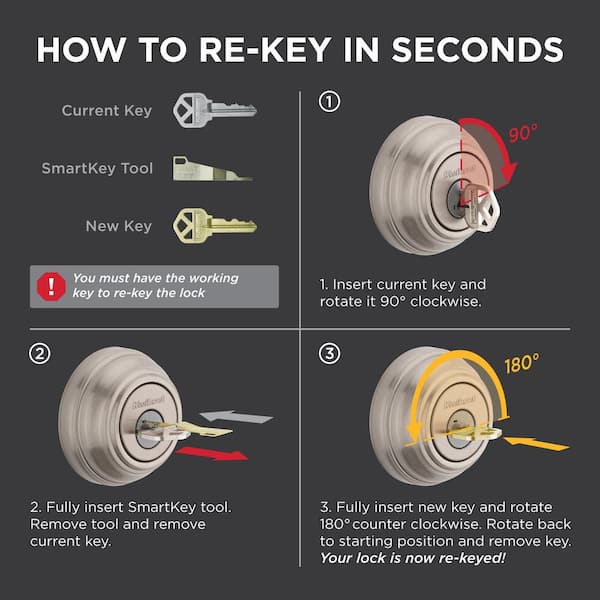
Credit: www.homedepot.com
Troubleshooting Common Issues
Removing the cylinder from a Kwikset deadbolt can sometimes present challenges. These issues can slow down the process or cause frustration. Understanding common problems helps solve them quickly. This guide covers typical troubles and easy fixes. It ensures smooth removal of the cylinder without damage.
Stuck Cylinder Due To Misaligned Screws
Misaligned screws often block cylinder removal. Check all screws for tightness and position. Loosen screws slightly to see if the cylinder moves. Tighten them again after removal. Use the right screwdriver to avoid stripping screws.
Cylinder Not Turning With Key
The cylinder may refuse to turn during removal. Dirt or rust can cause this. Spray a small amount of lubricant inside the keyhole. Gently wiggle the key while turning. Avoid forcing the cylinder to prevent damage.
Broken Or Worn-out Cam
A broken cam inside the cylinder stops removal. Signs include no response when turning the key. Remove the faceplate and inspect the cam. Replace it if cracked or worn. Use exact replacement parts for Kwikset models.
Key Stuck Inside Cylinder
A stuck key blocks cylinder extraction. Avoid pulling hard on the key. Use a lubricant spray in the keyhole. Try gently rocking the key back and forth. Call a locksmith if the key won’t budge.
Difficulty Releasing Cylinder Clip
The retaining clip holds the cylinder tightly. It can be hard to release without the right tools. Use a small flathead screwdriver or clip remover. Carefully pry the clip away from the cylinder. Keep clips safe for reinstallation.
Frequently Asked Questions
How Do I Remove The Cylinder From A Kwikset Deadbolt?
First, unscrew the interior side of the deadbolt. Then, turn the key slightly to align the cam. Pull the cylinder out carefully. This process releases the cylinder without damaging the lock.
What Tools Are Needed To Remove A Kwikset Deadbolt Cylinder?
You need a screwdriver, usually Phillips head, and the original key. These tools help unscrew the lock and turn the cylinder cam for easy removal.
Can I Remove The Cylinder Without A Key?
No, the key is required to turn the cam inside the lock. Without the key, the cylinder remains locked in place and cannot be removed safely.
How Long Does It Take To Remove A Kwikset Deadbolt Cylinder?
Removing the cylinder typically takes 5 to 10 minutes. It depends on your experience and if you have the correct tools and key.
Conclusion
Removing the cylinder from a Kwikset deadbolt is not hard. Follow the steps slowly and carefully. Use the right tools and stay patient. This helps avoid damage and keeps your lock working well. Practice makes the task easier over time.
Now, you can handle this job yourself with confidence. Keep your home secure and your deadbolt in good shape. Simple steps lead to good results.