If your hydraulic floor jack isn’t holding pressure or lifting as it should, the problem might be with the valve seats. Knowing how to repair valve seats can save you time, money, and frustration.
In this guide, you’ll discover simple, step-by-step methods to fix your jack and get it working like new again. Keep reading to learn how to bring your hydraulic floor jack back to life and avoid costly replacements.
Tools And Materials Needed
Repairing valve seats in hydraulic floor jacks requires specific tools and materials. Having the right items makes the job easier and safer. This section covers the essentials for a smooth repair process.
Essential Tools
Start with a set of wrenches to remove parts. A valve seat cutter or reamer helps clean and reshape the valve seat. Small screwdrivers assist in removing seals and clips. A hammer and punch set is useful for tapping out old seats. A clean cloth or brush is needed to wipe away dirt and debris.
Replacement Parts
New valve seats are crucial for a proper repair. Replacement seals and O-rings prevent leaks after reassembly. Check the hydraulic jack manual for part numbers. Having extra seals is smart; some may get damaged during repair.
Safety Gear
Wear safety glasses to protect your eyes from metal shavings. Gloves protect your hands from sharp edges and oil. Use a work apron or old clothes to keep clean. A well-ventilated area helps avoid inhaling dust or fumes.
Identifying Valve Seat Issues
Valve seats play a key role in hydraulic floor jacks. They control the flow of hydraulic fluid and keep the jack working smoothly. Identifying valve seat problems early can save time and money. It also helps avoid bigger damage to the jack. Knowing what signs to watch for and how to inspect the valve seat is important for proper repair.
Common Symptoms
Notice the jack lifting slowly or not holding weight well. This can signal valve seat issues. Strange noises during lifting or lowering may also point to a problem. You might see oil leaks near the valve area. The jack might lose pressure quickly without use. These signs often mean the valve seat is worn or damaged.
Inspection Techniques
Start by cleaning the valve area to see it clearly. Use a flashlight and magnifying glass for a close look. Check for cracks, rust, or dirt on the valve seat. Press the valve to see if it moves smoothly. Any stickiness or roughness could mean trouble. Test the jack’s lifting and holding ability during inspection. This helps confirm if the valve seat needs repair or replacement.
Preparing The Hydraulic Jack
Preparing the hydraulic jack is the first step in repairing valve seats. Proper preparation makes the repair process easier and safer. It helps avoid damage to the jack and ensures smooth operation after repair.
Start by getting a clean workspace. Gather tools and materials needed for the job. Wear gloves to protect your hands from hydraulic fluid.
Draining Hydraulic Fluid
Drain the hydraulic fluid before taking the jack apart. Place a container under the jack’s reservoir. Open the drain valve or remove the plug carefully. Let all fluid flow out to avoid spills. Dispose of old fluid according to local rules.
Disassembling Components
Remove parts carefully to access the valve seats. Use the right tools to avoid damage. Take off the handle, pump, and cylinder parts. Keep track of small pieces and springs. Clean each part with a cloth before inspection.

Credit: www.amazon.com
Removing The Old Valve Seat
Removing the old valve seat is the first step in repairing a hydraulic floor jack. This part is essential for the jack’s operation. A worn or damaged valve seat can cause leaks and reduce lifting power.
Careful removal helps protect other jack parts. Follow the right steps to avoid damage and make replacement easier. Below are key points to guide you through this process.
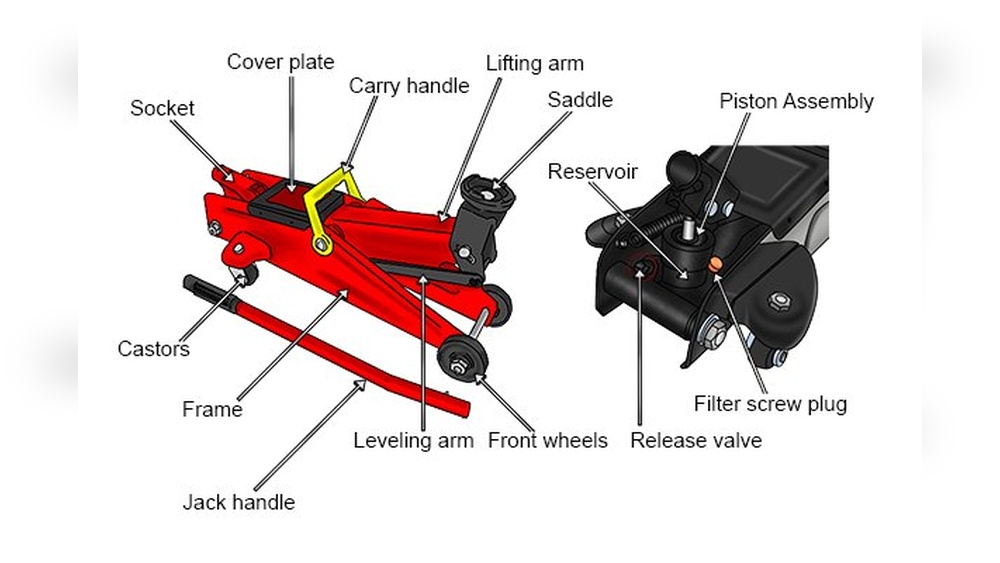
Locating The Valve Seat
The valve seat sits inside the jack’s cylinder. It seals the hydraulic fluid and controls flow. To find it, first remove the jack’s outer casing. Check the cylinder area for a small ring or insert. This ring is the valve seat.
It often looks like a metal or plastic ring inside the main cylinder. Use a flashlight for better visibility. Knowing its exact location helps avoid extra work later.
Safe Removal Methods
Use proper tools like a valve seat remover or a small punch tool. Avoid sharp objects that can scratch the cylinder. Gently tap around the valve seat to loosen it. Do not apply too much force to prevent damage.
Wear safety glasses and gloves to protect yourself. Work in a clean, well-lit area. Keep parts organized for easy reassembly.
Installing The New Valve Seat
Installing the new valve seat is a key step in fixing your hydraulic floor jack. This part controls the flow of hydraulic fluid. A proper installation ensures the jack works smoothly and safely. Follow careful steps to avoid leaks and damage.
Cleaning The Area
Start by cleaning the valve seat area thoroughly. Remove dirt, old grease, and debris. Use a clean cloth or brush for this task. A clean surface helps the new seat fit tightly. It also prevents leaks and wear later on. Make sure no particles remain before placing the new seat.
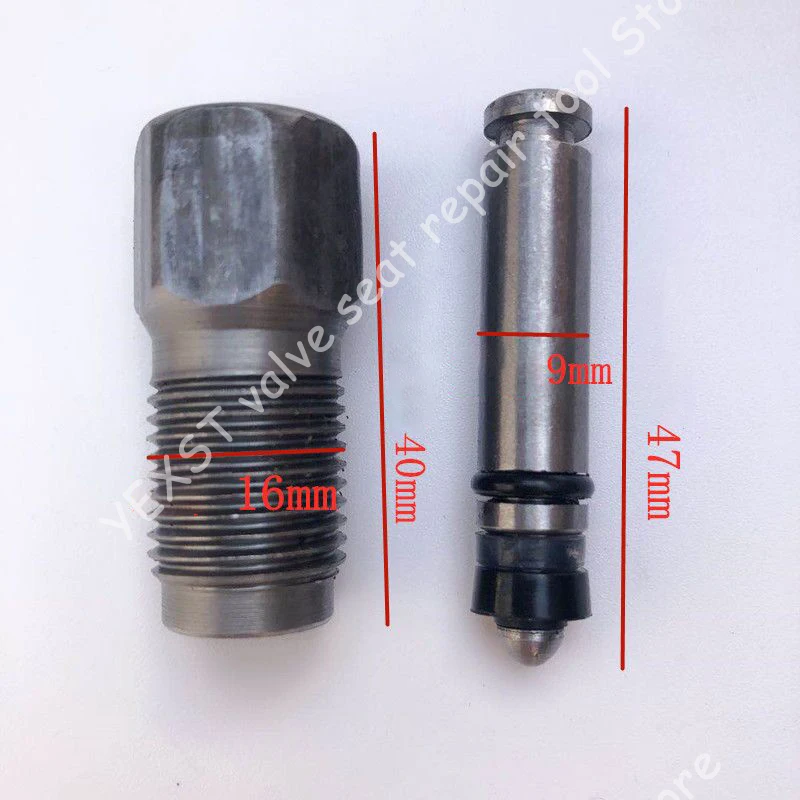
Proper Seat Placement
Place the new valve seat carefully in its position. Align it exactly as the old one was. Check that it sits flat and flush against the surface. Press it gently but firmly to secure it. Avoid tilting or forcing the seat in. Proper placement ensures the jack holds pressure well and operates safely.
Credit: www.aliexpress.com
Reassembling And Testing
After repairing the valve seats in your hydraulic floor jack, the next step is to put everything back together and check if it works well. This part is very important to make sure your jack is safe and ready to use again. Careful reassembly and testing prevent leaks and mechanical problems.
Reassembling The Jack
Start by placing the valve seats back in their correct spots. Tighten all screws and bolts firmly but do not over-tighten. Make sure the seals and O-rings are in good condition and seated properly. Reattach the pump and release valve carefully. Check that all parts move smoothly and fit well.
Refilling Hydraulic Fluid
Use the right type of hydraulic fluid for your jack. Pour the fluid slowly into the reservoir to avoid air bubbles. Fill until the fluid reaches the recommended level. Avoid overfilling, as this can cause leaks or damage. After filling, pump the handle a few times to circulate the fluid inside.
Leak And Performance Testing
Inspect the jack carefully for any fluid leaks around the repaired area. Pump the handle and watch if the jack lifts smoothly and holds weight without dropping. Check the release valve to make sure it lowers the jack steadily. Test the jack multiple times to confirm consistent performance and safety.
Maintenance Tips To Prevent Future Issues
Keeping your hydraulic floor jack in good shape helps avoid valve seat problems. Regular care saves time and money. It also keeps your jack safe and reliable for all tasks. Follow simple steps to maintain your jack and prevent valve seat damage.
Regular Inspections
Check your jack often for leaks or damage. Look closely at the valve seat area. Clean dirt and debris from the jack after each use. Replace worn or broken parts quickly. Regular inspections catch small issues before they grow.
Proper Usage Practices
Use the jack only for its intended weight limit. Avoid sudden drops or heavy impacts. Lift slowly and steadily to reduce strain. Store the jack in a dry, clean place. Proper use helps keep valve seats tight and sealed.

Credit: www.aliexpress.com
Frequently Asked Questions
How Do You Identify Worn Valve Seats In Hydraulic Jacks?
Worn valve seats cause leaks and poor jack performance. Look for oil seepage or inconsistent lifting. Check if the jack fails to hold pressure or lowers unexpectedly, indicating valve seat damage.
What Tools Are Needed To Repair Valve Seats?
You need valve seat cutters, a valve seat grinder, and a screwdriver. Also use cleaning brushes and replacement seals. Proper tools ensure precise valve seat resurfacing and reliable jack function.
Can I Repair Valve Seats Without Removing The Jack?
No, removing the jack is necessary for safe and effective valve seat repair. It allows proper access and prevents damage during the process. Working externally risks incomplete repair and safety issues.
How Often Should Valve Seats Be Inspected?
Inspect valve seats every 6 to 12 months with regular jack use. Early detection prevents major damage and extends jack life. Check more frequently if used heavily or in harsh conditions.
Conclusion
Repairing valve seats in hydraulic floor jacks keeps them working well. Small problems can cause big issues if left alone. Fixing valve seats helps the jack lift heavy loads safely. Take your time and follow each step carefully. Using the right tools makes the job easier.
Regular checks prevent future damage and save money. Good maintenance extends the life of your jack. Keep it in good shape to avoid unexpected failures. Simple repairs keep your tools ready for any task. You can handle this repair with patience and care.