Have you ever wondered what happens behind the wall when you flip a light switch? Understanding how light switch wiring works can save you time, money, and frustration.
Whether you want to fix a flickering light, install a new switch, or simply satisfy your curiosity, knowing the basics will empower you to take control of your home’s electrical system. Keep reading, and you’ll discover simple explanations that make wiring easy to understand—and maybe even enjoyable!
:strip_icc()/illustration-light-wiring-68fbf7c0-bcacb28c3bdc4eed8bda3204ffee82c4.jpg)
Credit: www.bhg.com
Basics Of Light Switch Wiring
Understanding the basics of light switch wiring is important for simple home projects. This knowledge helps you control lights safely and efficiently. Wiring connects the switch to the power source and the light fixture. Knowing how wires work together makes repairs and installations easier.
Common Wiring Types
Most homes use two main wiring types: single-pole and three-way. Single-pole switches control one light from one location. Three-way switches control one light from two locations. Copper wires are common, with black, white, and green or bare wires. Black is hot, white is neutral, and green or bare is ground.
Tools You’ll Need
Basic tools make wiring easier and safer. A screwdriver set helps remove and attach switch plates. Wire strippers cut and strip insulation from wires. A voltage tester checks if wires have electricity. Pliers help twist wires together. Electrical tape secures wire connections.
Safety Precautions
Turn off power before working on any wiring. Use a voltage tester to confirm power is off. Wear insulated gloves to avoid shocks. Avoid touching bare wires. Follow local electrical codes to prevent hazards. If unsure, ask a professional electrician for help.
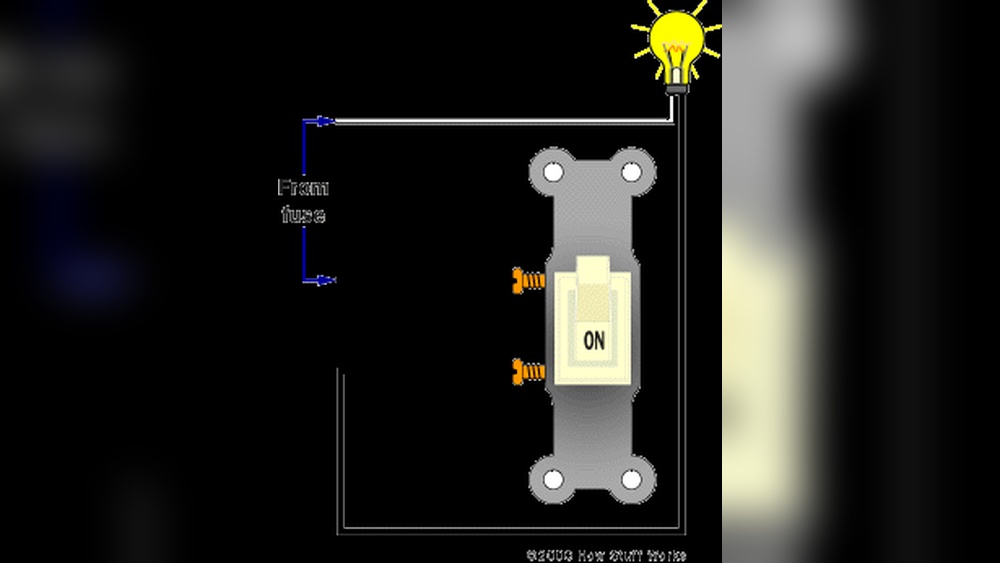
How A Light Switch Functions
A light switch controls the flow of electricity to a light fixture. It turns the light on or off by opening or closing the electrical circuit. Understanding how a light switch works helps in safe installation and troubleshooting.
Simple but effective. The switch acts as a gate for electricity. When closed, electricity flows. When open, it stops.
Switch Components
A basic light switch has a few key parts. The toggle or rocker is the part you press. Inside, there are metal contacts that connect or break the circuit. A plastic or metal frame holds everything together. The terminals connect the switch to electrical wires.
Circuit Flow Explained
Electricity flows from the power source through the switch to the light. When the switch is on, the circuit closes. Electricity travels through the switch to the light bulb. The bulb lights up. When the switch is off, the circuit is open. Electricity stops flowing. The light turns off.
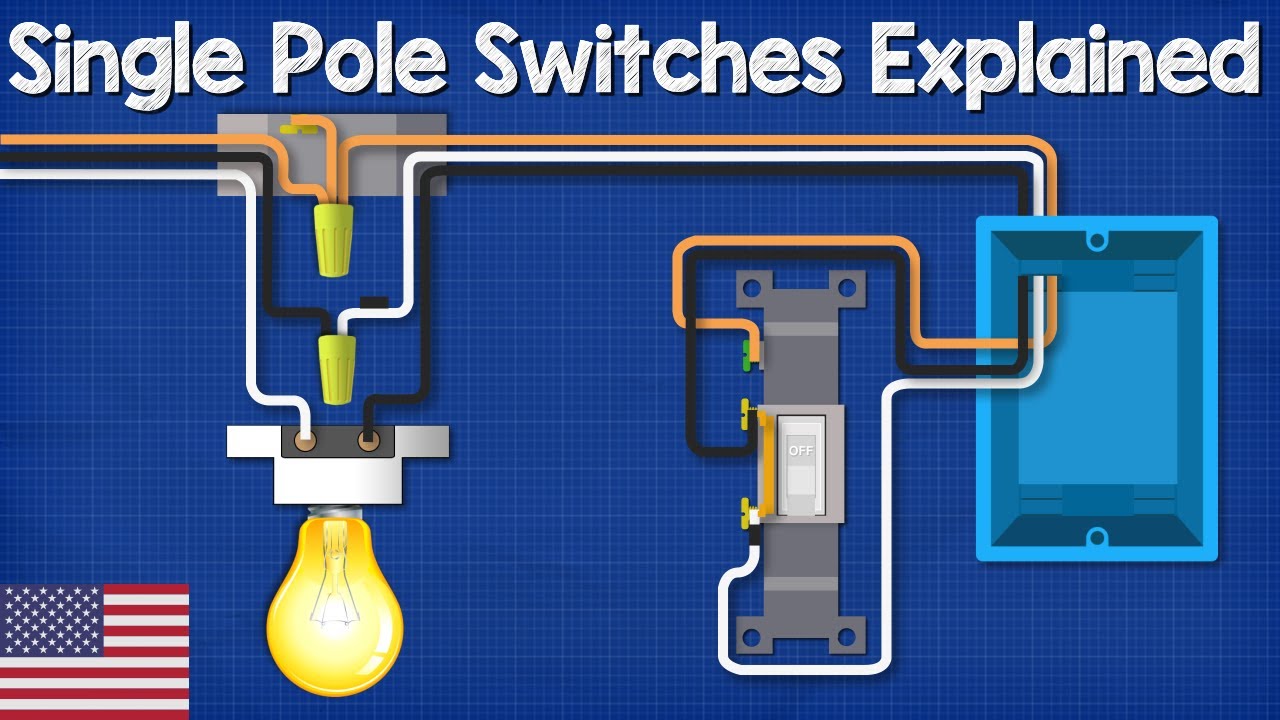
Wiring A Single-pole Switch
Wiring a single-pole switch is a basic skill for home electrical work. This switch controls one light or device from a single location. Knowing how to wire it safely helps you fix or install switches with confidence.
Understanding the wires and the process is key. This guide breaks down the steps clearly. Follow each part carefully to ensure a safe and working switch.
Identifying Wires
First, turn off the power at the breaker. Safety is the top priority. Next, open the switch box to see the wires.
Look for three common wires: a black (hot) wire, a white (neutral) wire, and a green or bare copper (ground) wire. The black wire carries electricity to the switch. The white wire returns power to the light fixture. The ground wire protects against shocks.
Sometimes, the neutral wire may not connect to the switch. Confirm which wires are present before starting.
Step-by-step Wiring Process
Start by connecting the ground wire to the green screw on the switch. This connection is important for safety.
Next, attach the black (hot) wire to one of the brass screws on the switch. Tighten the screw firmly to hold the wire.
Take the black wire that goes to the light fixture. Connect it to the other brass screw on the switch. This completes the circuit to control the light.
Neutral wires usually stay connected together in the box and do not attach to the switch.
Double-check all connections. Make sure wires are secure and no bare wire is exposed.
Close the switch box and turn the power back on. Test the switch to see if it controls the light correctly.
Wiring A Three-way Switch
Wiring a three-way switch allows control of a light from two different places. This setup is common in hallways, staircases, and large rooms. It makes turning lights on or off more convenient without walking back to the original switch.
When To Use Three-way Switches
Use three-way switches where two switches control one light. For example, a light at the top and bottom of stairs. Or in a long hallway with switches at each end. They help save time and improve safety in these areas.
Connecting Multiple Switches
Three-way switch wiring uses three wires between switches. Two traveler wires carry current back and forth. A common wire connects to the light fixture. Properly connecting these wires allows both switches to work together smoothly.
Common Wiring Mistakes To Avoid
Wiring a light switch might seem simple, but mistakes can cause serious problems. These errors can lead to faulty lights, electrical shocks, or even fires. Avoiding common wiring mistakes keeps your home safe and your switches working well.
Misidentifying Wires
Confusing wires is a frequent mistake. Each wire has a specific role. For example, the hot wire carries electricity to the switch. The neutral wire returns electricity back. The ground wire prevents shocks. Mixing these wires can cause short circuits or shocks. Always check wire colors carefully. Use a tester to confirm before connecting.
Loose Connections
Loose wires can cause flickering lights or sparks. They happen when wires are not tightly connected to terminals. This creates poor contact and heat build-up. Always tighten wire screws firmly. Make sure wires are wrapped around screws properly. Avoid leaving exposed wire ends. Secure connections last longer and work better.
Overloading Circuits
Connecting too many devices to one circuit causes overload. This can trip breakers or damage wires. Light switches should handle only the intended load. Know the circuit’s capacity before adding more lights or devices. Spreading the load over different circuits prevents overheating. Overloading can lead to power outages or fire hazards.
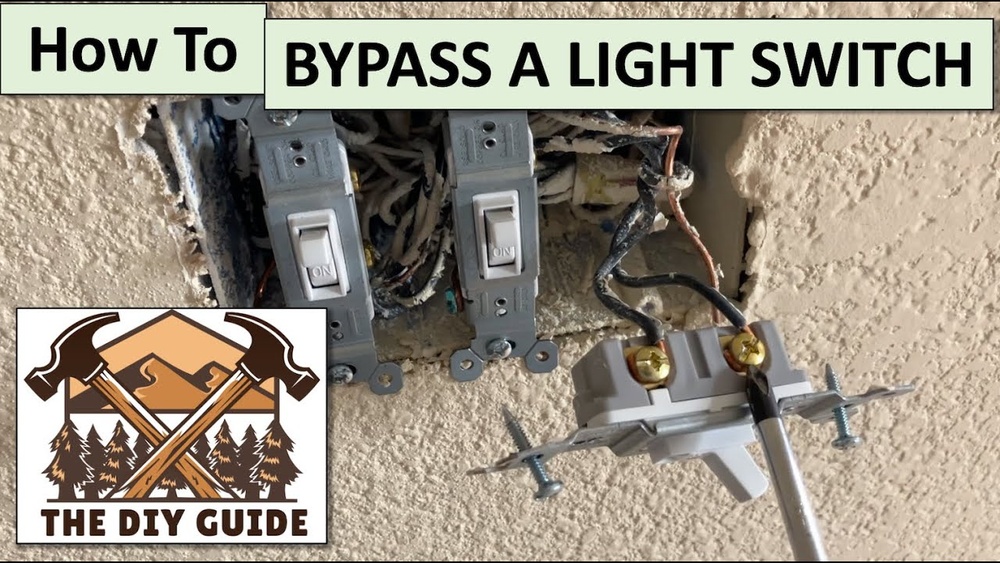
Credit: www.youtube.com
Tips For Successful Diy Wiring
Successful DIY light switch wiring requires care and clear steps. Follow simple tips to avoid mistakes and keep safe. These tips help you check your work, keep wires tidy, and know each wire’s job.
Testing Your Work
Testing ensures the wiring works correctly. Use a voltage tester or multimeter to check connections. Turn off power before testing. Confirm the switch turns the light on and off properly. Never skip this step to avoid electrical hazards.
Using Electrical Tape
Electrical tape protects wire connections from short circuits. Wrap tape tightly around wire nuts and exposed wires. This keeps wires insulated and prevents accidental contact. Use high-quality tape made for electrical use only. Proper taping improves safety and durability.
Labeling Wires
Label wires to remember their purpose. Use small pieces of tape and a marker to name each wire. Label before disconnecting wires for easier reassembly. Clear labels save time and reduce errors. This step is helpful for future repairs or upgrades.

Credit: mepacademy.com
Frequently Asked Questions
How Does A Basic Light Switch Wiring Work?
A basic light switch wiring connects the power source to the light fixture. The switch interrupts or completes the electrical circuit. When you flip the switch, it either allows current to flow or stops it, turning the light on or off.
What Are The Common Types Of Light Switch Wiring?
Common light switch wiring types include single-pole, three-way, and four-way switches. Single-pole controls one light from one location. Three-way controls one light from two locations. Four-way controls one light from three or more locations.
Can I Install Light Switch Wiring Myself Safely?
Yes, if you have basic electrical knowledge and follow safety rules. Always turn off power at the breaker. Use a voltage tester to confirm no current. Follow local electrical codes and guidelines for safe installation.
Why Does A Light Switch Sometimes Buzz Or Spark?
Buzzing or sparking can indicate loose wiring or a faulty switch. It may cause electrical hazards or damage. Replace damaged switches promptly and ensure all connections are secure to prevent risks.
Conclusion
Understanding light switch wiring helps you handle basic electrical tasks safely. Knowing how wires connect inside a switch makes repairs easier. Always turn off power before working on any wiring. Use the right tools and follow simple steps carefully. This knowledge saves time and avoids mistakes.
It also helps you communicate better with electricians. Keep learning and stay safe while dealing with home wiring. Simple wiring can make your home more functional and comfortable.