Are you tired of that stuffy bathroom smell lingering long after your shower? Adding a bathroom fan can make a huge difference, and the best part is—you don’t have to be an expert to do it yourself.
If you already have a light switch in your bathroom, you’re halfway there. Imagine controlling both your light and fan from the same spot, keeping things simple and neat. In this guide, you’ll learn exactly how to add a bathroom fan to your existing light switch step-by-step.
By the end, you’ll have a fresh, well-ventilated bathroom without the hassle or extra wiring. Ready to breathe easier and upgrade your space? Let’s get started.
Tools And Materials Needed
Installing a bathroom fan to an existing light switch requires specific tools and materials. Having the right equipment makes the job easier and safer. Prepare everything before starting to avoid interruptions.
This section covers the essential tools and required materials for this project. Each item plays an important role in the installation process.
Essential Tools
- Screwdriver set – for removing and securing screws
- Wire stripper – to strip electrical wires cleanly
- Voltage tester – to ensure power is off before work
- Drill with bits – for making holes in walls or ceilings
- Measuring tape – to measure placement and wire length
- Utility knife – for cutting drywall or insulation
- Flashlight – to see clearly inside dark spaces
- Wire nuts – to connect electrical wires safely
Required Materials
- Bathroom exhaust fan – sized for your bathroom
- Electrical cable – suitable gauge for bathroom wiring
- Switch box – if you need to replace or add one
- Switch plate – covers the switch neatly
- Wire connectors – to join wires securely
- Fan ducting – to vent air outside properly
- Foil tape – to seal duct connections
- Drywall patch – for fixing any holes made

Credit: diy.stackexchange.com
Safety Precautions
Safety is the top priority when adding a bathroom fan to an existing light switch. Working with electricity can be dangerous. Taking the right precautions protects you from shocks and injuries. Follow these simple steps to work safely and confidently.
Turning Off Power
Always turn off the power before starting any electrical work. Find the circuit breaker that controls the bathroom light switch. Flip it to the off position. Double-check that the light switch no longer works. This stops electricity flow and lowers the risk of shock.
Using A Voltage Tester
Use a voltage tester to make sure power is off. Touch the tester probes to the wires in the switch box. The tester will light up or beep if electricity is present. No light or sound means it is safe to work. Never skip this step. It confirms your safety.
Locating The Existing Light Switch
Locating the existing light switch is the first step to add a bathroom fan. This step helps you understand the current electrical setup. It also shows where you can connect the fan without extra wiring. Start by finding the switch that controls the bathroom light.
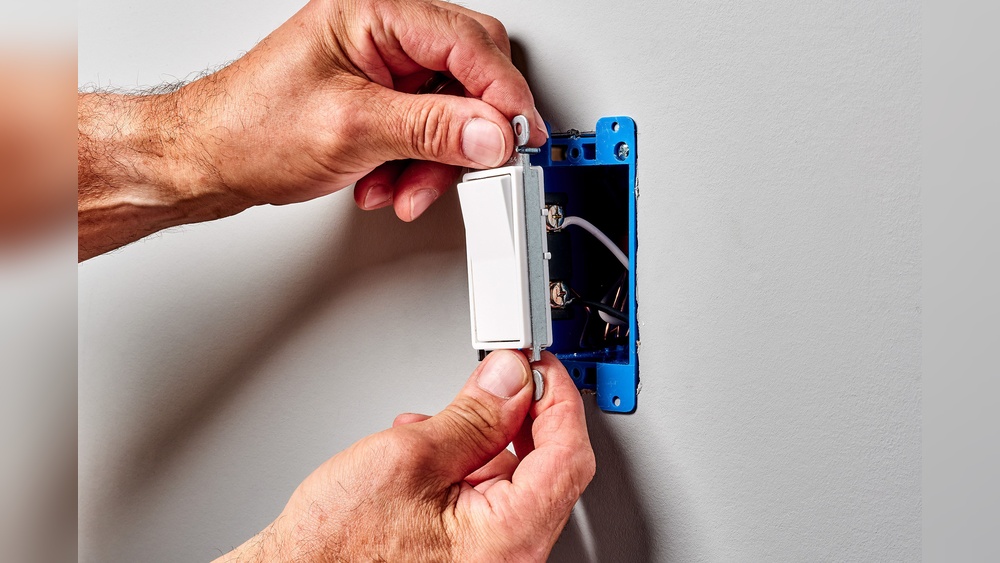
Identifying The Switch Box
Look for the wall plate that covers the light switch. Remove the screws carefully and take off the plate. Behind it, you will see the switch box. It is usually made of plastic or metal. The box holds the switch and wires inside the wall. Make sure the power is off before touching anything.
Checking Wiring Compatibility
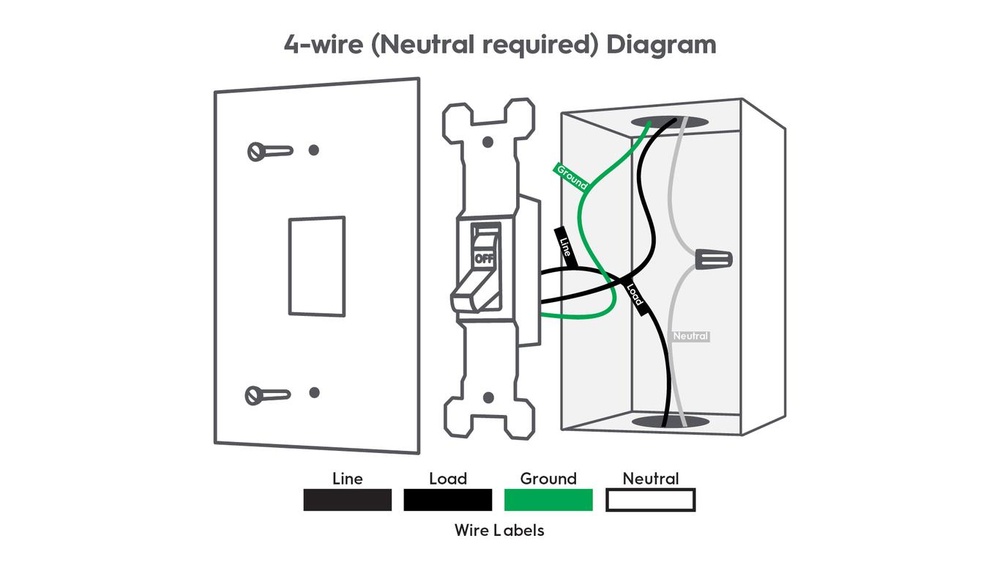
Check the wires inside the switch box. You want to see if there is enough space for another wire. Look for black, white, and green or bare copper wires. Black is hot, white is neutral, and green is ground. Confirm the wires can support a bathroom fan. Use a voltage tester to ensure no power is running. If unsure, ask a professional electrician for help.

Credit: diy.stackexchange.com
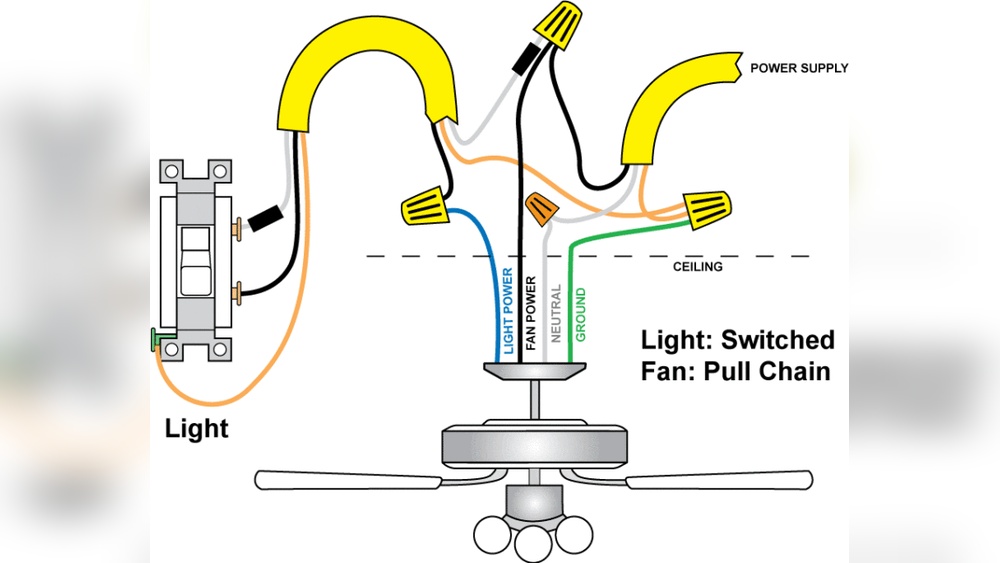
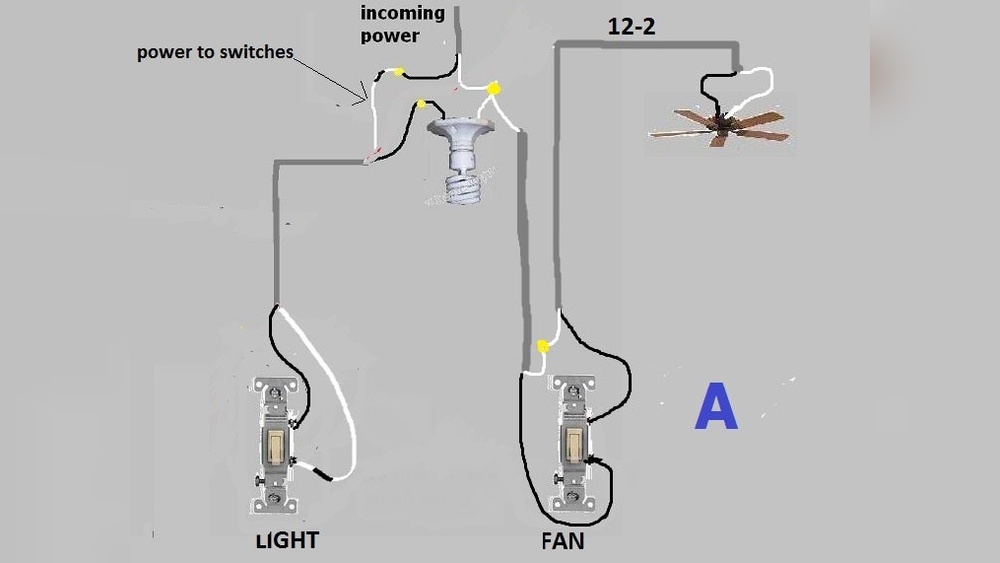
Wiring The Bathroom Fan
Wiring the bathroom fan is a key step in installing it properly. It involves running wires and connecting them to the existing light switch. This process helps control the fan easily from the switch. Safety is important, so turn off the power before starting any wiring work.
Running The Fan Wire
Start by choosing the right wire for your fan. Usually, a 14/2 or 12/2 wire works well for bathroom fans. Run the wire from the fan location to the switch box. Use wire clips or staples to keep the wire neat and secure along the wall or ceiling. Avoid sharp bends or damage to the wire insulation.
Connecting To The Switch
Open the switch box carefully. Identify the existing wires connected to the switch. Connect the black wire from the fan to the black wire on the switch. Join the white wires together with a wire nut. Connect the ground wire from the fan to the ground screw on the switch. Tighten all connections and place wires safely inside the box.
Installing The Fan Unit
Installing the fan unit is a key step in adding a bathroom fan to an existing light switch. This process ensures the fan works efficiently and fits properly in the space. Careful installation prevents noise and vibration problems later.
Follow each step to position and secure the fan correctly. Proper placement helps the fan remove moisture and odors from your bathroom. Secure mounting keeps the fan stable and safe during use.
Positioning The Fan
Choose a spot near the light switch for easy wiring. The fan should be close to the ceiling for best airflow. Avoid placing it too close to walls or other fixtures.
Mark the exact location using the fan’s template. Check for any obstacles like beams or pipes behind the ceiling. Make sure the spot allows the duct to run smoothly outside.
Securing The Fan In Place
Cut the ceiling hole following the marked outline carefully. Insert the fan housing into the hole, ensuring a snug fit. Use screws or mounting brackets to fix the fan firmly.
Double-check that the fan does not move or wobble. Tighten screws until the fan is stable but avoid overtightening. Connect the duct securely to the fan outlet for proper ventilation.

Credit: www.diychatroom.com
Testing The Installation
Testing the installation is a key step after adding a bathroom fan to an existing light switch. It ensures the fan works safely and correctly. This step prevents any electrical issues or damage. Follow these simple checks to confirm your setup is ready for daily use.
Restoring Power
Turn the circuit breaker back on. This restores power to the bathroom switch. Check that the light switch feels normal when you flip it. Watch for any sparks or unusual smells. These signs mean there could be a wiring problem. If everything looks normal, proceed to test the fan.
Ensuring Proper Operation
Flip the light switch to the “on” position. The bathroom fan should start running immediately. Listen for the fan’s noise; it should be steady and not too loud. Feel near the fan vent to check airflow. If the fan does not run, double-check the wiring connections. Make sure all wires are tight and properly connected. Confirm the fan turns off when the switch is off. This test shows the fan and switch work together as planned.
Troubleshooting Common Issues
Adding a bathroom fan to an existing light switch can seem simple. Yet, some common issues might stop the fan from working. Troubleshooting helps fix these problems fast. It saves time and prevents frustration. This section covers two main issues: the fan not turning on and switch problems.
Fan Not Turning On
First, check if the fan has power. Test the circuit breaker to see if it is tripped. Reset it if needed. Look at the wiring connections inside the fan. Loose wires cause the fan to stay off. Tighten any loose wires carefully. Also, check if the fan motor is faulty. Try spinning the blades gently. If they do not move, the motor might be stuck or broken. Replace the motor if necessary. Lastly, make sure the fan is compatible with your switch.
Switch Problems
Sometimes, the switch itself is the problem. Test the switch by turning it on and off several times. Listen for any clicking sounds. No click might mean a broken switch. Use a voltage tester to check if the switch sends power to the fan. Replace the switch if it does not work properly. Check the wiring behind the switch plate. Wires can come loose or be connected incorrectly. Secure and correct the wiring as needed. Make sure the switch is rated for both the light and fan load.
Frequently Asked Questions
How Do I Wire A Bathroom Fan To An Existing Switch?
Turn off power first. Connect fan’s hot wire to the switch’s output wire. Use wire nuts for secure connections. Ground all wires properly. Restore power and test the fan.
Can I Control A Bathroom Fan And Light With One Switch?
Yes, by wiring the fan and light in parallel to the switch. Both will turn on/off together. Ensure the circuit can handle combined load safely.
What Tools Are Needed To Add A Fan To A Switch?
You need a screwdriver, wire stripper, voltage tester, wire nuts, and electrical tape. A drill might be necessary for mounting. Safety gear is recommended.
Is It Safe To Add A Fan To An Existing Light Switch?
Yes, if done correctly. Turn off power, follow electrical codes, and use proper wiring methods. When unsure, consult a licensed electrician for safety.
Conclusion
Adding a bathroom fan to an existing light switch is a smart choice. It saves space and adds convenience. With the right tools and safety steps, anyone can do it. Take your time and follow each step carefully. This small upgrade improves air flow and reduces moisture.
Your bathroom will feel fresher and cleaner. Now, you can enjoy a simple, effective fan setup without rewiring. A practical project that brings real benefits to your home.