Are you planning to replace or repair a light switch but don’t know where to start? Disconnecting a light switch might seem tricky, but with the right steps, you can do it safely and easily.
Imagine saving money by handling this simple task yourself instead of calling an electrician. In this guide, you’ll discover clear, step-by-step instructions that anyone can follow. Keep reading to learn how to disconnect your light switch without stress or confusion.
Your home projects just got a lot simpler!

Credit: www.youtube.com
Safety First
Safety must be your top priority before disconnecting any light switch. Electricity can cause serious injury or death. Taking simple steps can protect you and others in your home. Follow these safety measures carefully to avoid accidents.
Turn Off Power
Start by turning off the power at the circuit breaker. This stops electricity from flowing to the switch. Never rely on just the switch to cut power. Always double-check that the power is off before touching any wires.
Use A Voltage Tester
Use a voltage tester to check the switch for live wires. This tool tells you if electricity is still present. Test all wires, even if you turned off the breaker. If the tester shows power, do not proceed until the power is completely off.
Wear Protective Gear
Wear rubber gloves and safety glasses to protect yourself. Gloves reduce the risk of electric shock. Glasses protect your eyes from sparks or debris. Dress in clothes that cover your arms and legs for added safety.
Credit: diy.stackexchange.com
Gather Tools
Gathering the right tools is the first step to disconnect a light switch safely. Having all tools ready helps the task go smoothly. It also keeps you safe during the work. Each tool has a specific role in the process. Knowing what to use makes the job easier and faster.
Screwdrivers Needed
Use a flathead and a Phillips screwdriver. These help remove the switch cover and screws. Choose screwdrivers with comfortable handles. Make sure the size fits the screws well. This prevents damage to screws and tools.
Voltage Tester
A voltage tester checks if the wires have electricity. It is important to avoid electric shocks. Use a non-contact voltage tester for safety. Touch it near wires to see if power flows. If the tester shows no power, you can work safely.
Wire Strippers
Wire strippers remove the plastic coating on wires. This is needed when disconnecting or reconnecting wires. Choose wire strippers with different size options. They help strip wires without cutting the metal inside. Using the right tool protects the wire and ensures good connection.
Locate The Switch
Locating the light switch is the first step to disconnect it safely. You need to find the exact switch you want to work on. This helps avoid turning off the wrong switch and prevents accidents.
Identify Switch Type
Look closely at the switch on the wall. Common types include toggle, rocker, and push-button switches. Each type looks different and may feel different when pressed. Knowing the type helps you handle it properly during disconnection.
Access The Switch Box
The switch box holds the electrical connections behind the switch. Usually, it is hidden inside the wall. To access it, turn off the power at the circuit breaker first. Then, use a screwdriver to remove the switch cover plate carefully. This reveals the wires and the switch inside.
Remove The Cover Plate
Removing the cover plate is the first step in disconnecting a light switch. It gives you clear access to the switch and wiring. This step requires care to avoid damage or injury.
Unscrew The Plate
Locate the screws holding the cover plate in place. Use a screwdriver to turn them counterclockwise. Keep the screws safe for reassembly. Remove the plate gently once the screws are out. Set it aside on a flat surface.
Handle With Care
Cover plates can be fragile, especially if they are old. Avoid bending or cracking the plate while removing it. Hold it firmly but gently. Keep it away from sharp objects or edges. Proper handling ensures the plate stays intact for later use.
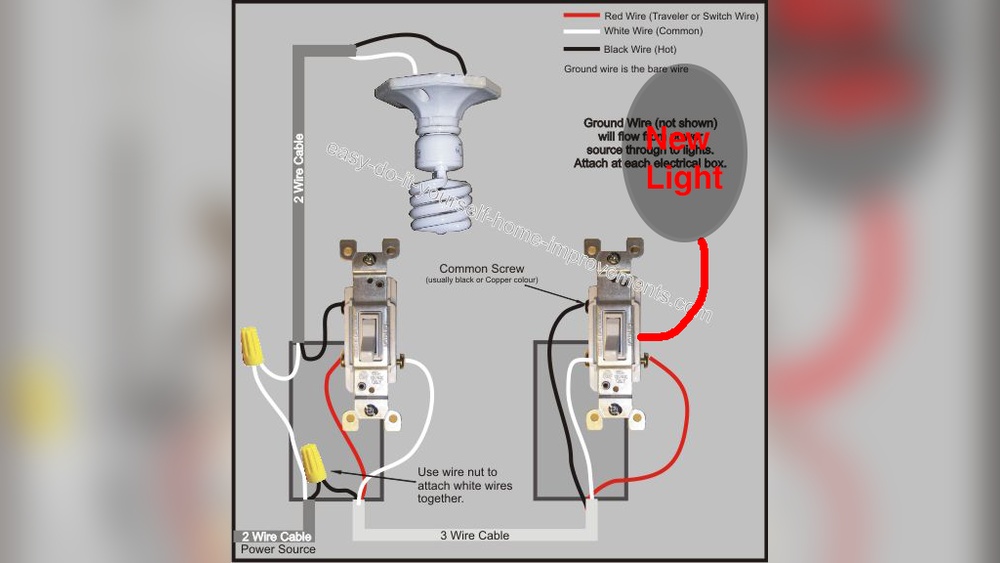
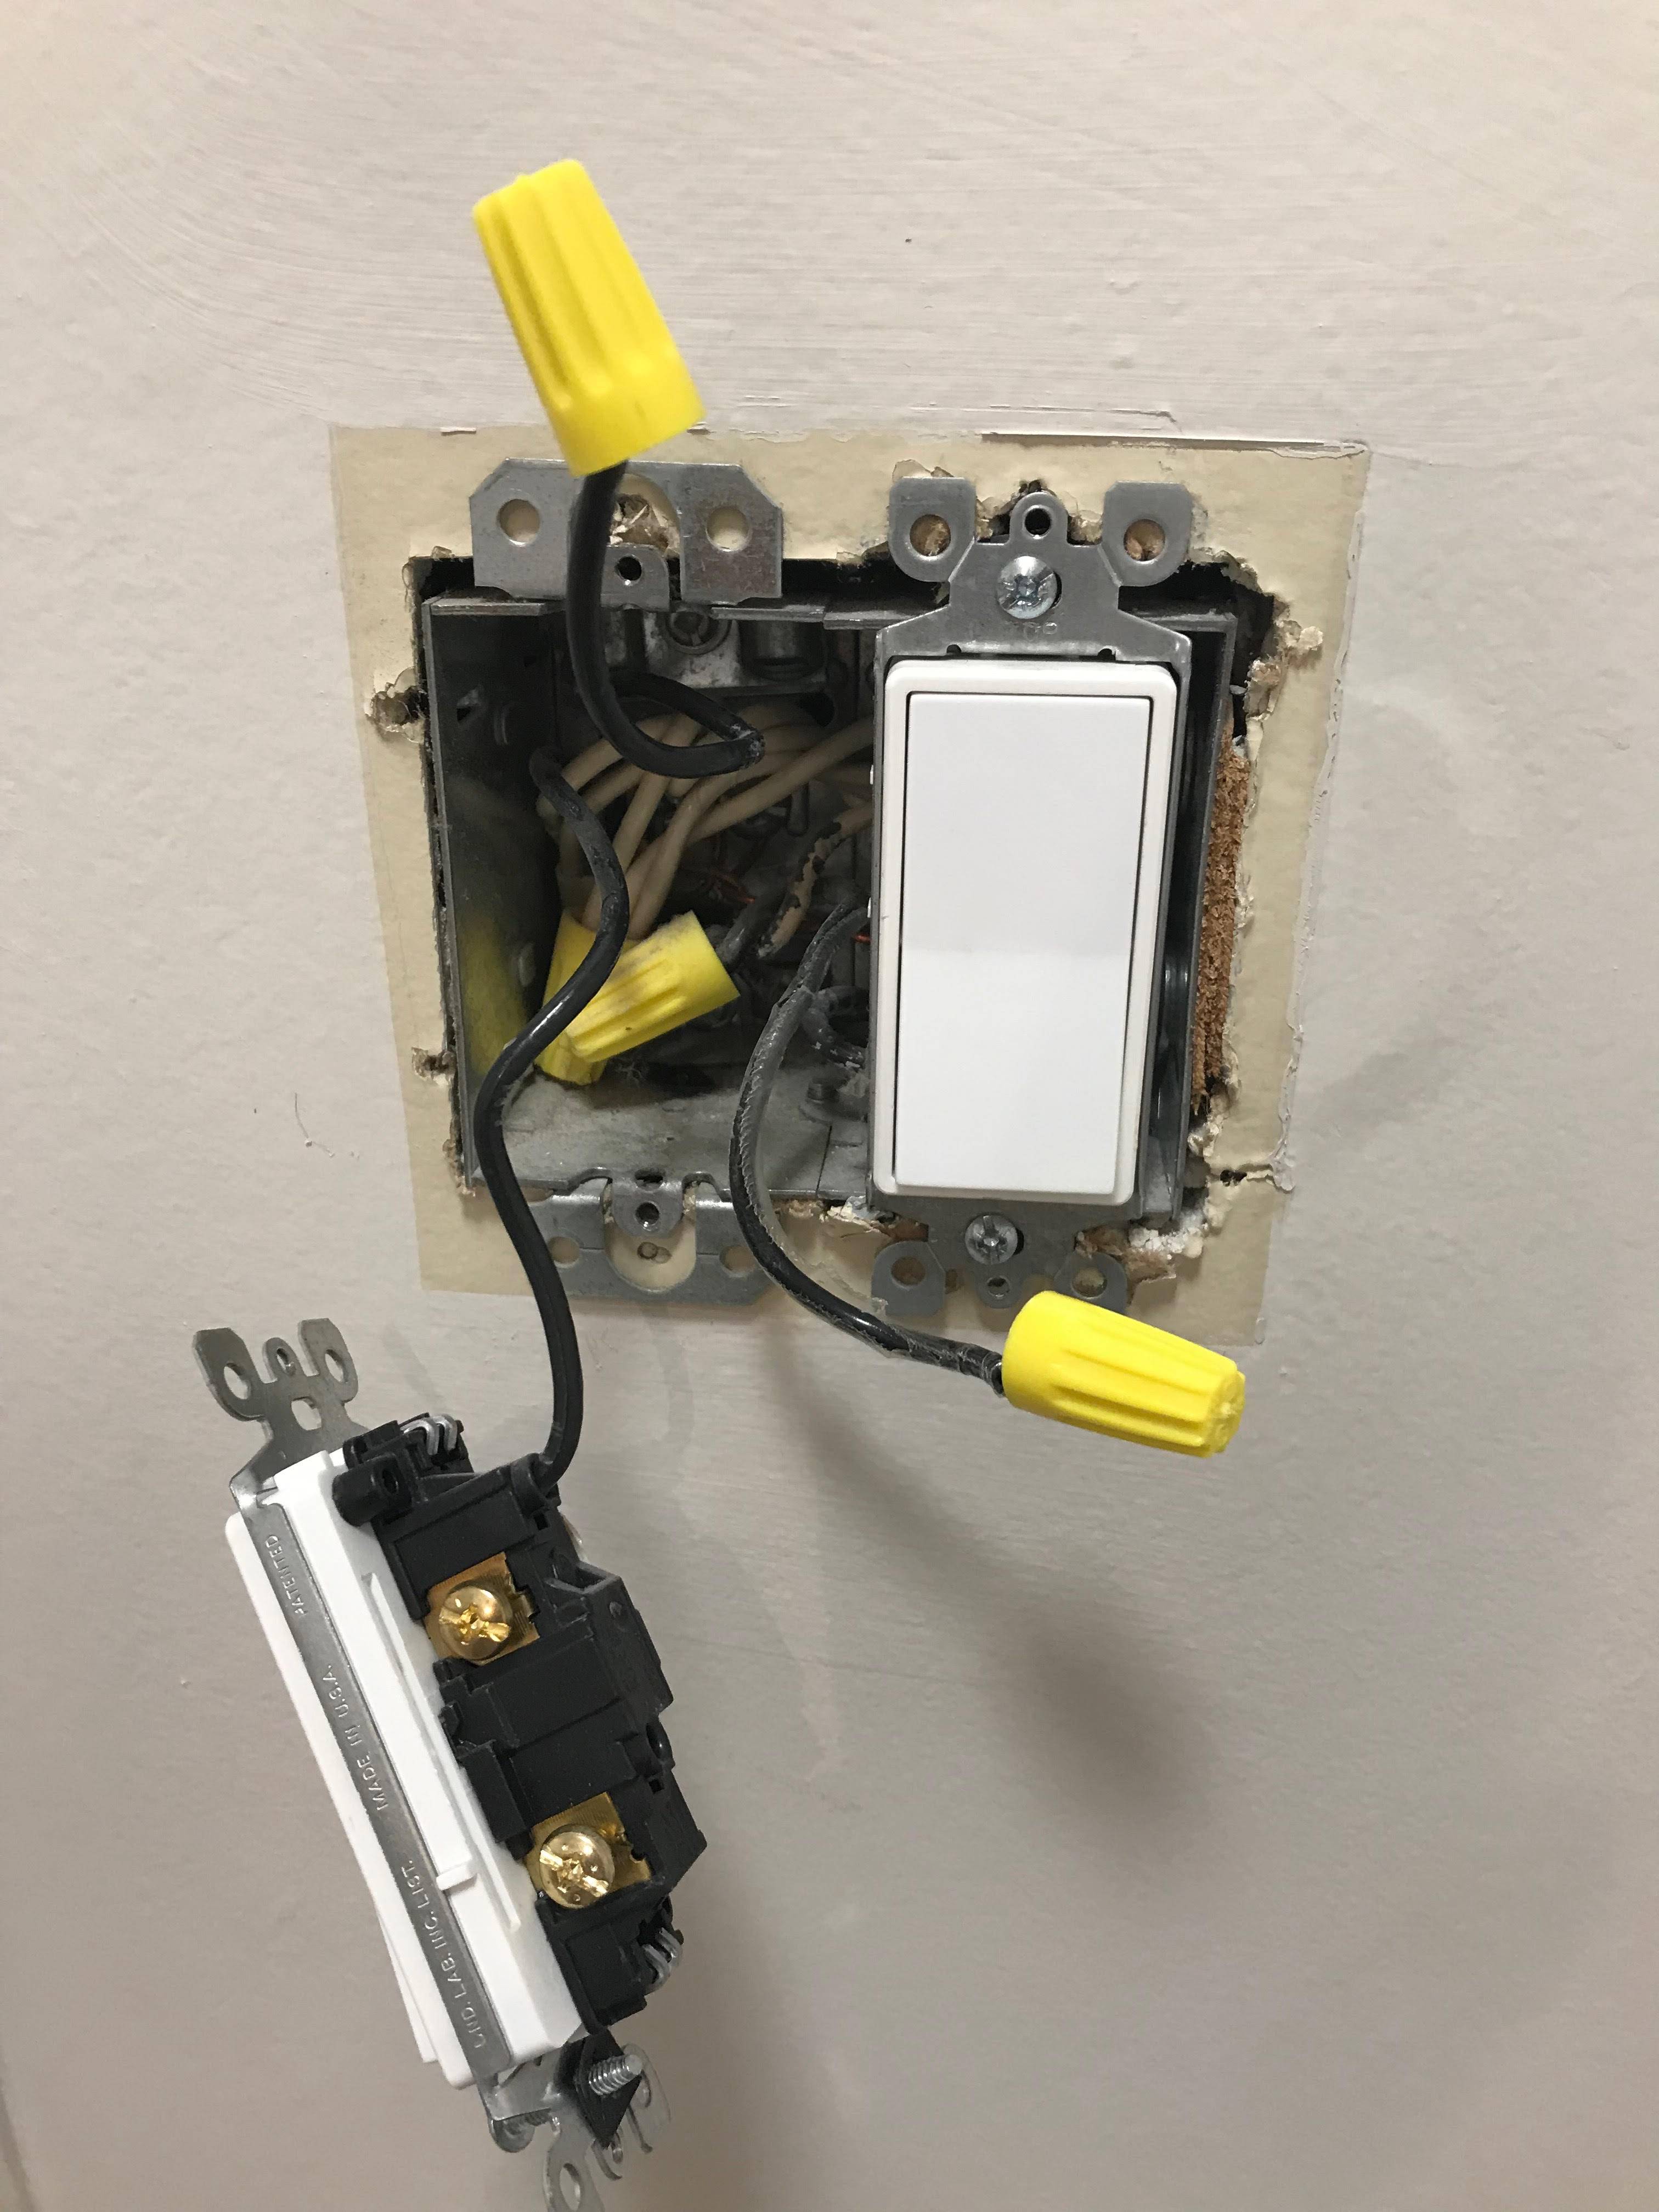
Disconnect The Wires
Disconnecting the wires from a light switch is a key step. It must be done carefully to avoid damage or injury. This section explains how to handle the wires safely and correctly. Follow each step to keep the process smooth and safe.
Note Wire Positions
Look closely at where each wire is connected. Take a photo or draw a simple diagram. This helps to reconnect wires later without mistakes. Remember the color and position of every wire. This step saves time and prevents confusion.
Loosen Terminal Screws
Use a screwdriver to turn the terminal screws. Turn them slowly to avoid stripping the screws. Loosen each screw enough to free the wire. Do not remove the screws completely to avoid losing them.
Remove Wires Safely
Gently pull each wire from the terminal. Hold the wire close to the terminal to avoid damage. Do not yank or twist the wires. Place the wires safely away to avoid contact with metal parts. This keeps the area safe for the next steps.
Cap And Secure Wires
After disconnecting a light switch, properly capping and securing the wires is crucial. This step prevents electrical shorts and keeps the wires safe. It also protects anyone who might touch the switch box later. Proper wire capping stops accidental shocks and fire risks. Follow these simple steps to safely secure your wires.
Use Wire Nuts
Wire nuts are small plastic caps that twist onto wire ends. They hold wires together and cover exposed metal. Match the wire nut size to the wire gauge for a tight fit. Twist the wires together first, then screw on the wire nut. Make sure no bare wire is visible outside the nut. This keeps wires insulated and secure.
Tape For Extra Safety
Adding electrical tape around wire nuts adds an extra safety layer. Wrap tape tightly over the wire nut and wires. This helps prevent the nut from loosening over time. It also offers more insulation against moisture and dust. Use good-quality electrical tape designed for wire insulation.
Close The Switch Box
Closing the switch box is an important step after disconnecting a light switch. It keeps the wiring safe and prevents dust or moisture from entering. Properly closing the box also helps avoid electrical hazards and keeps the area neat.
Replace Cover Plate
Start by placing the cover plate back onto the switch box. Align it carefully with the screw holes. The cover plate protects the wiring inside and gives a finished look to the wall.
Make sure the plate fits flush against the wall. Avoid forcing it if it does not fit easily. A properly placed cover plate ensures safety and neatness.
Secure Screws
Use a screwdriver to tighten the screws on the cover plate. Turn each screw slowly to avoid stripping the threads. Tight screws hold the plate firmly in place.
Do not overtighten, as this can crack the cover plate. Check that the plate does not move after securing screws. A steady cover plate protects wiring and keeps the switch box safe.
:max_bytes(150000):strip_icc()/how-to-replace-a-light-switch-1824670_07_newswitch_40431-69f2872f4a734dc89e3c2bed8711fc69.jpg)
Credit: www.thespruce.com
Restore Power And Test
After disconnecting a light switch, restoring power is the next step. This process ensures everything works safely. Testing confirms the switch and light function properly. Follow these steps carefully to avoid any issues.
Turn On Circuit Breaker
Find the circuit breaker panel in your home. Look for the switch labeled for the light you worked on. Flip the switch to the ON position. This restores electricity to the circuit. Wait a few seconds for power to flow.
Check For Proper Function
Go to the light switch you disconnected. Flip the switch up and down. Watch if the light turns on and off correctly. If the light does not work, turn off the breaker again. Double-check your wiring or connections before trying again.
When To Call A Professional
Knowing when to call a professional is important for safety and success. Some light switch problems are simple to fix. Others require expert skills to avoid risks. Calling an electrician can save time and prevent accidents. Here are signs that you should hire a professional.
Complex Wiring Issues
Wiring that looks tangled or confusing is a red flag. Professionals understand wiring diagrams and codes. They can safely disconnect switches with complex wiring. Incorrect handling may cause shorts or fires. Always trust experts with complicated electrical setups.
Persistent Electrical Problems
Switches that keep failing or flickering need expert attention. Persistent issues may show deeper electrical faults. A professional can diagnose hidden problems correctly. They use special tools to test circuits. Fixing these problems ensures safety and lasting repairs.
Frequently Asked Questions
How Do I Safely Disconnect A Light Switch?
Turn off the power at the circuit breaker first. Use a voltage tester to ensure no electricity flows. Unscrew the switch cover and disconnect the wires carefully. Label wires if needed for easier reconnection later.
What Tools Are Needed To Disconnect A Light Switch?
You need a screwdriver, voltage tester, and wire stripper. A flashlight may help in dark areas. Always use insulated tools for safety during electrical work.
Can I Disconnect A Light Switch Without Turning Off Power?
No, always turn off the power at the breaker. Working on live wires risks electric shock or injury. Safety first to avoid accidents.
How To Identify Wires When Disconnecting A Light Switch?
Look for black (hot), white (neutral), and green or bare (ground) wires. Use labels or take a photo before disconnecting. This helps during reconnection or replacement.
Conclusion
Disconnecting a light switch is safer than it seems. Always turn off the power before starting. Double-check with a tester to avoid shocks. Take your time and follow each step carefully. This small task can save you money and trouble.
With practice, you will feel more confident handling switches. Keep safety your top priority throughout the process. Now, you know how to disconnect a light switch correctly. Try it yourself and see how simple it can be.