Have you ever wished you could control your lights from a spot that’s more convenient? What if you could turn an existing outlet into a light switch without calling an electrician?
Installing a light switch from an outlet might sound tricky, but with the right steps, you can do it yourself. This guide will walk you through the process in simple, clear terms. By the end, you’ll have the confidence to upgrade your space and take control of your lighting exactly how you want.
Ready to get started? Let’s dive in!
Tools And Materials Needed
Starting a project to install a light switch from an outlet requires the right tools and materials. Having these items ready makes the work easier and safer. The list below covers the essentials needed for this task.
Basic Hand Tools
Essential hand tools include a screwdriver, wire stripper, and pliers. A flathead and Phillips screwdriver help remove and secure screws. Wire strippers remove insulation without cutting the wire. Needle-nose pliers bend and hold wires securely.
Electrical Materials
You will need a light switch, electrical box, and wire connectors. The switch controls the light. The box holds the switch inside the wall safely. Wire connectors join wires without loose ends.
Safety Equipment
Safety is key. Use insulated gloves and safety glasses. Gloves protect from electric shocks. Glasses shield eyes from debris or sparks.
Additional Supplies
Gather electrical tape, voltage tester, and a drill with bits. Electrical tape insulates wire connections. A voltage tester confirms power is off. A drill helps mount the electrical box if needed.
Credit: www.azdiyguy.com
Safety Precautions
Turn off the power at the circuit breaker before starting any work. Use a voltage tester to ensure wires are not live. Wear insulated gloves to protect yourself from electric shock.
Turn Off The Power At The Circuit Breaker
Always switch off the power before starting any electrical work.
Locate your home’s circuit breaker panel. Find the breaker controlling the outlet.
Flip it to the off position. Test the outlet with a voltage tester to confirm.
Use Proper Tools And Equipment
Choose insulated screwdrivers and wire strippers for safety.
Wear rubber-soled shoes to avoid electric shocks.
Keep a flashlight handy in case the power goes out.
Verify No Electricity In The Wires
Test all wires with a non-contact voltage tester.
Check each wire carefully before touching or cutting.
Never assume wires are safe without testing.
Wear Safety Gear
Use safety goggles to protect your eyes from sparks or debris.
Wear gloves designed for electrical work to reduce shock risk.
Keep your clothes tight to avoid catching on tools or wires.
Work In A Dry Environment
Ensure the work area is dry. Water and electricity do not mix.
Avoid working in damp or wet conditions to prevent shocks.
Use a dry cloth to clean hands and tools before starting.
Turning Off Power
Turning off power is the first step before installing a light switch from an outlet. It keeps you safe from electric shocks. Always treat electricity with respect. Even a small mistake can cause injury or damage.
Power must be completely off at the circuit breaker. This stops any current from flowing through the wires. Never rely on just the wall switch to cut power. It only controls the light, not the entire circuit.
Locate The Correct Circuit Breaker
Find the breaker box in your home. It is usually in a basement, garage, or utility room. Open the panel carefully. Look for labels on the breakers. They tell which breaker controls which area. Turn off the breaker that powers the outlet you want to work on.
Use A Voltage Tester To Confirm Power Is Off
After switching off the breaker, test the outlet. Use a voltage tester or multimeter. Touch the tester probes to the outlet terminals. No reading means power is off. This step confirms your safety before touching wires.
Inform Others In Your Home
Tell your family or housemates about the power shutoff. This prevents anyone from turning the breaker back on by mistake. Use a note on the breaker box or inform them directly. Safety is a shared responsibility.
Removing The Outlet Cover
Removing the outlet cover is the first step in turning an outlet into a light switch. This task requires care and the right tools to keep everything safe. The cover hides the wiring inside the wall. Removing it lets you see the wires clearly for the next steps.
Before starting, make sure to turn off the power. This prevents any electric shocks. Safety is the top priority in this job. Use a screwdriver that fits the screws on the outlet cover. Most covers use a flathead or Phillips screwdriver.
Gathering The Right Tools
Find a screwdriver that matches the screws on the outlet cover. A flathead or Phillips screwdriver usually works. Keep a small container nearby. It helps hold the screws safely after removal. Avoid losing screws during the process.
Turning Off The Power
Switch off the circuit breaker for the outlet. Test the outlet with a voltage tester. Confirm no power is running to the outlet. This step avoids electric shock or injury. Never skip this important safety step.
Removing The Screws
Use the screwdriver to turn the screws counterclockwise. Remove both screws fully. Place them in the container. Handle the outlet cover gently. Avoid breaking or cracking it during removal.
Taking Off The Outlet Cover
After screws are out, pull the cover straight off. Sometimes it sticks slightly. Wiggle it gently to loosen. Do not use force. The cover should come off easily. Now, the wires inside the outlet box are visible.
Identifying Wiring
Identifying wiring is the first step in installing a light switch from an outlet. It helps you understand which wires control power and which connect to the light. Knowing this prevents mistakes and keeps the work safe.
Each wire has a purpose. Learning to spot them makes the switch installation easier. Use simple tools like a voltage tester to check wires safely. Always turn off the power before touching any wires.
Understanding Wire Colors
Wire colors show their functions. Black or red wires carry power. White wires usually return the current. Green or bare wires connect to the ground. These color rules guide you during installation.
Using A Voltage Tester
A voltage tester helps find which wire has electricity. Touch the tester to each wire carefully. The tester lights up on live wires. This step confirms the power source and wires to use.
Identifying Hot And Neutral Wires
The hot wire carries electricity to the outlet or switch. The neutral wire completes the circuit by carrying electricity back. Identifying these wires avoids wrong connections and hazards.
Checking Ground Wires
Ground wires protect against electric shock. They usually connect to a green screw or metal box. Make sure to connect the ground wire properly for safety.

Credit: diy.stackexchange.com
Disconnecting The Outlet
Begin by turning off the power at the circuit breaker to stay safe. Unscrew the outlet cover and carefully pull out the outlet. Disconnect the wires from the outlet, noting their positions for later use.
Understanding The Importance Of Disconnecting The Outlet
Disconnecting the outlet is a key step before installing a light switch. It keeps you safe from electrical shocks. Always turn off the power at the circuit breaker first. Never work on live wires. This step protects you and your home.
Tools Needed For Disconnecting The Outlet
Gather a screwdriver, voltage tester, and wire cutters. A voltage tester checks if power is off. Screwdrivers help remove the outlet cover and screws. Wire cutters may be needed to trim wires carefully.
Step-by-step Guide To Disconnect The Outlet
Start by removing the outlet cover with a screwdriver. Use the voltage tester to check wires for power. Test all wires, not just one. Unscrew the outlet from the electrical box. Gently pull the outlet out to access wires. Note how wires connect to the outlet. Loosen screws holding wires and remove them carefully.
Safety Tips During Disconnection
Wear rubber-soled shoes and avoid wet floors. Keep your hands dry and tools insulated. Double-check the power is off before touching wires. Work slowly and do not rush. Make sure wires do not touch each other or metal parts.
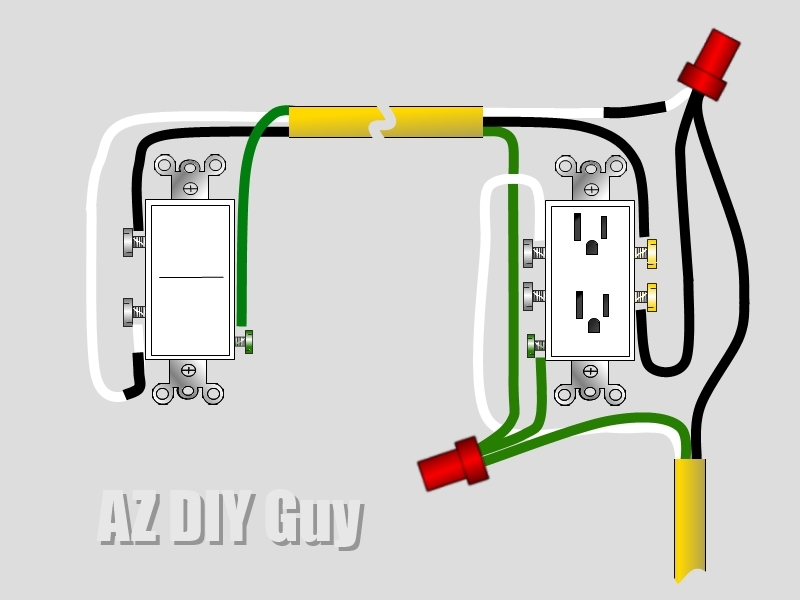
Wiring The Light Switch
Wiring the light switch is a crucial step when installing a switch from an outlet. This part connects the power source to the light fixture through the switch. Proper wiring ensures the switch works safely and efficiently. Clear understanding of wiring will help avoid mistakes that can cause electrical problems.
Wiring involves handling live wires and connecting them to the switch terminals. Safety is important. Always turn off the power at the circuit breaker before starting. Use a voltage tester to confirm no electricity flows in the wires.
Identify The Wires
Locate the hot, neutral, and ground wires inside the outlet box. The hot wire is usually black or red. The neutral wire is white. The ground wire is green or bare copper. Label each wire to avoid confusion.
Disconnect The Outlet Wires
Remove the wires from the outlet terminals carefully. Keep track of which wire goes where. This step frees the wires for connection to the new switch. Do not cut the wires unless necessary.
Connect The Switch Wires
Attach the hot wire to one terminal on the switch. Connect the wire going to the light fixture to the other terminal. This setup allows the switch to control the light’s power. Tighten the terminal screws securely to hold wires in place.
Attach The Ground Wire
Connect the ground wire to the green screw on the switch. Grounding prevents electrical shock. If no ground wire exists, check local codes for safe alternatives.
Secure The Wiring And Switch
Carefully push the wires back into the box. Mount the switch using screws. Make sure wires do not pinch or bend sharply. A clean and secure installation helps maintain safety and function.

Credit: www.youtube.com
Mounting The Switch
Mounting the switch is a key step after wiring. It secures the switch in place and makes it ready for use. Proper mounting ensures safety and a neat finish. Take your time for a steady and secure fit.
Prepare The Switch Box
Check the outlet box for any damage or loose parts. Remove any debris or dust inside the box. The box must be clean and dry before mounting the switch. A clean box helps the switch fit snugly and safely.
Align The Switch
Hold the switch inside the outlet box carefully. Make sure the switch is facing the correct way. The toggle or rocker should point up or down, as usual. Align the screw holes on the switch with those on the box.
Screw The Switch In Place
Use a screwdriver to fasten the screws firmly. Start by inserting the screws into the holes. Turn the screwdriver clockwise until the switch is tight. Do not over-tighten as it may crack the switch or box.
Check The Switch Stability
Gently wiggle the switch to test its hold. It should feel solid without any movement. A loose switch can cause wiring issues or safety hazards. Tighten screws again if the switch feels loose.
Testing The Installation
Testing the installation is a key step after converting an outlet to a light switch. It ensures safety and confirms the switch works correctly. Skipping this step can cause electrical problems or hazards.
Follow clear steps to check your work. Use simple tools and observe carefully. This helps avoid damage and saves time.
Turn The Power Back On
First, restore power at the circuit breaker. This lets electricity flow to the switch and light fixture. Be sure the breaker is fully on.
Use A Voltage Tester
Check the switch terminals with a voltage tester. It confirms power reaches the switch. No voltage means a wiring error or breaker issue.
Operate The Switch
Flip the switch on and off. Watch if the light turns on and off. The switch should control the light smoothly.
Check For Loose Connections
If the light flickers or does not work, power off again. Tighten any loose wires at the switch and outlet box. Loose wires cause poor contact and hazards.
Observe For Unusual Signs
Look for sparks, burning smells, or buzzing sounds. These signs mean a problem. Turn off power and fix the issue before use.
Troubleshooting Common Issues
Troubleshooting common issues helps fix problems fast. Installing a light switch from an outlet can cause some errors. Knowing what to check saves time and keeps you safe. This section covers common problems and how to solve them.
Check The Power Supply
Make sure the power is off before you start. Use a tester to confirm no electricity flows. Sometimes the circuit breaker trips without notice. Reset the breaker if needed. Double-check power at the outlet and switch box.
Verify Wire Connections
Loose wires cause switches to not work properly. Tighten all screws and wire nuts firmly. Match wires by color—black to black, white to white. Look for damaged or frayed wires. Replace any faulty wiring before continuing.
Test The Switch Function
Switches can be defective out of the box. Use a multimeter to check the switch’s continuity. Flip the switch on and off during the test. A bad switch will not show continuity when on. Replace the switch if it fails this test.
Inspect Outlet And Switch Compatibility
Some outlets cannot be converted to switches. Check that the outlet box has enough space. Use a switch rated for your circuit’s voltage and current. Incorrect parts cause failures or hazards. Always use compatible components for safety.
Look For Grounding Issues
A missing ground wire can cause problems. Confirm the ground wire is connected to the switch box and switch. Use a tester to verify grounding. Grounding protects against shocks. Fix any missing or loose ground connections.
Frequently Asked Questions
How Do I Convert An Outlet To A Light Switch?
To convert an outlet to a light switch, first turn off power. Remove the outlet cover and disconnect wires. Connect the switch wires to the outlet circuit. Secure the switch and test the connection carefully.
What Tools Are Needed To Install A Light Switch?
You need a screwdriver, wire stripper, voltage tester, electrical tape, and a light switch. A drill and wire nuts may also be required for secure connections.
Is It Safe To Install A Light Switch From An Outlet?
Yes, it is safe if you turn off the power at the breaker. Follow electrical codes and use proper tools. If unsure, consult a professional electrician to avoid hazards.
Can I Use The Existing Wiring For The Switch Installation?
Yes, you can use existing wiring if it’s in good condition and properly rated. Ensure the wires match the switch’s requirements and connections are secure.
Conclusion
Installing a light switch from an outlet can be simple and safe. Follow each step carefully and take your time. Always turn off the power before you start working. Use the right tools and check your work twice. This project saves money and helps you learn new skills.
Enjoy the satisfaction of doing it yourself. Stay safe and keep improving your home projects.