Are you ready to give your project a professional, secure finish? Installing Lift the Dot fasteners might seem tricky at first, but with the right steps, you can do it yourself quickly and easily.
These fasteners offer a strong hold that won’t accidentally pop open, making them perfect for everything from upholstery to outdoor gear. In this guide, you’ll learn exactly how to install Lift the Dot fasteners with simple tools and clear instructions.
Keep reading, and you’ll master the technique that adds both function and style to your work.

Credit: www.sailrite.com
Lift The Dot Fasteners Basics
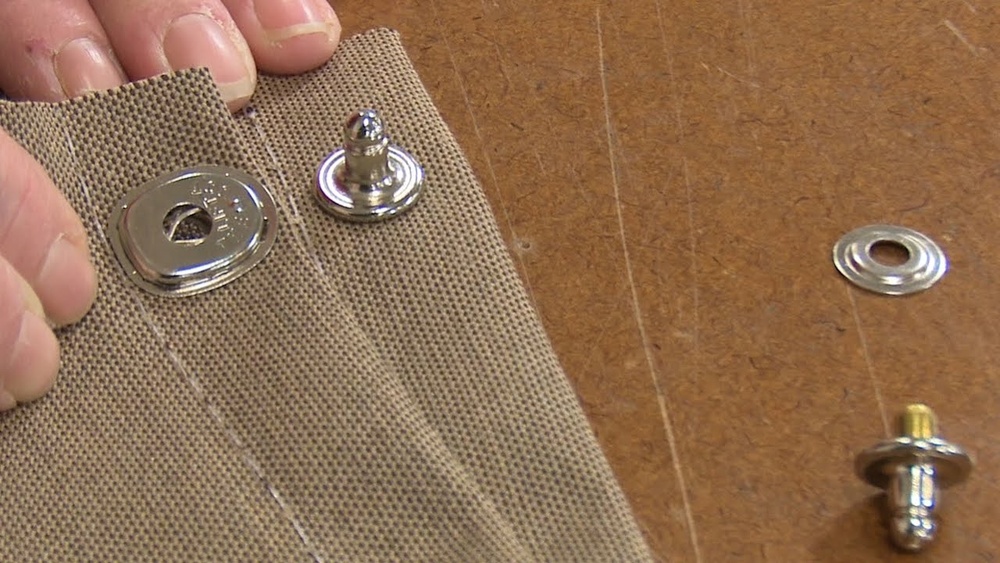
Installing the socket and stud is a key step in fitting Lift the Dot fasteners. This process ensures a strong, reliable connection between two fabric pieces. Proper installation keeps the fastener secure and easy to use. Follow these steps carefully for the best results.
Positioning The Socket
Start by placing the socket on the fabric where you want it. Make sure the fabric lies flat and smooth. The socket should sit flush against the material. Align it with the matching part on the other fabric piece. Mark the spot clearly for accurate placement. This helps avoid mistakes during installation.
Securing The Stud
Next, position the stud on the opposite fabric piece. Check that it lines up perfectly with the socket. The stud must face the socket’s opening for proper closure. Push the stud into the fabric carefully. Hold it steady before fixing it in place. This prevents the stud from moving or bending.
Using The Press Tool
Use a press tool to attach both socket and stud firmly. Place the fabric with the socket or stud under the tool’s die. Apply steady pressure to secure the fastener parts. Avoid using too much force to prevent damage. The press tool ensures a tight, lasting hold. Repeat for both socket and stud sides for full installation.

Credit: www.sailrite.com

Credit: www.youtube.com
Frequently Asked Questions
How To Install Lift The Dot Fastener?
Mark fabric spots for socket and stud. Use a hole cutter to pierce fabric. Insert socket and stud. Bend prongs over washer with a screwdriver or special tool. Press firmly to secure the Lift the Dot fastener in place.
How To Attach A Snap Fastener?
Place the snap parts on aligned fabric spots. Pierce fabric, insert socket and stud. Use snap pliers to press firmly until secure.
What Are Lift The Dot Fasteners?
Lift the Dot fasteners are secure snaps that open only in one direction. They prevent accidental release and enhance durability.
How To Install Prong Fasteners?
Align prong fasteners with pre-punched holes. Insert prongs through holes downward. Fold prongs outward to secure firmly. Ensure tight fit for durability.
Conclusion
Installing Lift the Dot fasteners is simple and quick with the right steps. Prepare your fabric carefully and mark the spots accurately. Use the proper tools to set each fastener piece firmly. Check alignment before pressing the parts together to ensure a secure fit.
Practice on scrap material if needed to build confidence. These fasteners provide strong hold and easy opening when installed correctly. Follow the instructions closely for best results every time. Enjoy the neat, professional look that Lift the Dot fasteners give your projects.