Have you ever wished you could control a light in your room without getting up or unplugging it? Adding a light switch to an existing light can make your space more convenient and user-friendly.
It’s easier than you might think, even if you don’t have much experience with electrical work. In this guide, you’ll discover simple steps to safely install a light switch that puts you in control. Keep reading, and by the end, you’ll have the confidence to upgrade your lighting setup yourself.

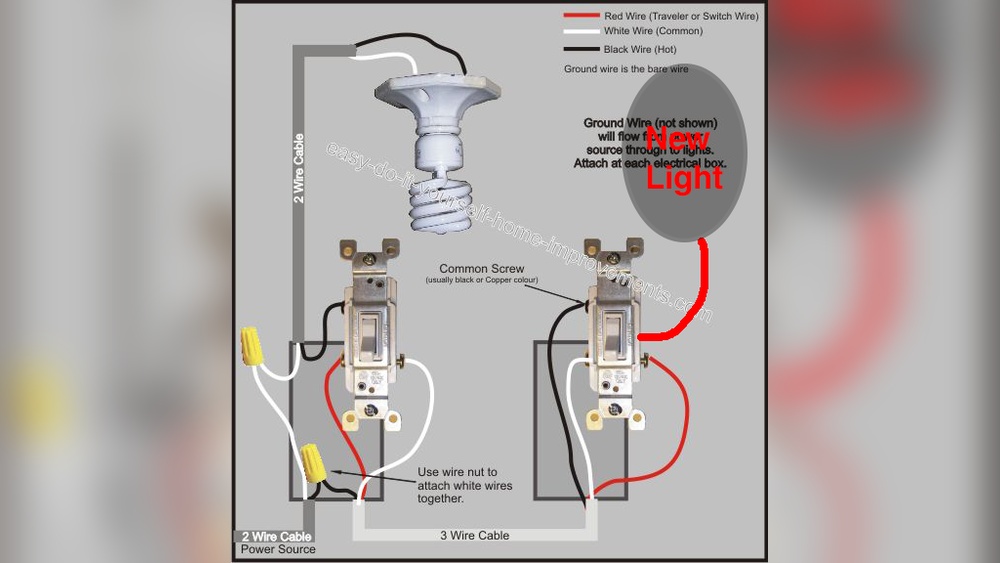
Credit: diy.stackexchange.com
Tools And Materials Needed
Adding a light switch to an existing light requires some basic tools and materials. Having the right items makes the job easier and safer. Prepare everything before you start to avoid interruptions.
Essential Tools
- Voltage tester to check power is off
- Screwdriver set for screws and terminals
- Wire stripper to remove insulation
- Drill with bits for making holes
- Measuring tape to measure wire lengths
- Flashlight or headlamp for better visibility
- Electrical tape to secure wire connections
- Wire nuts for joining wires safely
Required Materials
- Light switch suitable for your circuit
- Electrical box to house the switch
- Electrical wire matching your home’s wiring
- Wire connectors for safe joins
- Wall plate to cover the switch
- Cable clamps to secure wiring

Credit: www.finehomebuilding.com
Safety Precautions
Safety is the top priority when adding a light switch to an existing light. Electrical work can be dangerous without the right steps. Taking proper precautions helps prevent shocks, injuries, and damage.
Always prepare well before starting. Use tools and methods that protect you from live wires. Follow clear, simple safety rules to keep your work area safe.
Power Shutoff
Turn off the main power at the circuit breaker. This stops electricity flow to the wires you will handle.
Double-check that the power is off. Never trust just the switch position. Work safely with no electricity running.
Using A Voltage Tester
Use a voltage tester to check wires before touching them. It shows if wires still have power.
Test all wires in the box. Confirm no live current is present. This step is vital for safe work.
Planning The Installation
Planning the installation is the first step to add a light switch to an existing light. It helps avoid mistakes and ensures safety. A clear plan saves time and effort. Prepare tools and materials before starting. Understanding the wiring layout is essential. Think about where the switch will be most useful. Careful planning makes the project easier and safer.
Choosing The Switch Location
Pick a spot that is easy to reach. Near the door is usually best. Make sure the location follows local electrical codes. Avoid placing the switch where it may get wet. The height should be comfortable for most users. Mark the spot clearly before cutting or drilling. A well-placed switch improves convenience and safety.
Tracing Existing Wiring
Identify the wires that power the light. Use a voltage tester to check if wires are live. Turn off the main power before handling any wires. Follow the wiring from the light fixture to the switch area. Look inside the wall or ceiling for wire paths. Use a wire tracer tool for hidden cables. Knowing the wiring layout prevents damage and ensures a proper connection.
Turning Off Power
Turning off the power is the first and most important step before adding a light switch. It keeps you safe from electric shock and prevents damage to your electrical system. Always treat electricity with respect.
Before starting any work, make sure the power to the circuit is completely off. This simple act protects you and your home.
Locate The Circuit Breaker
Find your home’s main electrical panel. Look for the circuit breaker that controls the light you want to work on. It often has labels or numbers to help you identify it.
Switch Off The Correct Breaker
Flip the breaker to the off position. This stops electricity from flowing to the light fixture and wires. Double-check by turning on the light switch to ensure it is off.
Test The Power With A Voltage Tester
Use a voltage tester to confirm no electricity is present. Touch the tester to the wires or terminals. The tester should show no power before you start working.
Keep Safety Precautions In Mind
Wear insulated gloves and use insulated tools. Avoid working in wet conditions. Always keep your workspace clear and dry for safety.
Removing The Light Fixture Cover
Removing the light fixture cover is the first step in adding a light switch to an existing light. It allows access to the wiring inside. This step needs care and the right tools. Safety is important before starting any work with electrical fixtures.
Turn off the power to the light at the circuit breaker. Use a voltage tester to confirm no electricity flows to the fixture. This prevents shocks or accidents while working.
Gather The Right Tools
Prepare a screwdriver set, usually Phillips or flathead. Some covers use clips or screws. Check the fixture type to choose the correct tool. Having the right tools saves time and avoids damage.
Locate The Mounting Screws Or Clips
Look around the edge of the light cover. Screws are often visible on the outer rim. Some covers use clips hidden inside. Press gently around the edges to find clips or fasteners.
Remove The Cover Carefully
Unscrew or unclip the cover slowly. Support the cover with one hand to prevent it from dropping. Place screws in a safe spot. Keep the cover intact for later reinstallation.
Inspect The Fixture And Wiring
With the cover off, check the fixture and wires. Look for any damage or wear. This helps plan the next steps safely. Use a flashlight if needed to see clearly inside.
Running The Switch Wiring
Running the switch wiring is a key step in adding a new light switch. It involves connecting wires safely from the power source to the switch and then to the light fixture. Proper wiring ensures the switch works well and meets electrical codes.
Routing Wires Through Walls
Start by planning the path for the wires inside the wall. Use a stud finder to avoid nails or screws. Drill small holes through the wall studs to run the wires. Keep the wire path as straight as possible to make pulling easier. Pull the cable carefully to avoid damage to the insulation.
Securing Cables
Secure cables with wire staples or clips to prevent movement. Place staples about every 12 inches along the wire. Avoid pinching or crushing the cable when stapling. Leave some slack near the switch box to allow for connections. Proper securing protects wires from wear and keeps everything neat.
Connecting The Switch
Connecting the switch is a key step to control your light easily. It involves working with wires and making safe connections. Take your time and follow each step carefully. This will ensure your light switch works correctly and safely.
Identifying Wire Types
Start by recognizing the wires inside the switch box. Usually, you will find three types: live, neutral, and ground. The live wire carries electricity to the switch. The neutral wire returns electricity to the panel. The ground wire protects from electrical shocks. Each wire has a different color: black or red for live, white for neutral, and green or bare copper for ground. Knowing these colors helps you avoid mistakes.
Making Proper Connections
Turn off the power before touching any wires. Connect the live wire from the power source to one terminal of the switch. Attach the live wire that goes to the light fixture to the other terminal. Twist wires tightly and secure them with wire nuts. Connect the ground wire to the green screw on the switch. Keep neutral wires connected together in the box. Tight connections prevent sparks and failures.

Credit: www.do-it-yourself-help.com
Mounting The Switch And Cover Plate
Mounting the switch and cover plate is the final step in adding a light switch. It holds the switch firmly in place. It also protects the wiring and gives a clean look.
Proper mounting ensures safety and ease of use. A loose switch can cause problems or shocks. A well-mounted switch feels solid and works smoothly.
Preparing The Electrical Box
Check the electrical box inside the wall. Make sure it fits the switch size. Remove any debris or old wires. The box should be clean and secure. Tighten any loose screws to keep the box steady.
Attaching The Switch To The Box
Place the switch into the electrical box carefully. Align the screw holes on the switch with the box holes. Insert the screws and tighten them by hand first. Use a screwdriver to secure the screws firmly. Do not overtighten; it may crack the switch or box.
Installing The Cover Plate
Choose a cover plate that matches your switch and wall color. Place it over the switch, aligning screw holes. Insert the screws and tighten them evenly. The cover plate should sit flush against the wall. Avoid forcing the plate to prevent damage.
Testing The New Switch
Testing the new switch is a key step after installation. It confirms the switch works properly and safely controls the light. Without testing, problems may go unnoticed and cause issues later.
Follow clear steps to check the switch’s function. Use basic tools and simple actions to ensure everything is correct. Careful testing helps avoid electrical hazards and ensures your light operates smoothly.
Turn Off The Power
Start by switching off the power at the breaker box. This prevents electric shock during initial checks. Use a voltage tester on the switch wires. Confirm no current flows before touching anything.
Inspect The Wiring Connections
Look at all wire connections inside the switch box. Make sure wires are tightly secured to terminals. Loose wires can cause flickering or no light. Proper wiring is crucial for safe switch operation.
Restore Power And Test The Switch
Turn the breaker power back on. Flip the switch on and off several times. Check if the light turns on and off without delay. Any flickering or no response means a wiring issue.
Use A Voltage Tester For Extra Safety
Use a voltage tester on the switch terminals with power on. It confirms power reaches the switch. No reading indicates a wiring problem or faulty switch. This step adds an extra safety check.
Check The Light Fixture
Ensure the light bulb is working and properly installed. Replace the bulb if it is burnt out. Sometimes the problem is the bulb, not the switch. Test the light fixture separately if needed.
Troubleshooting Common Issues
Adding a light switch to an existing light is usually simple. Sometimes, problems can happen. Knowing common issues helps fix them fast. This section covers the most frequent problems. It gives clear advice to solve them.
Switch Not Working
Check if the power is on. A tripped breaker or blown fuse can stop the switch. Use a voltage tester to see if power reaches the switch. Loose wires can cause failure. Tighten all wire connections carefully. Make sure the switch is the right type for your circuit. Replace the switch if it still does not work.
Flickering Lights
Flickering can mean a loose connection. Check the bulb first. Replace it to rule out a bad bulb. Look at the switch wiring. Tighten any loose wires. A damaged switch can cause flicker. Swap it with a new one if needed. Sometimes, the light fixture itself has a problem. Inspect its wiring or replace the fixture if flicker continues.
Frequently Asked Questions
How Do I Add A Light Switch To An Existing Light?
To add a switch, first turn off power. Run new wiring from the light to the switch location. Connect wires correctly: live, neutral, and ground. Mount the switch and restore power. Test the switch to ensure proper operation.
What Tools Are Needed To Install A Light Switch?
You need a voltage tester, wire strippers, screwdriver, drill, electrical tape, and wire nuts. These tools help ensure safe and accurate switch installation. Always use insulated tools for electrical work.
Can I Install A Light Switch Without Rewiring The Whole Room?
Yes, if existing wiring is accessible. Run a switch leg wire from the light fixture to the switch. This method avoids rewiring the entire circuit, saving time and effort.
Is It Safe To Add A Light Switch Myself?
It can be safe if you follow safety steps. Always turn off power at the breaker before working. Use a voltage tester to confirm no current. If unsure, consult a professional electrician to avoid hazards.
Conclusion
Adding a light switch to an existing light can improve convenience at home. Follow safety steps carefully to avoid risks. Use the right tools and materials for the job. Take your time and check each connection twice. Small projects like this boost your home’s function and comfort.
Remember, simple changes make a big difference in daily life. Keep learning and trying new things around your house. You can do this safely with patience and care.