Have you ever wished you could control your light with a simple switch but didn’t know where to start? Adding a switch to an existing light can seem tricky, but it’s easier than you think.
Imagine turning your room’s lighting on and off without unplugging lamps or fumbling in the dark. In this guide, you’ll discover clear, step-by-step instructions to make it happen safely and quickly. Keep reading, and soon you’ll have full control over your lighting with just a flick of a switch.

Credit: www.finehomebuilding.com
Tools And Materials Needed
Adding a switch to an existing light needs the right tools and materials. Having these ready helps the job go smoothly. It also keeps you safe while working. Let’s look at what you need before starting.
Essential Tools
- Screwdriver set – flathead and Phillips
- Wire stripper and cutter
- Voltage tester
- Drill with bits
- Needle-nose pliers
- Electrical tape
- Measuring tape
- Level tool
Required Materials
- Light switch (single-pole or as needed)
- Switch box
- Electrical wires (14 or 12 gauge)
- Wire connectors (wire nuts)
- Wall plate cover
- Electrical cable clamps
Safety Gear
- Insulated gloves
- Safety glasses
- Rubber-soled shoes
- Flashlight or headlamp
Prepare all items before starting. This saves time and helps avoid mistakes. Use safety gear to protect yourself from shocks and injuries. Never work on live wires without turning off power.
Preparing For Installation
Preparing to add a switch to an existing light needs careful steps. Safety and planning are important before starting any electrical work. Follow these simple steps to get ready.
Turn Off Power
First, turn off the power at the circuit breaker. This stops electricity from flowing while you work. Use a voltage tester on the light or switch wires. Confirm that no current is running before touching any wires. Safety first.
Locate Existing Wiring
Find the wires that connect to your light fixture. Check inside the light box and nearby outlets. Look for black (hot), white (neutral), and green or bare (ground) wires. Understanding the wiring helps connect the new switch correctly.
Plan Switch Placement
Decide where to place the new switch on the wall. Choose a spot that is easy to reach and close to the light source. Mark the location and check behind the wall for pipes or cables. Good planning makes installation smoother and safer.
Wiring Basics
Understanding wiring basics is important before adding a switch to an existing light. It helps you work safely and correctly. This section breaks down key points about wiring. You will learn to identify wire types, understand circuit connections, and see common wiring setups.
Identify Wire Types
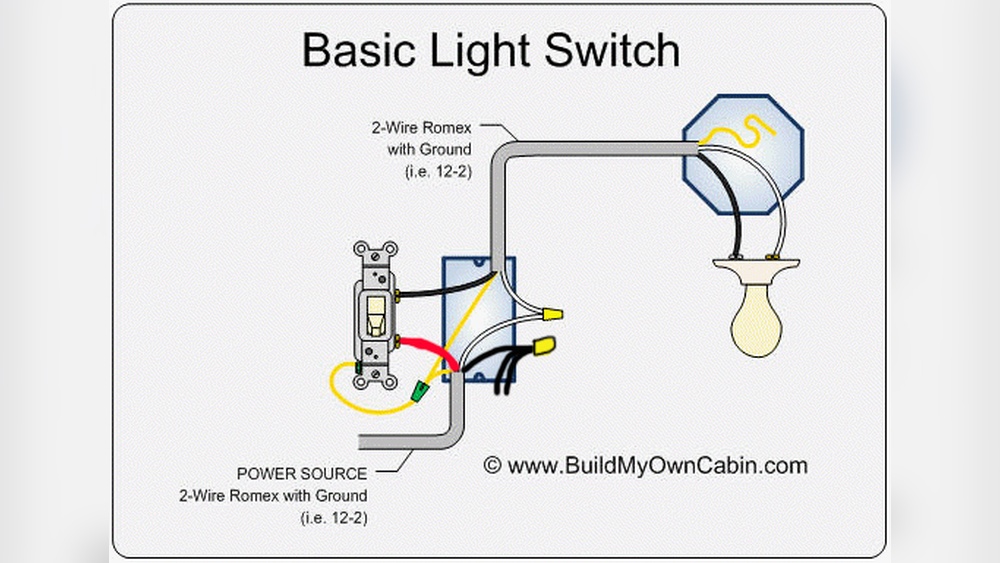
First, know the different wires in your electrical box. The black wire is usually the “hot” wire. It carries power from the breaker to the light. The white wire is the “neutral” wire. It completes the circuit by carrying power back. The green or bare copper wire is the ground wire. It helps prevent shocks by directing electricity to the ground.
Understand Circuit Connections
Next, know how wires connect in a circuit. The switch breaks or completes the hot wire. When the switch is off, the hot wire is open, stopping power. When the switch is on, it closes the circuit, allowing power to flow. The neutral wire does not connect to the switch. It runs directly to the light fixture. The ground wire connects to the metal box and switch for safety.
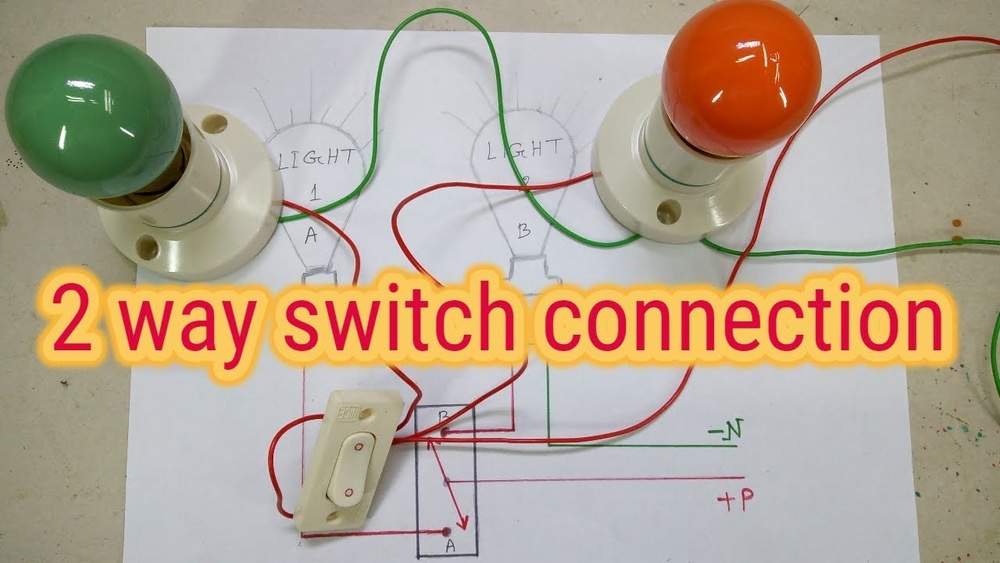
Common Wiring Configurations
Most homes have two common wiring setups for switches. One is a “switch loop” where power goes to the light first. The switch controls the hot wire in a loop. The other is power coming to the switch first, then to the light. Knowing your setup helps you add the switch correctly. Always turn off power before working on wiring.

Credit: www.do-it-yourself-help.com
Installing The Switch
Installing a switch to control an existing light is a straightforward task. It involves preparing the wires, connecting them properly, and securing the switch in place. Each step is important for safety and functionality. Follow these clear steps to complete the installation.
Cutting And Stripping Wires
First, turn off the power at the circuit breaker. Use a wire cutter to trim the wire to the needed length. Strip about half an inch of insulation from the ends using a wire stripper. Expose clean copper wire without damaging it. This prepares the wires for a solid connection.
Connecting Wires To The Switch
Match the wires by color: black to black, white to white, and green or bare for ground. Loop the exposed wire ends around the switch terminals. Tighten the screws securely to hold the wires. Check that no bare wire is showing outside the terminals. Proper connections prevent shorts and ensure the switch works well.
Mounting The Switch Box
Place the switch box into the wall opening. Use screws to fix it firmly to the wall studs. Push the wires gently into the box without bending or pinching them. Attach the switch cover plate to complete the installation. Secure mounting keeps the switch stable and safe to use.
Testing The New Switch
Testing the new switch is a key step after installation. It ensures the switch works correctly and safely controls the light. This step confirms that the wiring is done right and the switch functions as expected.
Restore Power Safely
First, turn the power back on at the circuit breaker. Make sure your hands are dry and you are not standing on a wet surface. Use a voltage tester to check the switch box for power. Only proceed if the power is restored safely.
Check Switch Operation
Flip the switch to the “on” position. The light should turn on immediately. Flip the switch “off” to turn the light off. Test the switch several times to confirm it works smoothly. Listen for any unusual sounds like buzzing or clicking.
Troubleshooting Tips
If the light does not turn on, double-check all wire connections. Tighten any loose wires and ensure the switch is mounted correctly. If the light flickers, check for a faulty bulb or loose wiring. Use a voltage tester to verify power flow. Replace the switch if problems persist.

Credit: diy.stackexchange.com
Finishing Touches
Finishing touches are essential after installing a new switch. They ensure safety and improve the look of your work. Taking time to complete these steps avoids future problems. Follow these simple tips to finish your project well.
Secure Switch Plate
Place the switch plate over the switch carefully. Align it with the screw holes. Use a screwdriver to tighten the screws. Do not overtighten to avoid cracking the plate. A secure plate protects wires and gives a neat finish.
Clean Up Work Area
Remove all tools and debris from the workspace. Wipe dust or dirt from the switch and wall. Clean the floor to avoid slips or injuries. A tidy area shows good craftsmanship and care.
Regular Maintenance
Check the switch regularly for any loose parts. Test the switch to ensure it works properly. Replace damaged plates or faulty switches quickly. Proper care extends the life of your installation.
Frequently Asked Questions
How Do I Safely Turn Off Power Before Adding A Switch?
Always turn off the circuit breaker for the light’s circuit. Use a voltage tester to confirm no power is present before starting work. Safety ensures no accidental shocks during installation.
What Tools Do I Need To Add A Switch To A Light?
You need a screwdriver, wire stripper, voltage tester, electrical tape, and a new switch. These tools help you safely connect and secure wiring for proper switch operation.
Can I Add A Switch To Any Existing Light Fixture?
Most standard light fixtures allow adding a switch. Check wiring accessibility and power source location. If unsure, consult an electrician to ensure compatibility and safety.
How Do I Identify Wires For The New Switch Connection?
Look for the hot (live) wire, neutral wire, and ground wire in the fixture box. The hot wire typically carries current to the light and switch. Proper identification is crucial for correct installation.
Conclusion
Adding a switch to an existing light is a simple task. It saves energy and gives you more control. Always turn off the power before starting work. Use the right tools and follow safety rules. Take your time and check connections carefully.
This small change can make a big difference in your home. Now, you can enjoy easy lighting control anytime you want. Give it a try and see how it works for you.