Are your light switch covers looking old, cracked, or just plain boring? Changing them is one of the easiest and fastest ways to refresh the look of any room.
You don’t need special skills or expensive tools to do it yourself. In just a few simple steps, you can give your space a clean, updated feel that catches the eye. Ready to learn how to change light switch covers quickly and safely?
Keep reading, and you’ll see how simple this small change can make a big difference in your home.
Tools And Materials Needed
Changing light switch covers is a simple task that refreshes any room’s look. Having the right tools and materials makes the job easier and safer. This section lists everything needed for this project.
Essential Tools
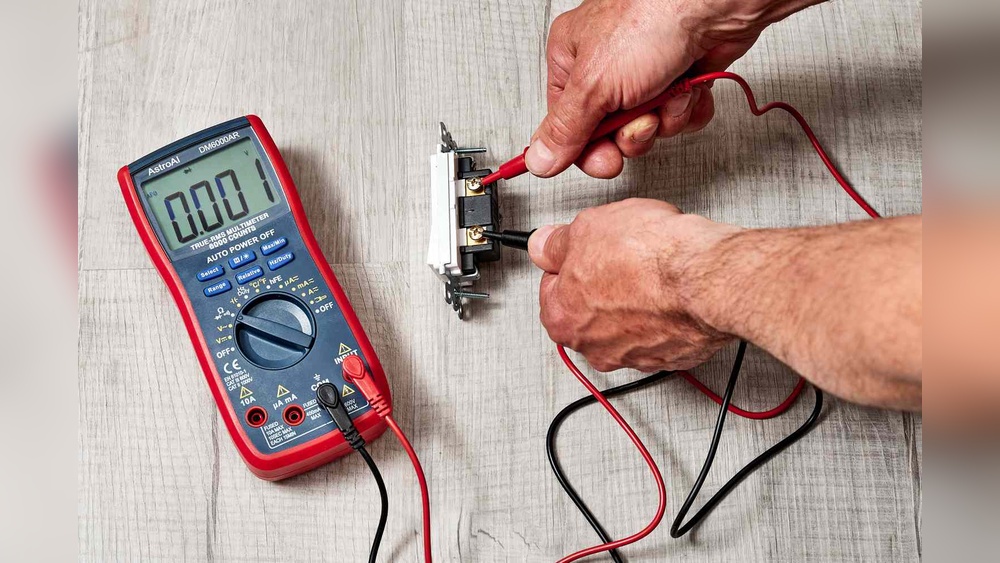
A screwdriver is the main tool required. Most light switch covers use a flathead or Phillips head screw. A flashlight helps if the area is dim. Needle-nose pliers can assist with removing tight screws. A voltage tester is important for safety. It ensures power is off before you start working.
Materials Needed
New light switch covers come in various styles and colors. Choose covers that fit your switch type and wall decor. Keep extra screws handy in case the old ones are damaged. Use painter’s tape to protect the wall around the switch. A soft cloth helps clean the area before installing the new cover.
Credit: www.reddit.com
Safety First
Changing light switch covers seems simple but can be risky. Electricity can cause shocks or injuries. Always put safety first to avoid accidents.
Follow clear steps and never rush the task. Safety helps you finish the job without problems.
Turn Off Power
Start by turning off the power at the circuit breaker. This stops electricity from flowing to the switch. Test the switch by pressing it to check no power is running.
Use Insulated Tools
Use screwdrivers with insulated handles. These tools protect you from electric shocks. Avoid metal tools without insulation near electrical parts.
Wear Safety Gear
Wear rubber gloves to protect your hands. Safety glasses can protect your eyes from dust or debris. Keep your workspace clean and dry.
Double Check Everything
Before touching wires, confirm power is off with a tester. Never guess. Double check to ensure your safety at every step.
Removing The Old Cover
Removing the old light switch cover is the first step in changing it. This task is quick and simple. It only needs a few basic tools and some care to avoid damage. Follow these steps to remove the cover safely and easily.
Turn Off The Power
Start by turning off the power at the circuit breaker. This stops any chance of electric shock. Never touch a switch cover without cutting the power first. Safety first.
Use A Screwdriver
Most switch covers are held by two screws. Use a screwdriver that fits the screw heads well. Turn the screws counterclockwise to loosen them. Keep the screws safe for the new cover.
Gently Remove The Cover
After the screws are out, gently pull the cover away from the wall. Sometimes it sticks due to paint or dirt. Wiggle it slightly to loosen it. Avoid forcing it to prevent cracks or damage.
Check The Switch And Wall
Look at the switch and wall behind the cover. Clean any dust or debris. Check for damage or loose parts. This helps prepare for the new cover installation.

Credit: home.howstuffworks.com
Choosing New Covers
Choosing new light switch covers can change the look of any room. These small details add style and safety. Picking the right cover means thinking about color, material, and size. This guide helps you find covers that fit your home and needs.
Color And Style
Choose a color that matches your walls or decor. White covers are common and clean. For a bold look, pick black or bright colors. Styles vary from simple to decorative. Match the cover style with your room’s theme.
Material Options
Plastic covers are cheap and easy to clean. Metal covers last longer and look modern. Wood covers add warmth but need care. Pick materials that fit your budget and style.
Size And Shape
Check the size of your current switch before buying. Covers come in standard sizes but also in bigger sizes for multiple switches. Shapes may be square or rounded. Make sure the new cover fits perfectly to avoid gaps.
Safety Features
Look for covers with smooth edges to avoid cuts. Some covers have childproof designs. Choose covers that protect wiring and prevent dust. Safety matters as much as style.
Installing The New Cover
Installing the new light switch cover is a simple task that finishes your project. This step makes the switch look clean and fresh. Follow the instructions carefully to avoid any mistakes.
Align The Cover Plate Correctly
Hold the new cover plate over the switch. Check that all screw holes line up with the switch box holes. The cover should sit flat against the wall without gaps.
Secure The Cover With Screws
Insert the screws into the holes by hand. Tighten them gently using a screwdriver. Avoid over-tightening to prevent cracking the cover plate.
Test The Switch Operation
Flip the switch on and off to ensure it moves freely. The cover should not block the switch’s movement. Make sure the switch feels stable and secure.
Troubleshooting Common Issues
Changing light switch covers is a simple task, but some common problems can occur. These issues may slow down your work or cause frustration. Knowing how to fix them helps you finish the job quickly and safely.
Below are common problems and easy solutions. Follow these tips to avoid mistakes and get a perfect finish.
Loose Or Misaligned Switch Plate
A switch plate that does not sit flush looks bad and may catch on clothes. Tighten the screws gently. Do not overtighten to avoid cracking the cover. Check if the switch is centered in the plate hole. Adjust the plate position if needed.
Cracked Or Broken Cover
Plastic covers crack easily if forced or dropped. Replace damaged covers with new ones. Avoid using covers with hairline cracks as they can break later. Use screwdrivers carefully to avoid chipping the edges.
Paint On The Switch Cover
Paint can stick to the cover during wall painting. Remove paint spots with a soft cloth and mild cleaner. Avoid harsh chemicals that damage plastic. Cover the plate with painter’s tape before painting walls next time.
Screws Not Fitting Properly
Screws may be too long or short for the new cover. Use screws that came with the new plate or match the old ones. Cross-threading screws can strip the holes. Insert screws carefully and tighten evenly on both sides.
Creative Cover Ideas
Changing light switch covers can brighten a room quickly. Start by turning off the power, then unscrew the old cover and replace it with a new design. Simple steps make a big difference in home style.
Changing light switch covers is a simple way to refresh a room. Plain covers often look dull. Creative covers add style and personality to any space.
Using unique switch covers can match your room’s theme. They make your home feel more inviting. Here are some easy and fun ideas to inspire you.
Painted Switch Covers
Paint switch covers with bright or soft colors. Use patterns like stripes, dots, or waves. This adds color and interest without much cost.
Try matching the cover color with the wall or furniture. A hand-painted cover gives a personal touch. Use acrylic paint for best results.
Decorative Tape Covers
Use washi tape or decorative tape for a quick update. Tape comes in many designs and colors. It peels off easily without damage.
Create stripes, zigzags, or checkered patterns with tape. This method is great for renters or temporary changes. It’s simple and fun to do yourself.
Fabric-covered Switch Plates
Cover switch plates with fabric for a soft, textured look. Choose patterns that match curtains or cushions. Glue fabric with spray adhesive for a smooth finish.
Trim edges neatly and seal with clear varnish. This idea adds warmth and charm to any room. It also softens the hard surface of plastic covers.
Vintage And Antique Covers
Look for vintage or antique switch covers at thrift shops. These add character and a unique story to your space. Metal or ceramic covers bring an old-world charm.
Clean and repaint them to fit your room’s style. Vintage covers work well in rustic or classic interiors. They turn simple switches into decor highlights.
Nature-inspired Covers
Use natural materials like wood, stone, or cork for covers. These add an earthy feel to your room. You can buy ready-made covers or craft your own.
Wood covers can be stained or painted. Stone covers offer a cool, smooth texture. These covers blend well with natural or minimalist decor styles.

Credit: www.youtube.com
Frequently Asked Questions
How Do I Safely Remove Old Light Switch Covers?
Turn off the power at the circuit breaker before starting. Use a screwdriver to unscrew the old cover carefully. Avoid forcing it to prevent damage to the wall or switch.
What Tools Do I Need To Change Light Switch Covers?
You typically need a flathead or Phillips screwdriver. Optionally, use a voltage tester for safety. A new switch cover plate matching your switch size is also required.
Can I Change Switch Covers Without An Electrician?
Yes, changing switch covers is simple and safe if power is off. Basic tools and caution suffice. Avoid touching wires to prevent electrical hazards.
How Do I Choose The Right Light Switch Cover Size?
Measure your current switch cover’s height and width. Match the new cover to these dimensions for a proper fit. Consider style and material for aesthetic appeal.
Conclusion
Changing light switch covers is simple and quick. You only need a few tools and steps. Always turn off the power before starting work. Removing the old cover carefully keeps things safe. Installing the new cover fits tightly and looks fresh.
This small change can brighten any room. Try different styles to match your decor. Now, you can update your home with ease. Give your switches a new look today!