Have you ever wished you could control your room’s lighting with a simple flick of a switch, but found out there isn’t one nearby? Adding a switch to an existing light can be easier than you think.
Imagine the convenience of turning your light on or off without getting up or reaching for a plug. In this guide, you’ll discover clear, step-by-step instructions to make this upgrade yourself—safely and quickly. Keep reading, and by the end, you’ll have the power to brighten your space exactly when you want.

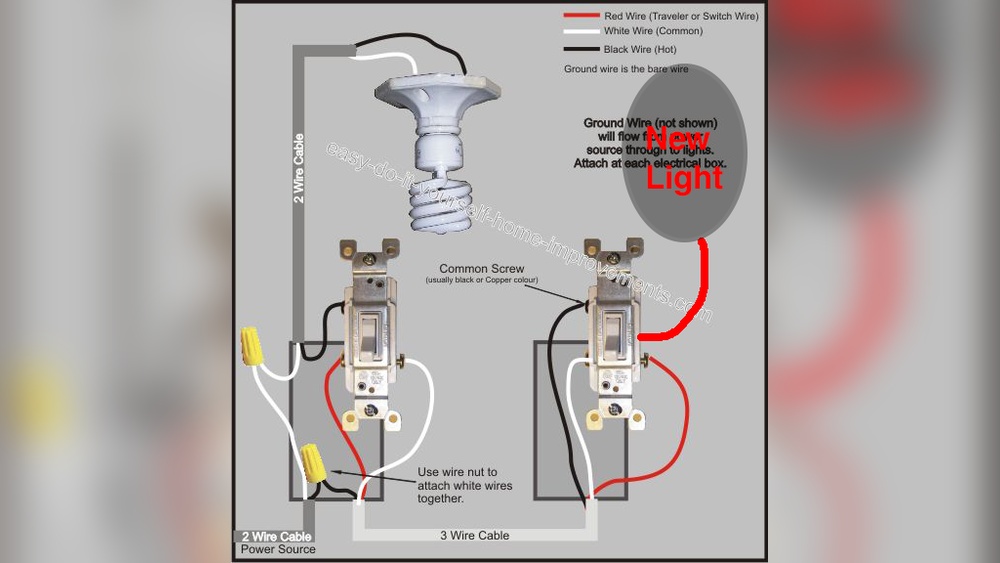
Credit: www.do-it-yourself-help.com
Tools And Materials Needed
Before adding a switch to an existing light, gather the right tools and materials. Having everything ready makes the job safer and easier. This section lists what you need for the task.
Essential Tools
- Screwdriver (flathead and Phillips)
- Wire stripper
- Voltage tester
- Drill with bits
- Pliers
- Measuring tape
- Flashlight or work light
- Electrical tape
Required Materials
- Light switch (single-pole switch)
- Electrical box (old work or remodel box)
- Electrical wire (14/2 or 12/2 NM cable)
- Wire nuts
- Switch cover plate
- Wire connectors or terminal screws
- Cable clamps
Safety Precautions
Safety is the top priority when adding a switch to an existing light. Working with electricity can be dangerous without the right precautions. Taking simple steps can prevent accidents and keep you safe.
Power Shutoff
Always turn off the power at the circuit breaker before starting work. Double-check that the power is off by flipping the light switch. This step avoids electric shocks and serious injury.
Using A Voltage Tester
Use a voltage tester to confirm the wires have no power. Touch the tester to each wire carefully. If the tester lights up or beeps, power is still on. Never touch wires until you are sure power is off.
Working With Wires Safely
Handle wires with insulated tools to avoid shocks. Keep your hands dry and avoid metal jewelry. Strip wires only as much as needed to make connections. Secure loose wires with wire nuts or electrical tape.
Locating The Existing Light Wiring
Finding the existing light wiring is the first step to adding a switch. This step helps you understand how the current light is connected. Knowing the wiring layout makes the installation safer and easier. Take your time to locate the wires before starting any work.
Careful handling of electrical parts is important for your safety. Make sure the power is off before you touch any wires. Use a voltage tester to confirm the power is off at the light fixture.
Accessing The Light Fixture
Start by removing the light fixture cover or shade. Use a screwdriver if screws hold the fixture in place. Gently pull the fixture down to see the wires behind it. Some fixtures may need to be unplugged or detached carefully. Keep all screws and parts in a safe place.
Check the ceiling or wall box where the fixture is mounted. This box holds the wires and protects them. You need full access to see all wires clearly.
Identifying Wires
Look for three common wires: live, neutral, and ground. The live wire usually has black or red insulation. The neutral wire is often white. The ground wire is green or bare copper. Colors may vary, so check carefully.
Use a voltage tester to find the live wire. This wire carries current when power is on. The neutral wire completes the circuit. The ground wire provides safety from electric shock.
Label each wire with tape to avoid confusion later. Take a photo of the wiring setup for reference. Knowing which wire does what helps you connect the switch correctly.

Credit: www.finehomebuilding.com
Choosing The Right Switch
Choosing the right switch is a key step in adding a switch to an existing light. The right switch ensures safety and proper function. It also matches your home’s style and wiring setup. Understanding switch types and wiring compatibility helps make the best choice.
Types Of Switches
Several switch types exist. The common one is the single-pole switch. It controls one light from one location. A three-way switch controls a light from two locations. For dimming, use a dimmer switch. Some switches include smart features for remote control.
Choose a switch type based on your needs. A simple on/off switch works for most lights. Use three-way switches for stairs or hallways. Dimmer switches add mood lighting options. Smart switches offer convenience and energy savings.
Compatibility With Wiring
Check your home wiring before buying a switch. Single-pole switches need two wires: live and load. Three-way switches require an extra traveler wire. Dimmer switches need specific wiring and bulb types. Smart switches often need a neutral wire.
Look inside your switch box to see the wires. Match the switch terminals to your wires. If unsure, take a photo and ask a professional. Correct wiring avoids electrical problems and switch failure.
Wiring The Switch
Wiring the switch is a key step in adding a switch to an existing light. It involves safely connecting the electrical wires to the new switch. This task requires care and attention to avoid any hazards. Follow the steps carefully to make sure your switch works properly and safely.
Turning Off Power
Always start by turning off the power at the circuit breaker. This stops electricity from flowing to the wires. Use a voltage tester to check that the power is off. Never work on live wires. Safety comes first.
Connecting Wires To The Switch
Identify the wires coming from the wall. You will usually see a black (hot), white (neutral), and a green or bare (ground) wire. Connect the black wire to the switch’s screw terminal. Attach the ground wire to the green screw. The neutral wire does not connect to the switch but stays in the box.
Securing Connections
Tighten all screws firmly to secure the wires. Use wire nuts to join any wire splices. Make sure no copper wire shows outside the nuts. Push the wires neatly into the switch box. Secure the switch with screws to the box. Proper connections prevent loose wires and hazards.
Installing The Switch Box
Installing the switch box is an important step when adding a switch to an existing light. This box will hold the switch securely and protect the wiring. Proper installation ensures safety and a clean look.
Start by choosing the right place for the switch box. Then, mount it firmly on the wall. Follow these steps carefully for the best result.
Selecting The Location
Pick a spot on the wall near the door or where it is easy to reach. The switch should be at a comfortable height, usually about 48 inches from the floor. Avoid placing the box where it will be hidden behind furniture or other objects.
Make sure there is enough space inside the wall for the box. Check for pipes, wires, or studs before cutting into the wall. Use a stud finder or a small drill bit to find clear space.
Mounting The Box
Cut a hole in the wall that fits the switch box snugly. Use a drywall saw for a clean cut. Insert the box into the hole and press it flush with the wall surface.
Secure the box by tightening the screws or using the built-in clamps. The box should not move when you gently shake it. Double-check that the box is level and straight before fixing it completely.
Testing The Switch
Testing the switch is a vital step after installation. It ensures the switch works correctly and safely. This step confirms your wiring is secure and the light responds as expected. Take your time and follow these simple checks.
Restoring Power
Turn the circuit breaker back on. This restores electricity to the switch and light. Be careful and avoid touching wires. Use a voltage tester to confirm power is live. If the power is off, check the breaker again.
Checking Operation
Flip the switch to the “on” position. The light should turn on immediately. Switch it off and watch the light go out. Repeat a few times to confirm consistent operation. If the light does not work, recheck your wiring connections.

Credit: diy.stackexchange.com
Troubleshooting Common Issues
Troubleshooting common issues helps fix problems quickly. It saves time and avoids frustration. Knowing what to check makes adding a switch easier. Here are some typical issues and how to solve them.
Switch Not Working
First, check the power supply. Make sure the circuit breaker is on. Test the switch with a voltage tester. If no power reaches the switch, the wiring may be wrong. Confirm all wires match the switch terminals. Replace the switch if it feels loose or broken.
Flickering Light
Flickering can mean a bad connection or a weak bulb. Tighten the bulb to ensure it fits well. Try a new bulb to rule out damage. Check the switch and wire connections for looseness. Loose wiring causes flickers and can be unsafe.
Loose Connections
Loose connections are a common cause of switch issues. Turn off power before touching wires. Tighten all wire nuts and terminal screws firmly. Look for damaged or frayed wires and replace them. Secure connections ensure proper switch function and safety.
Frequently Asked Questions
How Do I Add A Switch To An Existing Light Fixture?
Turn off the power at the breaker. Run a cable from the light to the switch location. Connect the wires to the switch and light fixture. Secure everything, then restore power and test the switch.
What Tools Are Needed To Install A Light Switch?
You need a screwdriver, wire stripper, voltage tester, electrical tape, and wire nuts. These tools help safely connect wires and secure the switch in place.
Can I Add A Switch Without Rewiring The Entire Circuit?
Yes, you can add a switch by tapping into the existing wiring at the light fixture. Ensure power is off and follow proper wiring codes for safety.
Is It Safe To Add A Switch To A Light By Myself?
Yes, if you follow safety guidelines and turn off power at the breaker. Use a voltage tester to confirm no electricity flows before working with wires.
Conclusion
Adding a switch to an existing light is easier than it seems. Follow each step carefully and stay safe. Double-check your work before turning the power back on. This small change can make your home more convenient. Take your time and enjoy the process.
With practice, handling simple electrical tasks feels less scary. Remember, safety always comes first. You can do this!