Have you ever wished you could brighten up a room without adding a new switch? What if you could easily add a light to your existing switch and control both with a simple flick?
It’s easier than you think, and you don’t need to be an expert electrician. Imagine transforming your space with just a few tools and some clear steps. In this guide, you’ll learn exactly how to do it safely and quickly—so keep reading and discover how to make your lighting work smarter for you.

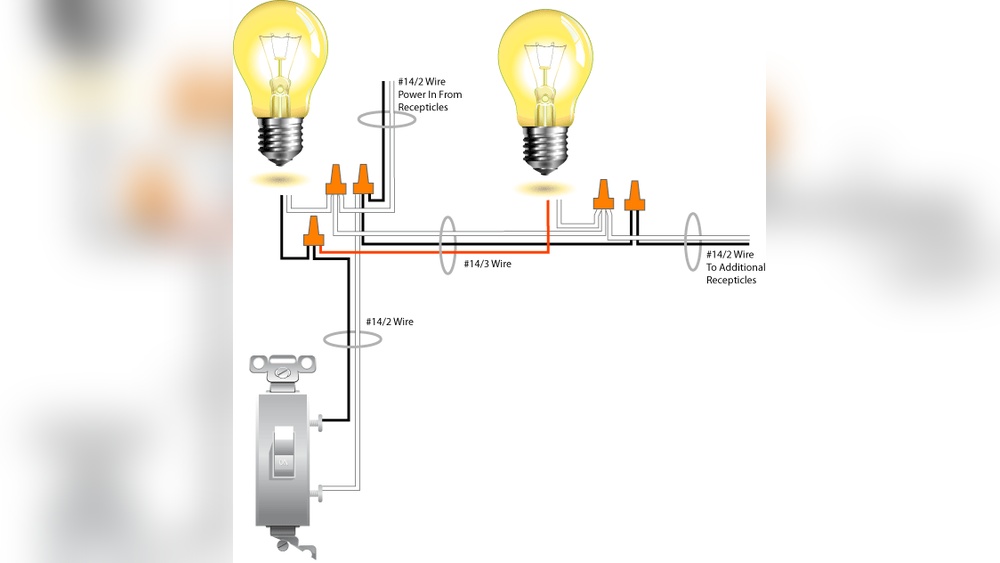
Credit: www.do-it-yourself-help.com
Tools And Materials Needed
Before starting to add a light to an existing switch, gather all necessary tools and materials. Having the right items ensures a smooth and safe installation process. This section lists what you need to prepare.
Basic Electrical Tools
You need a few basic tools for this task. A screwdriver set is essential for removing switch plates and securing wires. Wire strippers help remove insulation from wires without damage. A voltage tester checks if wires carry current, keeping you safe. Needle-nose pliers assist in bending and holding wires. Electrical tape helps secure wire connections. A drill might be needed if you must make new holes.
Required Materials
Gather the right materials before starting. You need a compatible light fixture for your space and switch type. Electrical wire, usually 14/2 or 12/2 gauge, connects the switch to the new light. Wire nuts secure wire connections safely. A light switch cover plate completes the look and protects the wiring. Use materials rated for your home’s voltage and current.
Safety Equipment
Safety is a must. Use insulated gloves to protect your hands from shocks. Safety goggles shield your eyes from dust or sparks. Turn off power at the circuit breaker before working on electrical parts. A non-contact voltage tester confirms the power is off. Work in a well-lit area to avoid mistakes. Keep a fire extinguisher nearby for emergencies.
Preparing For The Project
Before adding a light to an existing switch, preparation is key. This step keeps you safe and makes the project easier. Taking the right precautions avoids mistakes and delays. Follow these simple steps to get ready.
Turn Off Power
First, switch off the power at the circuit breaker. This stops electricity from flowing to the switch. Never work on live wires. Double-check the breaker box to ensure the power is off.
Test For Live Wires
Use a voltage tester to check for live wires. Touch the tester to the wires inside the switch box. If the tester lights up or beeps, power is still on. Only proceed once you confirm no electricity is present.
Clear The Work Area
Remove any objects around the switch. Clear space helps you move freely and safely. Keep tools and materials organized nearby. A tidy work area reduces the risk of accidents.
Locating The Existing Switch
Before adding a light to an existing switch, you must find that switch. This step is simple but very important. Knowing where the switch is helps you plan the wiring safely and correctly.
Start by checking the room where you want the light. Look for switches on the walls near the entrance or where lights are controlled. This first check saves time later.
Identify Switch Type
Not all switches are the same. Some control one light, others control many. Some are simple toggle switches. Others might be dimmers or smart switches.
Look at the switch’s design. A toggle switch moves up and down. A rocker switch presses like a button. A dimmer has a dial or slider.
Knowing the type helps you understand the wiring inside. It also tells you if you need special tools or parts for your new light.
Accessing The Switch Box
Once you find and identify the switch, the next step is to open the switch box. This box holds the wires and the switch itself.
Turn off power at the circuit breaker to keep safe. Use a screwdriver to remove the switch cover plate carefully.
Behind the plate, you see the switch and wires. Do not touch the wires before confirming the power is off. Use a voltage tester to be sure.
Accessing the switch box allows you to see how wires are connected. This view helps you plan the new wiring for the light.

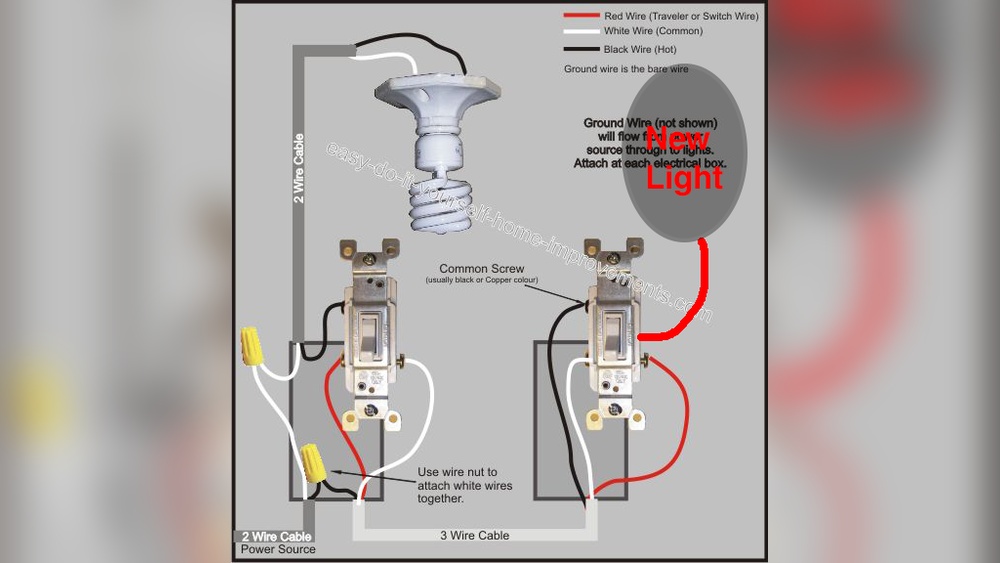
Credit: www.finehomebuilding.com
Wiring The New Light
Wiring the new light is a key step in adding it to an existing switch. This part needs care and attention to ensure safety and proper function. You will run new cables, connect wires correctly, and secure all connections firmly. Following clear steps helps avoid mistakes and keeps your home safe.
Running The New Cable
First, choose the right cable for your light. Usually, a 14/2 or 12/2 cable works well. Run this cable from the switch box to the new light fixture location. Keep the cable inside walls or ceilings for safety. Avoid sharp bends and secure the cable with staples every few feet.
Connecting Wires Correctly
Match wire colors between the switch and the new light. Black wires are hot and connect to each other. White wires are neutral and connect together. Green or bare wires are ground and must connect to the grounding screw or wire. Use wire nuts to join wires safely.
Securing Wire Connections
Twist wires tightly before placing wire nuts. Make sure no bare wire shows outside the nut. Tug gently to check if wires are secure. Wrap connections with electrical tape for extra safety. Push wires carefully into the box to avoid damage.
Installing The Light Fixture
Installing the light fixture is a key step in adding a light to an existing switch. This stage connects the wiring and secures the light to your wall or ceiling. Careful installation ensures safety and proper function. Follow each step closely for a neat, lasting result.
Mounting The Fixture
Start by turning off the power at the breaker. Use a voltage tester to confirm no electricity flows. Align the fixture’s mounting bracket with the electrical box. Secure the bracket with screws to hold it firmly. Make sure the fixture sits flush against the wall or ceiling. This prevents gaps and gives a clean look.
Attaching Bulbs And Covers
Choose the correct bulbs for your fixture’s specifications. Screw each bulb gently into its socket. Avoid overtightening to prevent damage. Next, attach the fixture’s covers or shades. These protect the bulbs and soften the light. Secure covers with clips or screws as designed. Test the light switch to ensure everything works well.
Testing The Installation
Testing the installation is the final step after wiring a light to an existing switch. It ensures everything works safely and correctly. This step helps avoid electrical problems and confirms the light turns on and off as expected.
Follow the instructions carefully to check all parts of the setup. Take your time and be patient. Proper testing will give peace of mind and ensure your new light is ready to use.
Restoring Power
Turn the power back on at the circuit breaker. Make sure the switch is off before restoring power. Wait a few seconds to allow the system to stabilize. Check for any unusual sounds or smells near the switch or light fixture. If everything seems normal, proceed to the next step.
Checking Light Operation
Flip the switch to the on position. The light should turn on immediately. Turn the switch off to see if the light goes out. Test the switch a few times to confirm it works smoothly. If the light does not respond, recheck your wiring and connections.
Troubleshooting Common Issues
Troubleshooting common issues helps solve problems fast. Adding a light to an existing switch can face some simple hurdles. Knowing what to check saves time and effort. This guide covers typical problems and easy fixes.
Light Not Turning On
Check if the bulb is screwed in tightly. A loose bulb often causes no light. Try replacing the bulb with a new one. Make sure the light fixture is connected properly. Look for any visible damage to wires or the socket. Confirm the power is on at the breaker box. Sometimes, the breaker trips without clear signs.
Switch Problems
Test the switch by turning it on and off several times. A faulty switch may cause flickering or no light. Remove the switch cover and check wiring connections. Loose wires can stop the light from working. Tighten any loose screws or wires carefully. Replace the switch if it feels loose or worn. Use a voltage tester to check if power reaches the switch.
Electrical Safety Checks
Always turn off the power before touching any wires. Use a voltage tester to confirm no electricity flows. Wear insulated gloves to avoid shocks. Check for signs of damaged insulation on wires. Never work in wet conditions or with wet hands. Make sure all connections are secure and insulated well. If unsure, consult a licensed electrician for help.

Credit: diy.stackexchange.com
Tips For A Clean Finish
Achieving a clean finish after adding a light to an existing switch makes your work look professional. Small details matter. Neat wiring and proper covers create a polished look. Follow these tips to keep your installation tidy and safe.
Cable Management
Keep cables organized and secure. Use cable clips or ties to bundle wires together. Avoid leaving loose wires hanging inside the switch box. Properly folded wires reduce clutter and prevent damage. This also makes future maintenance easier. Label wires if needed to remember connections.
Cover Plates And Finishing Touches
Choose the right cover plate for your switch and light. Match the plate color to your wall for a seamless look. Ensure the plate fits snugly without gaps. Tighten screws evenly to avoid cracks or misalignment. Clean the area after installation to remove dust or fingerprints.
Frequently Asked Questions
How Do I Safely Add A Light To An Existing Switch?
Turn off the power at the breaker before starting. Use a voltage tester to confirm no electricity flows. Follow wiring diagrams carefully. If unsure, consult a licensed electrician to avoid hazards.
What Tools Are Needed To Add A Light To A Switch?
You need a voltage tester, wire strippers, screwdrivers, electrical tape, and wire nuts. Having a ladder and flashlight helps. Proper tools ensure safe and efficient installation.
Can I Control Two Lights With One Switch?
Yes, a single switch can control multiple lights. Connect wires properly in the switch box. Ensure the circuit can handle the load to prevent overload.
Is It Necessary To Check Wiring Before Adding A Light?
Yes, inspecting existing wiring prevents electrical faults. Look for damaged insulation or loose connections. Proper wiring ensures safety and functionality.
Conclusion
Adding a light to an existing switch can brighten any room easily. Follow safety steps to avoid accidents. Turn off power before starting any work. Use the right tools and materials for the job. Double-check connections to ensure the light works properly.
Take your time and be patient with each step. This small upgrade makes a big difference in your home. Try it yourself and enjoy better lighting today. Simple changes like this improve comfort and style.