Are you ready to take control of your home’s lighting and save on electrician costs? Learning how to install a light switch using a clear diagram can make the process simple and stress-free.
Whether you’re upgrading an old switch or adding a new one, understanding the wiring layout is key to getting it right the first time. In this guide, you’ll discover easy steps and practical tips that anyone can follow—even if you’ve never worked with electrical wiring before.
Keep reading to empower yourself with the skills to safely and confidently install your light switch like a pro.
Tools And Materials Needed
Basic tools like a screwdriver, wire stripper, and voltage tester are needed. Also, gather electrical tape, wire nuts, and the light switch itself. These materials help ensure a safe and proper installation.
Basic Tools For Installing A Light Switch
Start with a few essential tools. A screwdriver set is necessary to remove and attach screws. Use both flathead and Phillips screwdrivers for different screw types. A voltage tester keeps you safe by checking if wires have electricity. Wire strippers help to remove insulation from wires cleanly. Needle-nose pliers allow you to bend and twist wires easily.
Materials Required For The Light Switch Installation
Choose the right light switch for your setup. Single-pole switches are common for simple on/off control. You might need a three-way switch for controlling lights from two locations. Electrical tape secures wire connections and prevents shorts. Wire nuts join wires safely and keep connections tight. Use electrical boxes to hold the switch and protect wiring.
Safety Gear To Have Ready
Protect yourself with safety gear. Wear insulated gloves to avoid shocks. Safety glasses keep your eyes safe from sparks or debris. Use a flashlight or headlamp for better visibility in dark areas. Always turn off power at the breaker before starting any work.
Safety Precautions
Safety is the top priority when installing a light switch diagram. Electrical work can be dangerous without proper care. Following safety steps reduces the risk of shocks and accidents. Take time to prepare and protect yourself before starting.
Turn Off The Power
Always switch off the power at the main circuit breaker. Check the switch’s power with a voltage tester. Never trust the wall switch alone. Confirm no electricity flows to the wires before touching them.
Wear Protective Gear
Use insulated gloves to protect your hands. Safety glasses shield your eyes from sparks or debris. Wear shoes with rubber soles to avoid electric shocks. Keep your clothes tight to avoid catching on wires.
Use The Right Tools
Choose tools with insulated handles made for electrical work. Avoid using damaged or worn-out tools. Keep a flashlight nearby for better visibility. Using correct tools lowers the chance of mistakes and injuries.
Work In A Dry Area
Ensure the workspace is dry before starting. Water and electricity create a dangerous mix. Avoid standing on wet floors or damp surfaces. Dry conditions help prevent accidental shocks during installation.
Follow The Wiring Diagram Carefully
Study the light switch diagram before starting. Connect wires exactly as shown in the diagram. Incorrect wiring can cause short circuits or fires. Double-check each connection before turning power back on.
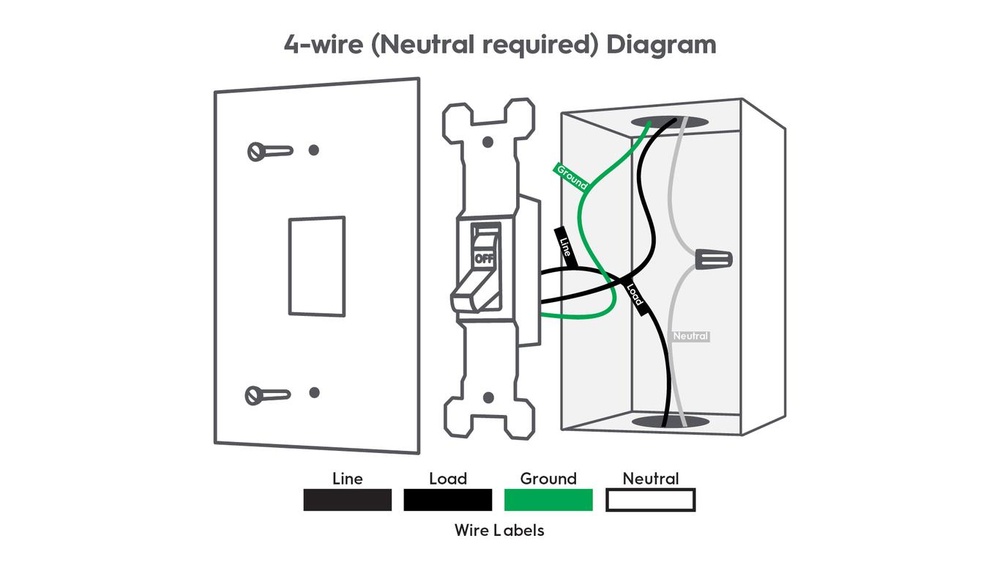
Reading The Light Switch Diagram
Reading a light switch diagram is key before installing any switch. It shows how wires connect and where each part goes. Understanding this diagram helps avoid mistakes and keeps you safe. It also makes the installation faster and easier.
Symbols And Labels
Diagrams use symbols to represent switches, wires, and fixtures. Each symbol stands for a specific part. Labels next to symbols explain what they mean. For example, a simple circle might show a light bulb. Lines represent wires, and arrows may show current flow. Knowing these symbols helps you read the diagram clearly.
Labels often include letters or numbers. They show wire types or switch names. This information guides you on where to connect each wire. Look for common labels like “L” for live wire or “N” for neutral wire. Reading these carefully prevents confusion.
Wiring Paths
Wiring paths show how electricity moves through the switch and light. Lines connect symbols, showing the flow of current. Follow these paths to understand wire connections. Notice if wires run between switches or directly to the light fixture.
Some diagrams show multiple switches controlling one light. The wiring paths will have extra lines for this. Pay attention to these paths to avoid wiring errors. Clear wiring paths make your installation safe and functional.
Turning Off Power
Turning off power is the first step in installing a light switch diagram safely. Working with electricity can be dangerous. Always make sure the power is off before you begin. This prevents shocks and accidents.
Never skip this step. Even a small current can cause injury. Take your time to turn off the correct circuit breaker. Double-check the power status before touching any wires.
Locate The Circuit Breaker
Find the main electrical panel in your home. It is often in the basement, garage, or utility room. Open the panel door to see the switches inside. Each switch controls power to different parts of your home.
Identify The Correct Switch
Look for the breaker labeled for the room or area of the light switch. If labels are missing or unclear, turn off the main breaker. This cuts power to the entire house. It is safer but also means all lights and devices stop working.
Turn Off The Breaker
Flip the switch to the off position. You may hear a click sound. This means the power is off. Do not guess if the breaker is off. Confirm it with a voltage tester or by checking the light switch.
Double Check Power Is Off
Use a non-contact voltage tester near the wires of the light switch. It will beep or light up if power is present. No signal means the power is off. Try the light switch to see if the light turns on. No light means you are safe to continue.
Removing The Old Switch
Removing the old light switch is the first step in installing a new one. This process must be done carefully to avoid damage or injury. Safety is very important. Always turn off the power before touching the switch.
Take your time to understand the switch setup. Knowing the parts helps in removing the switch correctly. Follow each step in order for a smooth removal.
Turn Off The Power
Find the circuit breaker for the switch. Switch it off to cut the power. Use a voltage tester to confirm there is no electricity. Never skip this step.
Remove The Switch Cover Plate
Use a screwdriver to take off the cover plate. Keep the screws safe for later use. Removing the plate gives access to the switch and wires.
Unscrew The Old Switch
Loosen the screws holding the switch in place. Pull the switch gently from the wall box. Do not yank or force it out.
Disconnect The Wires
Note how the wires connect to the switch. Take a photo or label the wires. Unscrew the terminals and free the wires carefully.
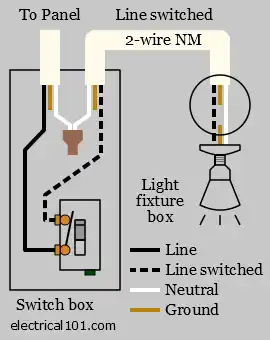
Credit: www.electrical101.com
Wiring The New Switch
Wiring the new switch is a key step in installing a light switch. It needs care and attention to ensure safety and proper function. Follow each step carefully to connect the wires correctly. Always turn off the power before starting any wiring work.
Connecting Ground Wire
Locate the ground wire in the electrical box. It is usually green or bare copper. Attach this wire to the green screw on the switch. Tighten the screw firmly to hold the wire in place. The ground wire helps protect against electric shocks.
Attaching Live And Neutral Wires
Identify the live (hot) wire, often black or red. Connect it to the brass or dark-colored screw on the switch. Next, find the neutral wire, typically white. Some switches do not need a neutral wire connection. If your switch does, attach the neutral wire to the silver screw.
Make sure each wire is wrapped tightly around its screw. Loose wires can cause sparks or failure. Double-check all connections before closing the switch box.
Securing The Switch And Testing
Securing the switch and testing it are the final steps in installing a light switch diagram. These steps ensure the switch stays in place and works correctly. Proper securing avoids loose wiring and potential hazards. Testing confirms the switch controls the light as expected. Follow these simple steps to finish the installation safely and effectively.
Securing The Switch In The Wall Box
Place the switch carefully inside the wall box. Push wires gently to avoid damage. Align the switch with the screw holes on the box. Use a screwdriver to tighten the screws firmly. Do not overtighten; this can crack the switch. The switch should feel stable and not move.
Attaching The Switch Plate
Once the switch is secure, attach the switch plate. Position the plate over the switch and screw it in place. Tighten screws evenly to keep the plate flat. The plate protects the switch and wires. It also gives a clean, finished look to the wall.
Testing The Light Switch
Turn the power back on at the breaker. Flip the switch to test the light. The light should turn on and off smoothly. Check for any flickering or unusual sounds. If the light does not work, turn off the power and check wiring. Repeat the test until the switch works correctly.

Credit: www.do-it-yourself-help.com
Troubleshooting Common Issues
Troubleshooting common issues is key to a successful light switch installation. Problems can arise even with simple wiring tasks. Knowing how to identify and fix these issues saves time and frustration.
Many problems come from wiring mistakes or faulty parts. Testing and checking connections carefully helps find the cause quickly. This section covers typical problems and easy fixes.
Check For Loose Connections
Loose wires often cause switches to fail or flicker. Turn off the power before inspecting. Tighten all screws and make sure wires fit securely under terminals. A loose connection can interrupt power flow.
Verify The Correct Wiring
Wrong wire placement stops the switch from working. Use a light switch diagram to confirm each wire’s position. Match the live, neutral, and ground wires exactly as the diagram shows. Mistakes here cause malfunctions.
Test The Switch With A Voltage Tester
A voltage tester checks if electricity reaches the switch. Turn on the power and touch the tester to wires. No voltage means a power supply problem. Voltage present but no light means a switch or bulb issue.
Replace Faulty Switches Or Bulbs
A broken switch or dead bulb stops the light from turning on. Swap the switch with a new one to test. Replace bulbs that do not light up, even if wiring is correct. This simple step solves many problems.
Ensure Proper Grounding
Ground wires protect from electrical shocks. Missing or poor grounding can cause safety risks. Check that the ground wire is connected to the switch and the electrical box. Proper grounding is essential.
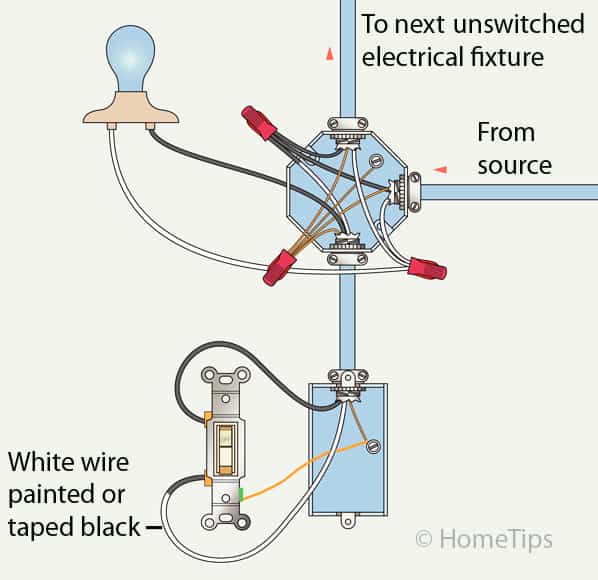
Credit: www.hometips.com
Frequently Asked Questions
What Tools Are Needed To Install A Light Switch?
You need a screwdriver, voltage tester, wire stripper, and electrical tape. These tools ensure safe and effective installation.
How Do I Connect Wires In A Light Switch?
Connect the live (hot) wire to the switch terminal. Attach the neutral and ground wires properly for safety.
Can I Install A Light Switch Without Turning Off Power?
No, always turn off the power at the breaker box. This prevents electrical shock and ensures safe installation.
What Is A Single-pole Light Switch Diagram?
It shows wiring for a switch controlling one light. It’s the simplest and most common light switch setup.
Conclusion
Installing a light switch is simpler than it seems. Follow the diagram step by step. Always turn off power before starting work. Double-check your connections for safety and proper function. A correctly installed switch saves time and trouble later. Take your time and stay patient.
Soon, you will enjoy easy control of your lights. Small projects like this build your confidence. Keep learning and trying new tasks around your home.