Are you tired of searching for an outlet near your favorite spot only to find none? What if you could easily add a new outlet right where you need it—using the existing wiring from a light switch?
Installing an outlet from a light switch is a smart, cost-effective way to bring more power to your room without calling an electrician. In this guide, you’ll discover simple, step-by-step instructions that anyone can follow. By the end, you’ll have the confidence to safely add an outlet and make your space more functional.
Ready to get started? Let’s dive in!
Tools And Materials Needed
Installing an outlet from a light switch needs the right tools and materials. Having these ready makes the job easier and safer. Prepare everything before starting the project.
Essential Tools
- Voltage tester to check power is off.
- Wire stripper to remove insulation safely.
- Flathead and Phillips screwdrivers for screws.
- Needle-nose pliers for bending and holding wires.
- Utility knife for cutting cables if needed.
- Electrical tape to cover wire connections.
- Drill with bits to make holes for the outlet box.
Required Materials
- New electrical outlet matching your home’s system.
- Outlet box to hold the new outlet securely.
- Electrical wire, usually 14/2 or 12/2 gauge.
- Wire nuts to join wires safely.
- Switch plate cover to replace or modify existing one.
- Wire connectors for secure and safe connections.
- Grounding wire for safety and code compliance.

Credit: www.do-it-yourself-help.com
Safety Precautions
Working with electrical outlets and switches requires careful attention. Safety comes first to avoid shocks and accidents. Follow these safety steps to protect yourself and your home.
Power Shutoff
Turn off the power at the circuit breaker before starting any work. Do not rely on the switch alone to cut the power. Double-check that the correct breaker is off. This step stops electricity flow and keeps you safe.
Using A Voltage Tester
Use a voltage tester to confirm no electricity is flowing. Test the wires and terminals before touching them. The tester shows if the power is still on. This tool is essential for your safety during the installation.
Preparing The Work Area
Preparing the work area is the first step to safely install an outlet from a light switch. A clean and organized space helps avoid accidents and makes the job easier. Taking time to prepare ensures a smooth process and better results.
Clearing The Space
Remove any furniture or objects near the switch. Clear the floor to avoid tripping hazards. Keep the area well-lit so you can see clearly. Cover nearby items to protect them from dust or debris. A clear space helps you focus on the task.
Gathering Supplies
Collect all tools and materials before starting. You will need a screwdriver, voltage tester, wire stripper, electrical tape, and the new outlet. Having everything ready saves time and prevents interruptions. Check that your supplies are in good condition and meet safety standards.

Credit: www.youtube.com
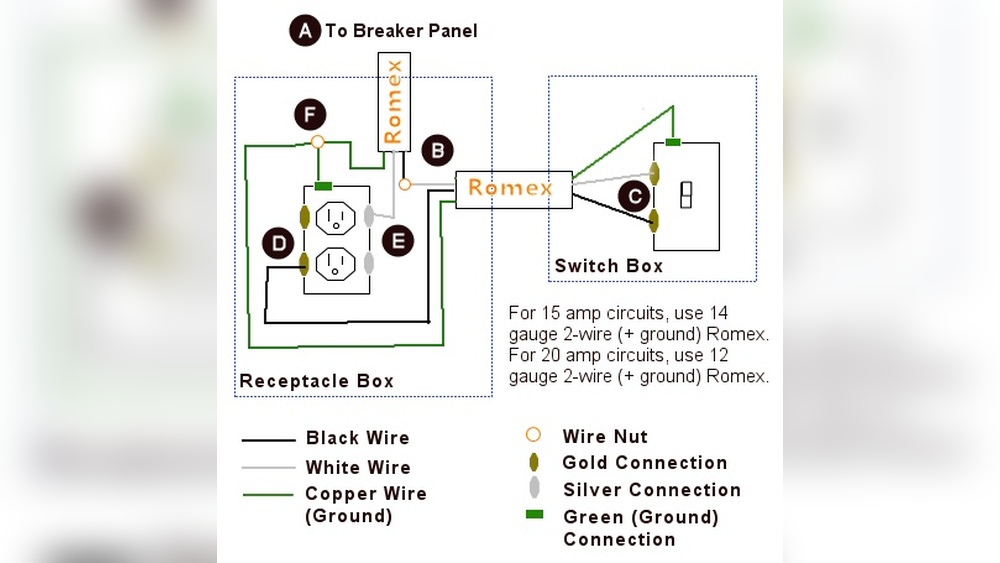
Locating The Switch Box Wiring
Locating the switch box wiring is the first step in installing an outlet from a light switch. You need to open the switch box carefully to see the wires inside. Knowing what each wire does helps avoid mistakes. It also ensures safety while working with electricity. Take your time to study the wires before starting any work.
Identifying Wires
Inside the switch box, you will find several wires. Usually, there are black, white, and copper or green wires. The black wires carry power. White wires are neutral. Copper or green wires are ground wires. Use a voltage tester to check which wire has power. Label the wires with tape for easy identification.
Understanding Wire Functions
The black wire brings power from the electrical panel. The white wire completes the circuit by carrying current back. The ground wire is for safety, preventing shocks. The switch interrupts the black wire to turn lights on and off. Knowing these functions helps in connecting an outlet properly.
Turning Off The Circuit Breaker
Turning off the circuit breaker is the first and most important step when installing an outlet from a light switch. This step keeps you safe from electric shock. It also protects the wiring and devices you work on. Never skip this step. Safety comes first.
Before starting, locate your home’s main electrical panel. The panel holds all the circuit breakers. Each breaker controls power to different parts of your home. You need to find the right one.
Locate The Electrical Panel
Look for a metal box on a wall, often in the basement, garage, or utility room. Open the panel door. Inside, you will see many switches. These are the circuit breakers.
Identify The Correct Circuit Breaker
Each breaker should have a label. The label shows which area or room it controls. Find the breaker that powers the light switch you want to work on. If labels are missing or unclear, turn off breakers one by one and test the switch.
Switch Off The Circuit Breaker
Flip the correct breaker to the “off” position. This stops electricity from flowing to that circuit. Double-check by trying the light switch. The light should not turn on. If it still works, find the right breaker and switch it off.
Use A Voltage Tester
Use a voltage tester to be sure power is off. Touch the tester to the wires in the switch box. No reading means no electricity. This confirms your safety before touching any wires.
Removing The Light Switch
Removing the light switch is the first step to install an outlet in its place. Safety is key. Turn off the power at the circuit breaker. Test the switch with a voltage tester to confirm no electricity flows. This protects you from shocks while working.
Once the power is off, you can start removing the switch plate and switch itself. Take your time. Handle parts gently to avoid damage. Follow these steps carefully.
Unscrewing The Switch Plate
Locate the screws holding the switch plate in place. Use a screwdriver to remove them. Keep the screws safe for later use. Gently pull the switch plate away from the wall. Set it aside carefully.
Detaching The Switch
Now, look at the screws holding the switch to the electrical box. Unscrew these to free the switch. Pull the switch out slowly. Observe the wires attached to it. Note their positions for easier reconnection. Use a voltage tester again to double-check no power is present.
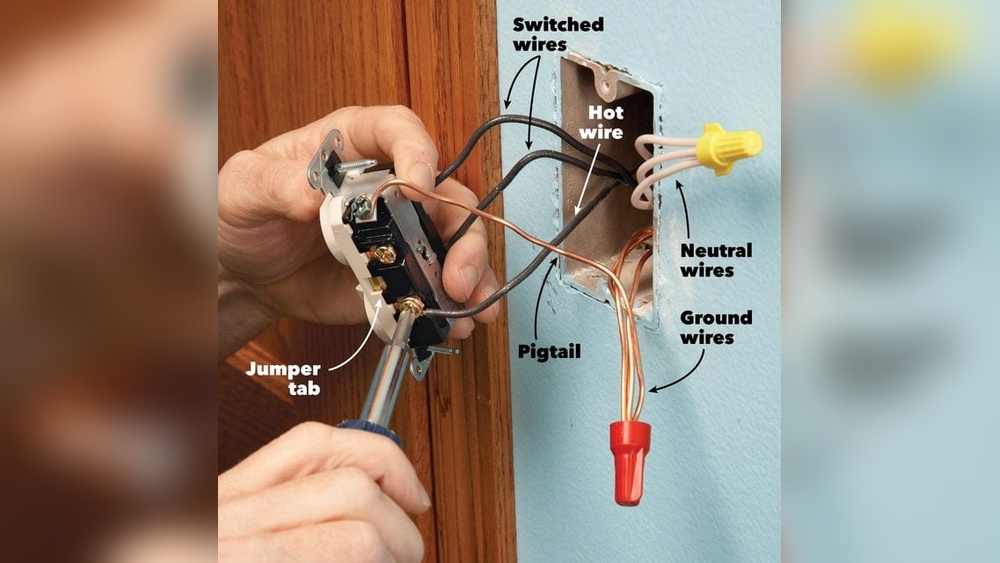
Wiring The New Outlet
Wiring the new outlet is a key step in this project. It ensures the outlet works safely and properly. This part requires care and focus. Follow the steps closely for the best results.
Connecting Hot, Neutral, And Ground Wires
First, identify the hot wire. It is usually black or red. Connect this wire to the brass terminal on the outlet.
Next, find the neutral wire. It is typically white. Attach it to the silver terminal on the outlet.
Finally, locate the ground wire. It is either green or bare copper. Connect it to the green grounding screw on the outlet.
Securing Wire Connections
Make sure all wires are tightly wrapped around their terminals. Loose connections cause sparks or shorts.
Use a screwdriver to firmly tighten each screw. Avoid over-tightening to prevent damage.
Check each connection by gently tugging the wires. They should not move or slip out.

Credit: www.quora.com
Installing The Outlet Box
Installing the outlet box is a key step in adding a new outlet from a light switch. This step prepares the space and ensures safe wiring. Follow clear instructions to mount the box and run the cable correctly. This helps avoid future electrical problems and keeps your home safe.
Mounting The Box
Start by choosing the right outlet box for your wall type. Use a box designed for old work or new work walls. Position the box where the outlet will go. Trace the box outline on the wall with a pencil. Cut the wall carefully along the lines using a drywall saw. Insert the box into the hole. Secure it tightly using the built-in clamps or screws. Make sure the box sits flush with the wall surface. Check for a firm fit before moving on.
Running The Cable
Next, run the electrical cable from the light switch to the new outlet box. Turn off the power before handling any wires. Pull the cable through the switch box’s cable clamp. Guide it through the wall cavity to the outlet box. Leave enough cable length inside both boxes for easy connections. Secure the cable with staples or clamps to prevent movement. Avoid sharp bends or kinks in the wire. This keeps the wiring safe and durable.
Testing The Outlet
After wiring the outlet from the light switch, the job is almost done. Finishing touches make your work safe and neat. These final steps protect the wiring and improve the look. Proper finishing also helps avoid accidents and electrical problems.
Installing Outlet Cover Plate
Start by placing the outlet cover plate over the outlet. Align it carefully so the screw holes match. Use a screwdriver to fasten the screws tightly. Do not overtighten, or the plate may crack. The cover plate protects wires and keeps the outlet clean.
Tidying Up
Check the outlet and switch area for any loose wires. Push wires neatly inside the electrical box. Make sure no wires are pinched or exposed. Secure any hanging cables with cable ties or clips. Clean the wall surface around the outlet for a fresh look.
Finishing Touches
Troubleshooting common issues helps you fix problems quickly. It saves time and avoids extra costs. Problems during outlet installation are normal. Knowing how to solve them makes the task easier. Here are two common issues and ways to fix them.
No Power At Outlet
Check the circuit breaker first. A tripped breaker stops power flow. Reset it by switching off and on. Test the outlet again.
Confirm the wiring matches the switch. Incorrect wiring can cut power. Use a voltage tester to check wires. The hot wire should connect to the switch and outlet correctly.
Make sure the switch is on. Sometimes the switch controls the outlet power. Turn it on and test the outlet.
Loose Connections
Loose wires cause flickering or no power. Turn off the power before checking wires. Tighten all wire nuts and terminal screws.
Look for damaged or frayed wires. Replace any that look worn out. Secure wires firmly to avoid loose connections later.
Use electrical tape to cover exposed wire parts. This prevents shorts and improves safety. Double-check all connections before turning power back on.
Frequently Asked Questions
Can I Install An Outlet From An Existing Light Switch?
Yes, you can install an outlet from a light switch by tapping into the switch’s wiring. Ensure power is off before starting. Use proper connectors and follow electrical codes for safety.
What Tools Are Needed To Install An Outlet From A Switch?
You need a voltage tester, wire stripper, screwdriver, outlet box, electrical tape, wire nuts, and a new outlet. These tools help safely connect and secure the wiring.
Is It Safe To Add An Outlet To A Light Switch Circuit?
It is safe if you follow electrical codes and turn off power first. Ensure the circuit can handle the extra load to prevent overload and hazards.
How Do I Know If The Switch Wiring Supports An Outlet?
Test the wiring with a voltage tester to confirm power presence. Check if the switch circuit can handle an outlet load. Consult an electrician if unsure.
Conclusion
Installing an outlet from a light switch is a useful skill. It gives you more power points where you need them. Always turn off the power before starting any work. Follow each step carefully for safety and success. Take your time and double-check your connections.
A well-installed outlet can make your space more functional. Now, you have the basics to try this at home. Stay safe, and don’t rush the process. You can do it with patience and care.