Are you looking to upgrade your home with a sensor light switch but don’t know where to start? Connecting a sensor light switch might sound tricky, but with the right steps, you can do it yourself quickly and safely.
Imagine walking into a room where the lights turn on automatically—no more fumbling for switches in the dark. This guide will walk you through everything you need to know, making the process simple and stress-free. Keep reading, and you’ll have your sensor light switch up and running in no time.
Credit: www.fourgenerationsoneroof.com
Tools And Materials Needed
Before starting to connect a sensor light switch, gather the right tools and materials. This step makes the job easier and safer. Having everything ready helps avoid delays and mistakes.
Use tools designed for electrical work. Materials must match the switch and home wiring. Safety is important, so choose quality items.
Essential Tools
A screwdriver set is needed to remove and install switch plates. Use a voltage tester to check if wires carry current. Wire strippers help prepare wires by removing insulation cleanly. Needle-nose pliers assist in bending and placing wires. A drill may be required if new holes are needed for mounting.
Required Materials
Buy the sensor light switch that fits your home’s wiring system. Use wire nuts to connect wires safely. Electrical tape adds extra protection to wire connections. If the wiring is old, consider new electrical wires. A wall plate covers the switch for a neat finish.
Safety Gear
Wear insulated gloves to prevent electrical shocks. Safety goggles protect your eyes from debris. Use a flashlight or headlamp for clear visibility in dark areas. Have a fire extinguisher nearby for emergencies.
Types Of Sensor Light Switches
Sensor light switches help save energy and add convenience. They turn lights on or off based on different triggers. Understanding the types of sensor light switches makes choosing the right one easier.
Each type works in a unique way. They detect motion, presence, or light levels to control lighting automatically. Below are the common types of sensor light switches.
Motion Sensor Switches
Motion sensor switches detect movement in a room. They turn lights on when someone enters and off after no motion is detected. These switches are great for areas used briefly, like hallways or bathrooms. They use infrared or microwave signals to sense motion.
Occupancy Sensor Switches
Occupancy sensor switches check if a space is occupied. They detect both motion and presence. Lights stay on as long as someone is in the room. These switches are ideal for offices and living rooms. They help avoid turning lights off too soon.
Ambient Light Sensor Switches
Ambient light sensor switches measure natural light in a room. They adjust artificial lighting based on daylight availability. Lights dim or turn off when there is enough sunlight. These switches save energy and keep lighting comfortable. They work well near windows or skylights.
Safety Precautions
Safety is the top priority when connecting a sensor light switch. Electrical work can be risky without the right steps. Taking proper precautions protects you and your home from harm.
Following safety rules reduces the chance of electric shock or fire. It also ensures the sensor light switch works correctly after installation. Prepare carefully before starting the project.
Turn Off The Power
Switch off the circuit breaker to cut power to the light switch. Use a tester to confirm no electricity flows in the wires. Do not skip this step. Live wires can cause serious injury.
Use Proper Tools
Use insulated screwdrivers and wire strippers. Avoid metal tools without insulation. Proper tools keep you safe and make the job easier. Check tools for damage before use.
Wear Safety Gear
Wear rubber-soled shoes to avoid electric shock. Use safety glasses to protect your eyes from debris. Gloves add extra protection when handling wires. Safety gear is essential, not optional.
Read The Instructions
Read the sensor light switch manual carefully. Follow the manufacturer’s steps exactly. Each device may have different wiring needs. Proper reading prevents mistakes and hazards.
Check Wiring Labels
Identify wires by their colors and labels. Connect wires according to the instructions only. Mixing wires can cause short circuits or damage. Double-check before making connections.
Work In Good Lighting
Ensure your workspace is well-lit. Clear, bright light helps you see wires clearly. Working in dim light increases the risk of errors. Use a portable lamp if needed.
Keep The Area Dry
Make sure your hands and the workspace are dry. Water conducts electricity and raises shock risk. Avoid working in damp or wet conditions. Safety improves in a dry environment.

Credit: www.fourgenerationsoneroof.com
Preparing The Wiring
Preparing the wiring is the first step to connect your sensor light switch safely. This step ensures the power is off and the wires are ready for the new switch. Proper preparation helps avoid electrical hazards and makes installation easier.
Follow the steps carefully. Take your time to check everything before moving on.
Turning Off The Power
Locate your home’s main electrical panel. Switch off the circuit breaker that controls the light switch. Double-check by trying to turn on the light. The light should not work. This step keeps you safe from electric shock.
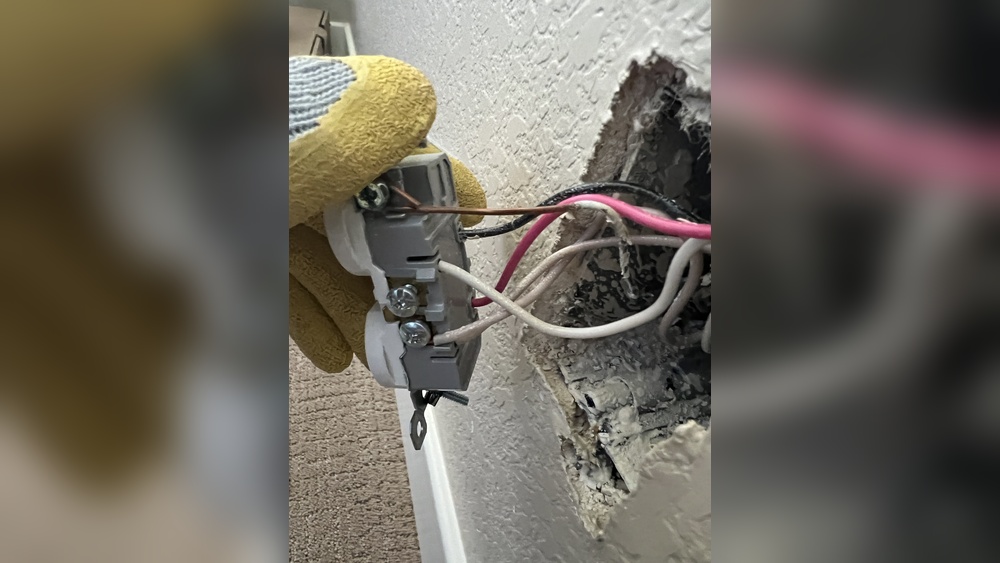
Removing The Old Switch
Unscrew the faceplate of the old switch. Use a screwdriver to remove the screws holding the switch in place. Gently pull the switch out from the wall. Do not touch the wires yet. Keep the screws safe for later use.
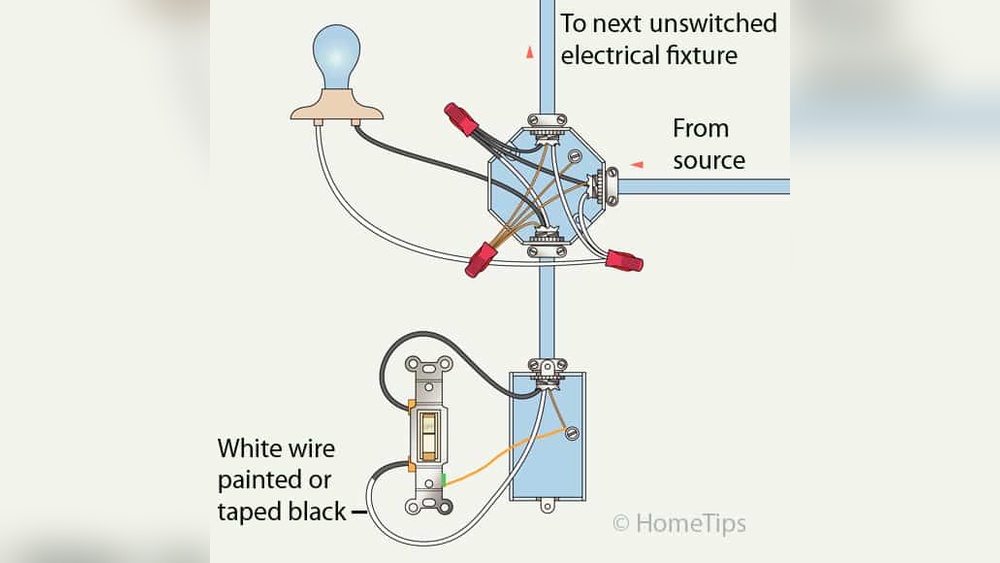
Identifying Wires
Look closely at the wires connected to the old switch. Usually, you will see a black (hot) wire, white (neutral) wire, and green or bare (ground) wire. Use a voltage tester to confirm no power is present. Make a note of each wire’s position. This helps when connecting the new sensor switch.
Installing The Sensor Switch
Installing the sensor switch is an easy process that improves your home’s lighting. This step involves connecting wires, securing the switch, and testing the setup. Follow each part carefully to ensure the switch works properly and safely.
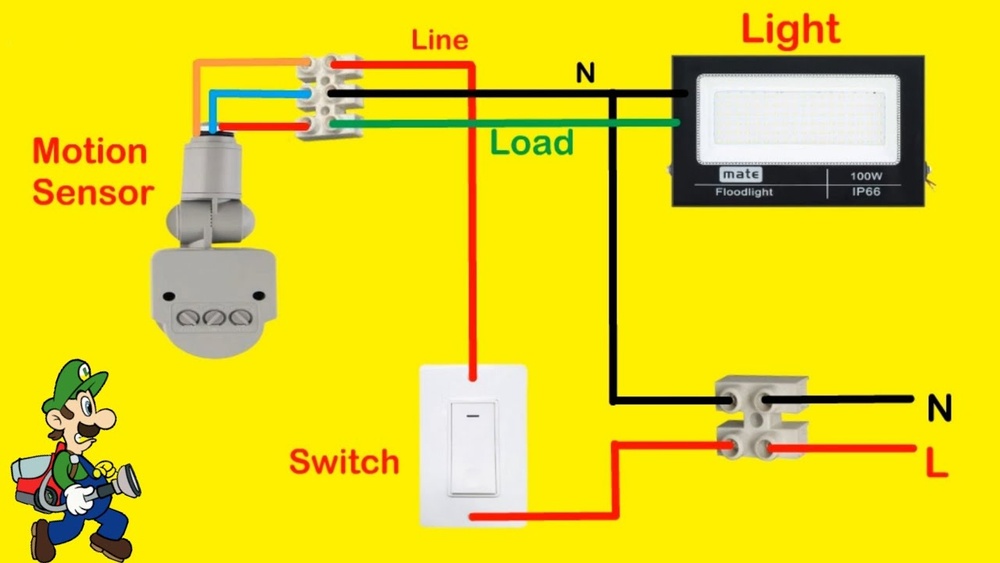
Connecting The Wires
Turn off the power at the circuit breaker before starting. Remove the old switch by unscrewing it from the wall. Identify the wires: usually black (hot), white (neutral), and green or bare (ground). Connect the sensor switch wires to the matching wires in the wall. Use wire nuts to secure each connection. Double-check that no bare wire is exposed.
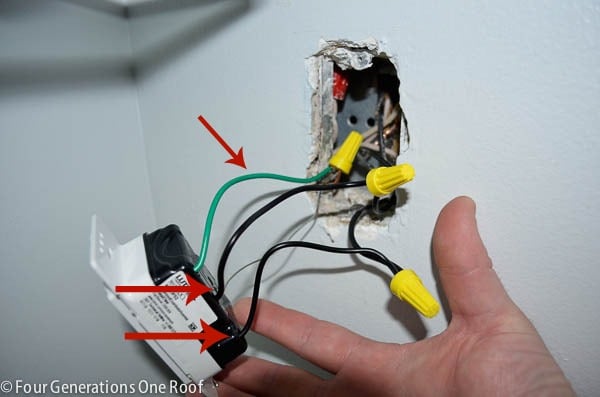
Securing The Switch
Push the connected wires gently into the electrical box. Align the sensor switch with the screw holes. Use screws to fasten the switch firmly to the box. Make sure it fits snugly and does not move. Attach the switch cover plate to finish the installation.
Testing The Connections
Turn the power back on at the breaker. Test the sensor by moving your hand in front of it. The light should turn on automatically. If the light does not respond, turn off the power and check the wire connections. Adjust the sensor settings if needed to match your room’s lighting conditions.

Credit: www.youtube.com
Adjusting Sensor Settings
Adjusting sensor settings is key to making your sensor light switch work well. Proper settings help the light respond correctly to movement and light levels. It saves energy by turning the light on only when needed. You can customize how sensitive the sensor is, how long the light stays on, and the light level that triggers it.
Sensitivity Adjustment
Sensitivity controls how much motion the sensor detects. Higher sensitivity means the sensor notices small movements. Lower sensitivity avoids false triggers from pets or passing cars. Turn the sensitivity dial or press the button to change the level. Test by moving near the sensor to check if it reacts properly. Adjust until it fits your needs.
Time Delay Settings
Time delay sets how long the light stays on after motion stops. You can choose seconds or minutes. Short delay saves more energy but may turn off too soon. Long delay keeps the light on longer for safety or convenience. Use the time delay dial or buttons to set the time. Try different settings to find the best balance.
Light Level Calibration
Light level calibration controls when the sensor activates based on daylight. It stops the light from turning on during the day. Adjust the sensor to activate only in low light or darkness. Some switches have a light sensor or a dial for this setting. Test at different times of day to make sure it works right. Proper calibration prevents unnecessary power use.
Troubleshooting Common Issues
Troubleshooting common issues helps keep your sensor light switch working well. Small problems can stop the switch from working or cause it to act strangely. Fixing these problems saves time and keeps your space safe and bright.
Switch Not Turning On
Check if the power supply is on. Sometimes, the circuit breaker may be off. Make sure the switch is connected to the correct wires. Loose or wrong connections can stop the switch from turning on. Also, test the sensor light switch on another circuit to rule out a wiring problem.
False Triggering
False triggering happens when the light turns on without movement. Clean the sensor lens to remove dust or dirt. Place the sensor away from heat sources like heaters or direct sunlight. Adjust the sensitivity settings to lower detection range. Avoid placing the sensor near moving objects like fans or curtains.
Inconsistent Operation
Inconsistent operation means the light works sometimes but not all the time. Check for loose wiring or poor connections. Ensure the sensor is not blocked by objects. Test the switch during different times of day to see if light levels affect it. Replace the sensor if it continues to work erratically.
Maintenance Tips
Maintaining your sensor light switch is key to keeping it working well. Regular care helps the sensor detect motion accurately and the switch to respond quickly. Simple steps can extend the life of your device and save you from frequent replacements.
Cleaning The Sensor Lens
Dust and dirt can block the sensor lens. Use a soft cloth to wipe it gently every few weeks. Avoid harsh chemicals that could damage the lens. Clean sensors catch motion better and reduce false triggers.
Checking The Batteries
Some sensor switches use batteries. Check them regularly to ensure the switch works without interruptions. Replace batteries as soon as the light dims or the sensor slows down. Fresh batteries keep the sensor active and reliable.
Inspecting The Wiring
Loose or damaged wires can cause the switch to fail. Turn off power before checking wires. Tighten any loose connections carefully. Look for signs of wear or corrosion. Proper wiring keeps the switch safe and functional.
Testing The Sensor Range
Make sure the sensor covers the needed area. Walk through the sensor’s detection zone and observe the light response. Adjust the sensor angle or sensitivity if the light doesn’t turn on properly. Correct range ensures the light works when you need it.
Frequently Asked Questions
How Do I Wire A Sensor Light Switch?
To wire a sensor light switch, first turn off power at the breaker. Connect the switch’s live, neutral, and ground wires to the corresponding house wires. Secure connections with wire nuts. Finally, mount the switch and restore power to test functionality.
What Tools Are Needed To Install A Sensor Light Switch?
You need a screwdriver, wire stripper, voltage tester, and wire nuts. A drill may be required for mounting. Always use insulated tools for safety when working with electrical wiring.
Can I Install A Sensor Light Switch Myself?
Yes, if you have basic electrical knowledge and follow safety precautions. Turn off power before starting. If unsure, consult a licensed electrician to avoid hazards or improper installation.
How Do I Adjust The Sensor Light Switch Settings?
Most switches have dials or buttons to set sensitivity, time delay, and ambient light threshold. Adjust these to customize when the light turns on or off based on motion and lighting conditions.
Conclusion
Connecting a sensor light switch is easier than it seems. Follow the steps carefully for safe installation. Double-check your wiring before turning on the power. Testing the switch ensures it works properly. Enjoy the convenience of automatic lighting in your home.
A sensor light switch saves energy and adds security. Small effort, big benefits. Give it a try today!