Are you looking to add an outlet to a light switch line but aren’t sure where to start? You’re not alone.
Many homeowners want the convenience of an extra outlet without rewiring their entire room. The good news is, it’s often easier than you think. In this guide, you’ll learn simple, step-by-step instructions to safely add an outlet to your existing light switch circuit.
By the end, you’ll have the confidence to do it yourself and create more power access exactly where you need it. Keep reading to discover how to make your space more functional with just a few tools and some basic know-how.
Tools And Materials Needed
Adding an outlet to a light switch line can be useful. It lets you power devices without new wiring. Safety must come first in this task. Electrical work can be risky without the right steps. Follow these safety precautions to avoid accidents and damage.
Turn Off The Power
Always switch off the power at the circuit breaker. Do not rely on the wall switch alone. Use a voltage tester to confirm the power is off. This stops electric shocks while working on wires.
Use Proper Tools And Equipment
Choose tools made for electrical work. Insulated screwdrivers and wire strippers protect you. Avoid using damaged or worn-out tools. Proper tools make the job safer and easier.
Wear Safety Gear
Use gloves designed for electrical work. Safety glasses protect your eyes from sparks or dust. Wear closed-toe shoes to avoid injury from dropped tools.
Check For Code Compliance
Follow local electrical codes and rules. This keeps your home safe and legal. Incorrect wiring can cause fires or fines. Check if you need a permit before starting.
Work In A Dry Environment
Never work on electrical circuits in wet places. Water increases the risk of electric shock. Make sure the area is dry and well-lit. This helps you see wires clearly and avoid mistakes.
Safety Precautions
Turn off the power before starting any electrical work. Use a voltage tester to be sure the wires are not live. Always follow local electrical codes for safety.
Finding the switch line is the first step to add an outlet safely. This line carries power to the light switch and controls the light fixture.
You need to know which wire is the switch line to avoid mistakes. Using the wrong wire can cause electrical problems or hazards.
Turn Off Power At The Breaker
Always turn off power to the switch at the circuit breaker. This step protects you from electric shock.
Use a voltage tester to confirm the power is off before touching wires.
Remove The Switch Cover And Switch
Unscrew the switch cover plate. Then, carefully pull out the switch from the wall box.
Look at the wires connected to the switch. Identify the wires that bring power in and out.
Use A Voltage Tester To Find The Hot Wire
Turn the power back on briefly. Test each wire with a voltage tester.
The wire that shows voltage is the hot wire from the power source. This wire is part of the switch line.
Mark this wire with tape for easy identification.
Trace The Switch Line Wires
Turn the power off again. Follow the wires inside the box.
One wire usually comes from the power source. The other goes to the light fixture.
The wire bringing power to the switch is your switch line. The other is the switched wire.
Label Wires Clearly
Use colored tape or labels to mark each wire. This step helps during wiring the new outlet.
Clear labeling reduces confusion and makes the next steps safer and faster.
Identify The Switch Line
Turning off power is the first step before adding an outlet to a light switch line. It keeps you safe from electric shocks. Always treat electricity with respect.
Even a small mistake can cause serious injury. Never work on electrical wiring while the power is on. Take time to ensure everything is off.
Locate The Circuit Breaker
Find your home’s circuit breaker panel. It usually sits in the basement or garage. Look for the label that matches the room you work in.
Switch Off The Correct Breaker
Flip the breaker that controls the switch line. Turn it fully to the off position. Double-check by trying the light switch to confirm no power flows.
Use A Voltage Tester
Always check for electricity with a voltage tester. Touch the tester to wires in the switch box. It should show zero voltage before you start work.
Double Check The Power
Test the outlet or switch with a lamp or device. If it does not turn on, power is off. This step protects you before touching wires.
Turn Off Power
Removing the switch cover is the first step in adding an outlet to a light switch line. This step allows you to access the wiring behind the switch. Always ensure the power is off to avoid electric shock.
Use a screwdriver to take off the screws holding the switch cover. Keep the screws in a safe place. Gently pull the cover away from the wall. Sometimes the cover may stick, so pull carefully.
Turn Off The Power
Find the circuit breaker that controls the switch. Flip it to the off position. Double-check by trying to turn on the light switch. The light should not turn on. This step keeps you safe while working.
Remove The Screws
Use a flathead or Phillips screwdriver. Unscrew the screws on the switch cover plate. Turn them counterclockwise until loose. Remove both screws completely. Set them aside for later use.
Pull Off The Cover Plate
Hold the cover plate with your fingers. Pull it straight out from the wall. Do not force it if it feels stuck. Wiggle gently to loosen the plate. Once removed, you will see the switch and wires.
Remove The Switch Cover
Testing for live wires is a crucial step before adding an outlet to a light switch line. It ensures safety by confirming whether electricity is flowing through the wires. Handling live wires without checking can cause electric shock or damage to your tools.
This process helps identify which wires carry current and which do not. Knowing this makes wiring easier and safer. Always test with the right tools and take your time.
Turn Off The Power
Start by switching off the main power at the circuit breaker. This stops electricity from flowing to the switch. Use a test tool to double-check that power is off before touching any wires. Safety first.
Use A Non-contact Voltage Tester
Hold the tester near each wire without touching it. If the tester lights up or beeps, the wire is live. Test every wire in the switch box carefully. This tool is easy and safe for beginners.
Check With A Multimeter
Set your multimeter to measure AC voltage. Touch the probes to the wire and ground or neutral. A reading above zero means the wire is live. Use this method for more exact results.
Mark Live Wires
Label wires that test live with tape or markers. This helps avoid confusion during wiring. Clear labels prevent mistakes and keep work safe. Always keep track of your findings.
Test For Live Wires
Choosing the right location for your new outlet is very important. The outlet should be easy to reach and useful for your needs. Think about where you will use the outlet most often. This helps to avoid moving furniture or tools later.
Also, consider the space around the light switch line. The outlet needs enough room for safe installation. Planning this carefully can save time and effort.
Check The Wall Space Near The Switch
Look for free wall space near the light switch. Avoid areas with pipes or wires inside the wall. Use a stud finder to locate safe spots. This prevents damage and keeps the work safe.
Consider Outlet Height And Accessibility
Place the outlet at a comfortable height. Usually, outlets are 12 to 18 inches above the floor. Choose a height that fits your daily use. Easy access makes the outlet more useful.
Avoid Obstructions And Heat Sources
Keep the outlet away from heat sources like heaters or ovens. Do not place it behind furniture or curtains. This keeps the outlet safe and easy to use.
Choose The Outlet Location
Decide where the outlet will be most useful and easy to reach. Choose a spot near the light switch line for simple wiring. Make sure the location fits your room’s needs and safety rules.
Understanding The Cable Type
Choose the right cable for your project. Use a cable with two insulated wires and a ground wire. Usually, 14/2 or 12/2 NM cable works well for outlets and switches. The size depends on your circuit’s amperage. Check local codes to be sure.
Turn Off The Power
Safety first. Switch off the circuit breaker that controls the light switch line. Use a voltage tester to confirm no electricity flows. Never work on live wires. This step protects you from electric shocks.
Measure And Cut The Cable
Measure the distance between the switch box and the new outlet location. Add a little extra length for easier connections. Cut the cable with wire cutters. Keep the cable straight and free of damage.
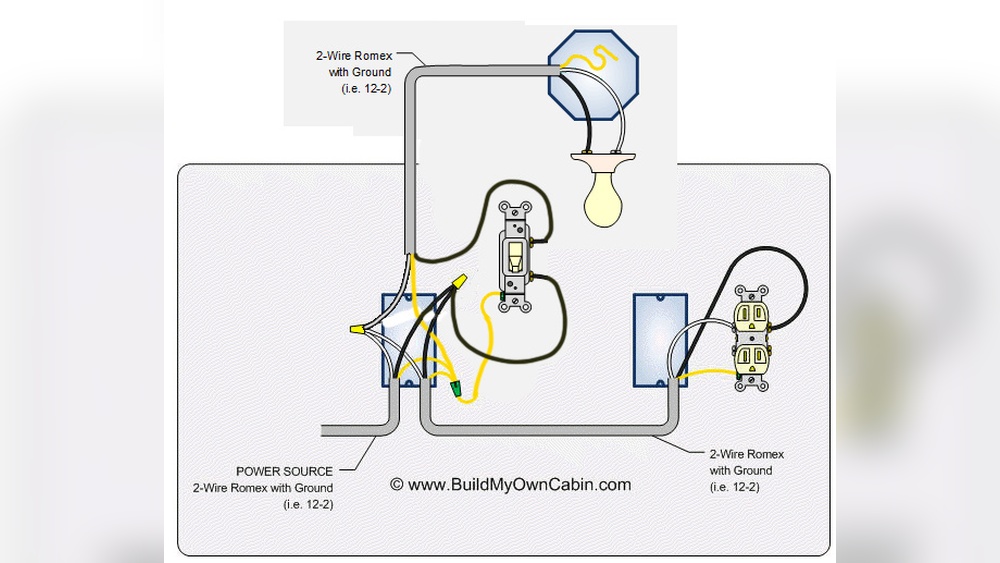
Run The Cable Between Boxes
Feed the cable through the wall or conduit. Use fish tape if needed to pull the cable. Avoid sharp bends or kinks in the wire. Secure the cable with staples or clamps. Leave enough slack in each box for wiring.
Credit: www.reddit.com
Run The Electrical Cable
Connecting wires to the outlet is an important step in adding an outlet to a light switch line. Proper connections ensure safety and reliable power flow. Take your time and follow each instruction carefully.
Before starting, turn off power at the breaker. Use a voltage tester to confirm no electricity flows. This step prevents shocks and accidents.
Identify The Wires
Look at the wires coming from the switch box. Usually, black or red wires are hot. White wires are neutral. Bare copper or green wires are ground. Knowing these helps make correct connections.
Prepare The Wires
Strip about half an inch of insulation from each wire end. Use wire strippers for clean cuts. Twisting stranded wires improves contact and connection strength.
Connect The Hot Wire
Attach the black or red hot wire to the brass terminal on the outlet. Tighten the screw firmly but do not over-tighten. A secure connection ensures power flows safely.
Connect The Neutral Wire
Attach the white neutral wire to the silver terminal on the outlet. This completes the circuit for current return. Make sure the wire is snug under the screw.
Connect The Ground Wire
Connect the bare copper or green ground wire to the green grounding screw. This connection protects against electrical faults. Tighten the screw securely.
Double Check All Connections
Review every wire connection. Make sure no wires are loose or touching each other. Proper wiring avoids shorts and electrical hazards.
Connect Wires To The Outlet
Wiring an outlet to a light switch line requires careful steps. This task connects power from the switch to the new outlet. Safety is key before starting any wiring work. Turn off the power at the breaker to avoid shocks.
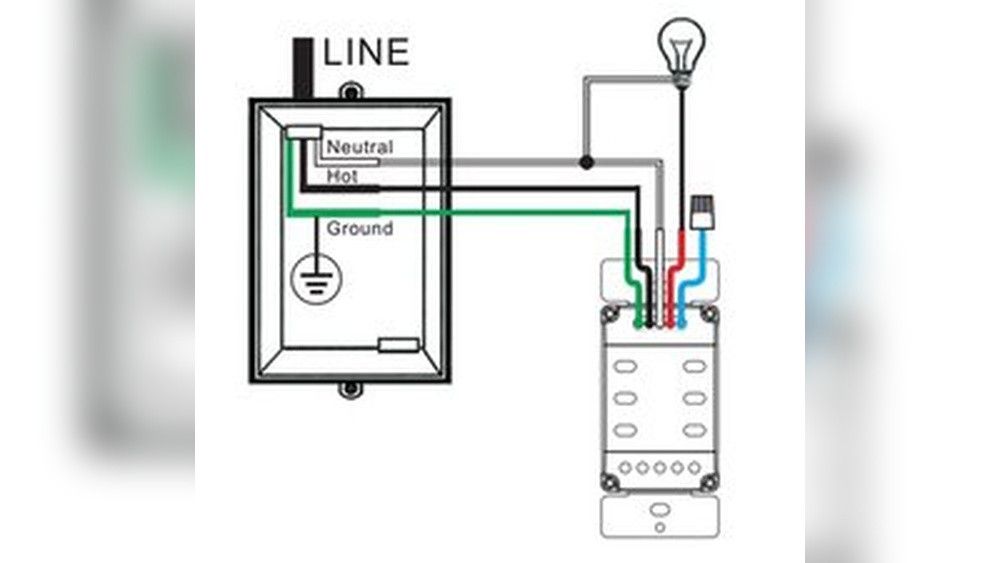
Understanding the wiring setup helps. The light switch line usually has a hot wire, a neutral wire, and a ground wire. The outlet must connect to these wires properly for safe use.
Identify The Wires In The Switch Box
First, open the switch box and check the wires inside. Look for the black (hot), white (neutral), and green or bare (ground) wires. Use a voltage tester to confirm the power is off. Label each wire to avoid confusion later.
Connect The Outlet’s Hot Wire To The Switch
Take a new black wire and connect one end to the switch’s hot terminal. Run the other end to the outlet’s brass terminal. This connection sends power from the switch to the outlet’s hot side.
Attach The Neutral Wire To The Outlet
Join the outlet’s silver terminal to the white neutral wire in the switch box. If there is no neutral wire in the box, you cannot add an outlet here. Neutral completes the circuit for the outlet.
Secure The Ground Wire Properly
Connect the outlet’s green or bare wire to the ground wire in the switch box. This step protects against electrical faults. Tighten all wire nuts and terminals securely.
Test The Outlet Before Closing The Box
Turn the power back on and test the outlet with a plug tester. Check if the outlet powers on and off with the switch. If it works, turn off power and close the switch box cover safely.
Wire The Outlet To The Switch
Securing the outlet and switch is a key step in your electrical project. It ensures safety and keeps everything stable. Loose parts can cause sparks or damage over time. Properly fastening each component protects your home and family.
Prepare The Electrical Box
Start by checking the electrical box. It must be clean and free of debris. Make sure the box is firmly attached to the wall stud. A loose box can cause the outlet and switch to wobble. Tighten any screws or nails holding the box in place.
Attach The Switch To The Box
Place the switch carefully inside the box. Align the screw holes with the box’s mounting holes. Use a screwdriver to tighten the screws evenly. Avoid over-tightening, which can crack the switch body. The switch should sit flush and stable.
Secure The Outlet In Place
Push the outlet gently into the box. Align the mounting tabs with the box holes. Insert the mounting screws and tighten them by hand first. Then use a screwdriver to make them snug. The outlet must not move when you plug in devices.
Check Alignment And Tightness
Look at the outlet and switch from the front. Both should be straight and level. Press on each gently to test firmness. If either feels loose, tighten the screws a bit more. Proper alignment makes the cover plate fit nicely later.
Secure The Outlet And Switch
After wiring your new outlet to the light switch line, restoring power is the next step. This ensures your new outlet and switch work properly. Testing the circuit confirms safety and function.
Always follow safety rules when restoring power. Turn the main breaker back on carefully. Avoid touching wires or metal parts during this process. Use a voltage tester to check if power flows correctly.
Turn On The Circuit Breaker
Locate the breaker panel and find the switch you turned off. Flip the breaker back to the ON position slowly. This restores electricity to the light switch and outlet line. Stay clear of the panel while doing this.
Check The Outlet For Power
Use a voltage tester or plug in a small device. A lamp or phone charger works well. If the outlet powers the device, the wiring is correct. No power means double-check connections or breaker status.
Test The Light Switch Operation
Flip the light switch on and off. The connected light should respond immediately. If the light does not work, re-inspect your wiring. Ensure all wires are tight and correctly connected.
Verify Outlet Safety
Use a socket tester to check wiring safety. This tool detects common wiring faults quickly. Correct any faults before using the outlet regularly. Safety is key to avoid shocks or damage.

Credit: www.do-it-yourself-help.com
Restore Power And Test
Troubleshooting helps fix common problems when adding an outlet to a light switch line. It saves time and avoids frustration. Many issues come from simple mistakes or overlooked steps. Careful checking can solve most problems quickly. Use these tips to find and fix problems safely.
Check The Power
Turn off the main power before starting any work. Use a voltage tester to confirm no electricity flows. Testing prevents shocks and damage. Never assume the power is off.
Inspect Wire Connections
Loose or wrong wire connections cause outlets to fail. Make sure wires are tight and connected to correct terminals. Use wire nuts to secure connections. Double-check colors match: black to black, white to white.
Test The Circuit Breaker
A tripped breaker may stop the outlet from working. Locate the breaker panel and reset the breaker for the switch line. If it trips again, there may be a short or overload.
Use A Circuit Tester
A circuit tester helps confirm the outlet is wired correctly. It shows proper grounding and power flow. Wrong wiring can cause shocks or damage. Testing avoids future hazards.
Verify Outlet Rating
Check the outlet’s voltage and current rating. It must match the circuit line. Using the wrong outlet can cause overheating or failure. Choose outlets designed for your circuit type.
Examine The Switch
The switch may interfere with outlet function. Make sure the switch wiring is correct and not breaking the outlet’s power. Switches wired incorrectly can cut power to the outlet.
Troubleshooting Tips
Adding an outlet to a light switch line can save space and increase convenience. Sometimes, the task might seem easy. Other times, it needs expert skills. Knowing when to call a professional is important for safety and quality.
Electric work involves risks. Mistakes can cause shocks, fires, or damage. A professional electrician knows the rules and tools. They ensure the job is done right. Here are signs that it is best to hire a pro.
Complex Wiring Systems
Older homes often have complicated wiring. The wires may not follow current codes. Identifying the correct wires can be hard. Professionals can navigate these systems safely.
Unclear Electrical Diagrams
Sometimes, no clear wiring plans exist. Guesswork increases the risk of errors. Electricians use special tools to trace wires. They avoid damaging the electrical system.
Need For Permits And Inspections
Local laws may require permits for changes. Inspections ensure safety and code compliance. Professionals handle paperwork and inspections. This avoids fines and legal issues.
Limited Electrical Knowledge
Working with electricity needs basic knowledge. Understanding circuits and breakers is key. Lack of knowledge increases danger and errors. A professional brings expertise and confidence.
Use Of Specialized Tools
Some tasks require special equipment. Wire testers and voltage detectors are examples. Professionals have these tools ready. They work efficiently and safely.
Time Constraints
Electricians finish jobs faster and better. Trying to rush without skills can cause mistakes. Hiring a pro saves time and stress.

Credit: www.do-it-yourself-help.com
Frequently Asked Questions
Can I Add An Outlet To An Existing Light Switch Line?
Yes, you can add an outlet to a light switch line by tapping into the switch’s wiring. Ensure the circuit is powered off before starting to avoid shocks. Use proper connectors and follow local electrical codes for safety and compliance.
What Tools Are Needed To Add An Outlet To A Switch?
You’ll need a voltage tester, wire stripper, screwdriver, wire nuts, electrical box, and outlet receptacle. These tools help ensure safe and efficient installation. Having the right tools makes the process smoother and reduces the risk of errors.
Is It Safe To Add An Outlet To A Light Switch Circuit?
Adding an outlet is safe if done correctly and following electrical codes. Always turn off power before working and use proper materials. If unsure, consult a licensed electrician to avoid hazards and ensure compliance.
How Do I Identify The Line And Load Wires In A Switch?
Use a voltage tester to identify line (power source) and load (to light) wires. The line wire carries current from the breaker, while the load wire goes to the light fixture. Proper identification ensures correct outlet wiring.
Conclusion
Adding an outlet to a light switch line is a useful skill. It gives you extra power spots without extra wiring. Follow safety steps carefully to avoid problems. Turn off power before starting work. Use the right tools and materials for best results.
Taking your time helps you do the job well. This simple upgrade can make your space more convenient. Try it yourself or ask a pro if unsure. Small changes like this improve your home’s function.