Are your metal cabinet hardware looking dull or outdated? Imagine giving them a fresh, stylish makeover without spending a fortune or hiring a professional.
You can transform your space quickly and easily by spray painting your metal cabinet hardware. In this guide, you’ll discover simple steps that anyone can follow to achieve a smooth, lasting finish. Keep reading, and you’ll learn how to make your cabinets stand out with a brand-new look you’ll be proud of.
Choosing The Right Spray Paint
Choosing the right spray paint is key for a smooth metal cabinet hardware makeover. The paint must stick well and resist wear. Not all spray paints work the same on metal surfaces. Picking the right type ensures a long-lasting, beautiful finish.
Types Of Spray Paint For Metal
Look for spray paints made specifically for metal. Enamel spray paint is tough and creates a hard finish. It protects against rust and scratches. Oil-based spray paints also work well on metal. They dry slower but offer strong coverage. Avoid water-based paints as they may peel off easily.
Color And Finish Options
Choose colors that match your room or style. Classic shades like black, white, or silver suit most cabinets. Glossy finishes reflect light and look shiny. Matte finishes give a smooth, soft look without shine. Satin finishes offer a balance between shiny and dull. Pick a finish that fits your taste and room design.
Safety Considerations
Spray paint fumes can be harmful. Use spray paint in a well-ventilated area. Wear a mask to protect your lungs. Gloves keep paint off your skin. Keep paint away from flames or sparks. Read the instructions on the can before you start spraying.
Preparing The Hardware
Preparing the hardware is the first and most important step before spray painting metal cabinet hardware. Proper preparation helps the paint stick well and last longer. It also gives a smooth and neat finish.
Start by carefully removing the hardware from the cabinet. Clean it well to remove dirt, grease, and old paint. Lightly sanding the surface helps the new paint to grip better.
Removing The Hardware
Use a screwdriver to remove knobs, handles, or pulls. Keep screws and small parts in a safe place. Removing hardware prevents paint from getting on the cabinet. It also makes painting easier and more even.
Cleaning And Degreasing
Clean the hardware with warm, soapy water. Use a soft cloth or brush to scrub away grease and dirt. Rinse and dry completely. For tough grease, use a degreaser or rubbing alcohol. Clean surfaces help paint stick better and last longer.
Sanding For Better Adhesion
Lightly sand the hardware with fine-grit sandpaper. This creates tiny scratches on the surface. The rough texture helps paint stick firmly. Wipe off sanding dust with a clean cloth. Sanding ensures a smooth and even paint finish.
Setting Up Your Workspace
Setting up your workspace is the first step for spray painting metal cabinet hardware. A good setup helps you work safely and get better results. Prepare the area so paint does not damage nearby items. Have all tools ready before starting. This saves time and keeps your work smooth.
Choosing A Well-ventilated Area
Pick a space with fresh air flow. Spray paint fumes can be harmful. Open windows and doors to let air move freely. Avoid small, closed rooms. Outdoors is best if weather allows. Good ventilation keeps you safe and paint drying fast.
Protecting Surrounding Surfaces
Cover tables, floors, and walls near your workspace. Use drop cloths, newspapers, or plastic sheets. Tape edges to keep covers in place. This stops paint from sticking to surfaces. Protecting your area makes cleanup easier after painting.
Gathering Necessary Tools
Collect all supplies before starting. You need spray paint, primer, and clear coat. Have gloves and a mask for safety. Use painter’s tape to hold pieces steady. A small stand or box helps spray all sides evenly. Ready tools speed up your work.

Credit: porchdaydreamer.com
Spray Painting Techniques
Spray painting metal cabinet hardware requires careful technique. Proper methods ensure a smooth, even finish. Follow these simple steps to get the best results and avoid common mistakes. Spray painting can be easy and satisfying with the right approach.
Shaking And Testing The Spray Paint
Shake the spray paint can for at least one minute. This mixes the paint inside well. Test the spray on a piece of scrap paper or cardboard. Check the spray pattern and paint flow. This prevents drips and uneven coverage on your hardware.
Applying Thin And Even Coats
Apply the paint in thin layers. Thick coats cause runs and bubbles. Allow each coat to dry before adding the next. Multiple light coats give a better finish. Patience leads to a smooth, durable surface on your metal pieces.
Maintaining Proper Distance And Motion
Hold the spray can about 8 to 12 inches from the hardware. Keep your hand moving steadily side to side. Avoid stopping in one spot. This prevents paint buildup and drips. Keep a consistent speed for even coverage every time.
Drying And Curing Process
After spraying paint on metal cabinet hardware, the drying and curing process is crucial. It ensures the paint sets well and lasts long. Proper drying prevents smudges and runs. Curing strengthens the finish, making it tough against scratches and chips.
Recommended Drying Times
Allow the paint to dry at least 30 minutes before handling. Some paints need up to an hour. Check the paint can for specific times. Avoid rushing this step to keep the finish smooth and even. Drying in a dust-free area helps avoid imperfections.
Avoiding Smudges And Runs
Handle the hardware gently during drying to prevent marks. Use gloves or hold edges only. Keep the pieces on a clean, flat surface. Avoid stacking or touching each other until fully dry. Light coats of paint reduce the risk of runs.
Curing For Durability
Curing can take several days to a week. It makes the paint hard and durable. Leave the hardware undisturbed in a dry place. Avoid exposure to water or heavy use during this time. Proper curing ensures the paint resists wear and lasts longer.
Finishing Touches
After spray painting your metal cabinet hardware, the finishing touches are crucial. These steps protect your work and bring your project together. Taking time with these details gives your hardware a smooth, lasting look.
Applying A Clear Sealant
Use a clear sealant to protect the paint from scratches and chips. Choose a spray sealant made for metal surfaces. Hold the can about 10 inches away and spray in light, even coats. Let each coat dry before adding another. This helps the paint last longer and keeps the color bright.
Reattaching The Hardware
Wait until the sealant is fully dry before reattaching the hardware. Use the original screws or new ones if needed. Tighten screws carefully to avoid scratching the paint. Check that each piece fits well and turns smoothly. Proper reattachment prevents damage and keeps your cabinet looking neat.
Tips For Long-lasting Results
Keep your hardware clean with a soft cloth and mild soap. Avoid harsh chemicals that can wear down the paint. Handle the cabinet gently to reduce wear and tear. Reapply clear sealant every year to maintain protection. These simple habits help your painted hardware look fresh for years.
Troubleshooting Common Issues
Spray painting metal cabinet hardware can bring new life to old pieces. Yet, problems may occur during the process. Knowing how to fix common issues saves time and frustration. This guide helps solve typical problems for a smooth painting experience.
Fixing Paint Drips
Paint drips happen when you spray too much paint in one spot. Let the paint dry completely before fixing drips. Use fine sandpaper to smooth the drips gently. Wipe away dust with a clean cloth. Spray a light, even coat over the area to blend it. Keep the spray can moving to avoid new drips.
Dealing With Uneven Coverage
Uneven coverage shows as patchy or thin paint spots. Hold the spray can about 8-12 inches from the hardware. Spray in steady, sweeping motions for even layers. Apply several light coats instead of one heavy coat. Let each coat dry before adding the next. This method creates smooth, uniform coverage.
Handling Rust And Peeling
Rust and peeling cause paint to flake off metal surfaces. Remove rust with a wire brush or sandpaper. Clean the hardware thoroughly to remove dust and grease. Use a metal primer to protect the surface before painting. Apply paint only after the primer dries well. This process stops rust and keeps paint firmly attached.

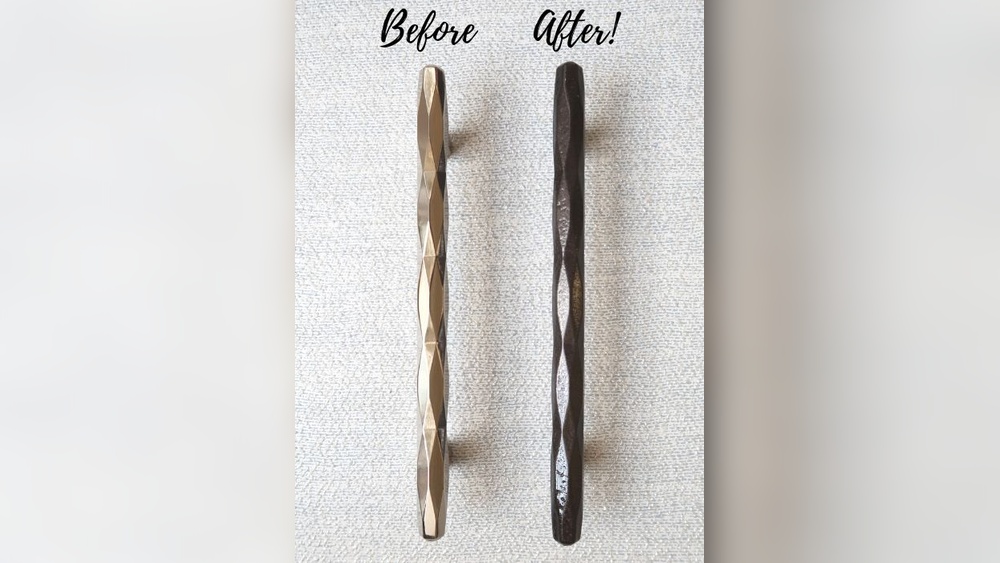
Credit: www.youtube.com

Credit: www.thriftydecorchick.com
Frequently Asked Questions
How Do I Prepare Metal Cabinet Hardware For Spray Painting?
Clean the hardware thoroughly to remove dirt and grease. Lightly sand the surface to help paint adhere better. Remove dust with a tack cloth before painting.
What Type Of Spray Paint Works Best For Metal Hardware?
Use spray paint specially formulated for metal surfaces. Look for rust-resistant and durable paints to ensure long-lasting results. Primer spray paint is recommended for better adhesion.
How Many Coats Of Spray Paint Should I Apply?
Apply 2 to 3 thin coats for even coverage. Let each coat dry completely before applying the next. Thin coats prevent drips and ensure a smooth finish.
Can I Spray Paint Metal Hardware Without Removing It?
It’s best to remove hardware before painting to avoid overspray. Removing hardware ensures even coverage and prevents damage to surrounding areas. It also makes cleaning and sanding easier.
Conclusion
Spray painting metal cabinet hardware is simple with the right steps. Clean the hardware well to help paint stick better. Use light, even coats for a smooth finish. Let each layer dry before applying the next. Take your time and work in a well-ventilated area.
This process can give old hardware a fresh, new look. Enjoy the satisfaction of updating your cabinets yourself. Small changes can make a big difference in your space. Keep your tools clean to use them again next time. Painting hardware can be a fun and rewarding project.