Have you ever wanted to control one light from two different switches? Maybe you have a long hallway or a large room where turning the light on or off from either end would be super convenient.
Connecting two light switches might sound tricky, but with the right steps, you can do it yourself and save money on an electrician. In this guide, you’ll learn exactly how to connect 2 light switches safely and easily. Keep reading—you’re just moments away from making your home smarter and more functional!

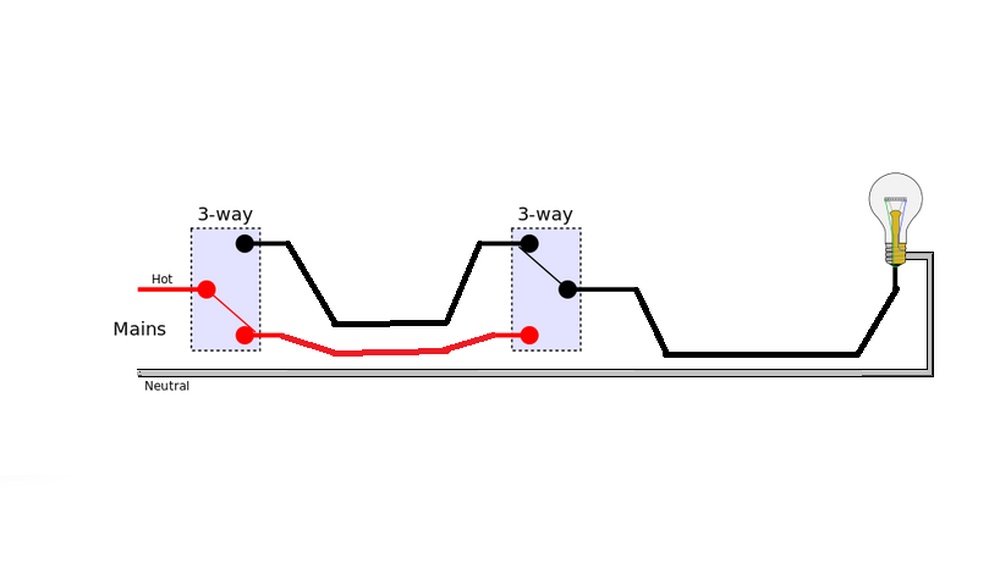
Credit: diy.stackexchange.com
Tools And Materials Needed
Before starting to connect two light switches, gather the right tools and materials. Proper preparation ensures safety and makes the work easier. Having everything ready saves time and avoids frustration. Here is a list of essential items.
Tools Needed
- Screwdriver (flathead and Phillips) for removing and securing screws
- Wire stripper to remove insulation from wires safely
- Voltage tester to check if wires carry electricity
- Needle-nose pliers for bending and twisting wires
- Electrical tape to insulate wire connections
- Drill with bits, useful for mounting or making holes
Materials Needed
- Two compatible light switches
- Electrical wires (14 or 12 gauge, depending on circuit)
- Wire connectors (wire nuts) to join wires securely
- Wall plates to cover switches neatly
- Wire labels to mark wires for easy identification
Safety Precautions
Safety is the top priority when connecting two light switches. Electricity can be dangerous if handled incorrectly. Taking the right safety steps protects you and your home.
Always prepare your workspace before starting. This reduces risks and helps avoid accidents. A careful approach makes the job easier and safer.
Turn Off The Power
Switch off the circuit breaker that controls the light switches. Use a voltage tester to confirm no power is present. Never work on live wires. This step prevents electric shocks.
Use Proper Tools And Equipment
Select insulated tools designed for electrical work. Wear rubber-soled shoes and gloves. This gear offers extra protection against electricity. Avoid using damaged or worn tools.
Follow Local Electrical Codes
Check local rules for wiring light switches. Use the correct wire types and sizes. Adhering to codes ensures safety and avoids future problems. It also helps pass inspections if needed.
Label Wires Before Disconnecting
Mark wires with tape or labels before removing them. This helps reconnect them correctly later. Proper labeling prevents wiring mistakes and malfunctions.
Work In A Well-lit Area
Good lighting helps you see wires clearly. It reduces errors and accidents. Use a flashlight or portable lamp if needed. Avoid working in dark or cramped spaces.
Types Of Light Switches
Light switches control the flow of electricity to lights. Different switches serve different needs. Knowing the types helps with proper installation and use.
Some switches control one light from one location. Others allow control from two or more spots. This guide covers the most common types.
Single-pole Switch
A single-pole switch controls a light from one place. It has two terminals plus a ground. This switch is simple and common in homes. It turns a light on or off with one flip. Wiring is straightforward and easy to understand. This switch is best for rooms with one entrance.
Three-way Switch
A three-way switch controls a light from two locations. It has three terminals plus a ground. This switch is useful in hallways or large rooms. It lets you turn lights on or off from two ends. Wiring is more complex than single-pole switches. Correct wiring ensures safety and proper function.

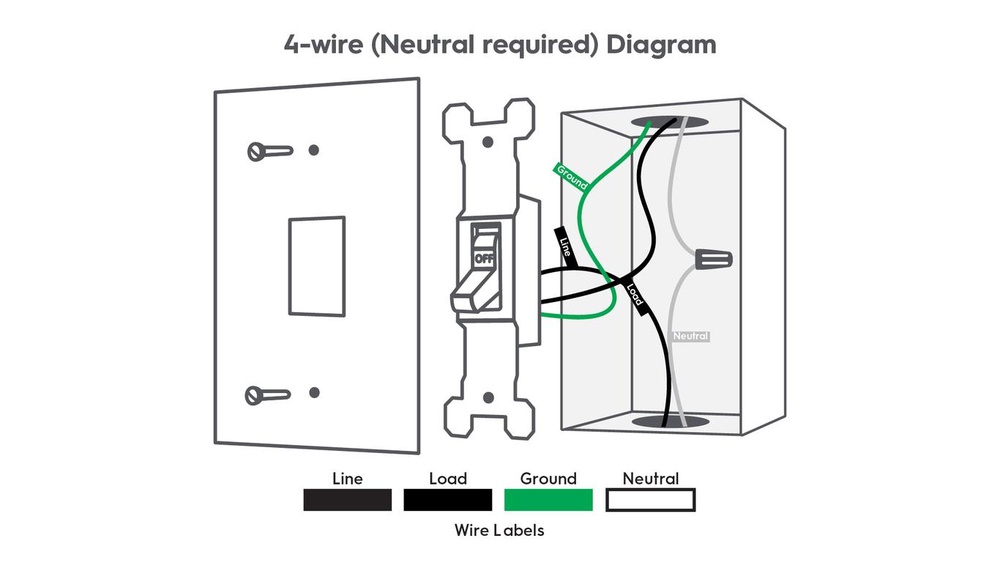
Credit: www.realpars.com
Wiring Basics
Understanding the basics of wiring is essential before connecting two light switches. Proper wiring ensures safety and proper function. It helps prevent short circuits and electrical shocks. This section covers the fundamental wiring concepts you need to know.
Understanding Wires
Wires carry electricity from the power source to the light and switches. Each wire has a specific role. The most common wires are hot, neutral, and ground. Hot wires carry current to the switch or light. Neutral wires complete the electrical circuit by carrying current back. Ground wires provide a safe path for electricity in case of a fault.
Color Codes
Wire colors help identify their purpose. Black or red wires usually mean hot wires. White wires are neutral. Green or bare copper wires are ground wires. Following color codes reduces confusion and increases safety. Always check local codes for any specific color rules.
Preparing The Work Area
Preparing the work area is the first step in connecting two light switches safely. A clean, organized space helps avoid mistakes and accidents. Clear away clutter and gather all tools before starting. This saves time and keeps the job smooth.
Make sure the work area has good lighting. Bright light helps see wires and connections clearly. Use a flashlight or work lamp if needed. Also, check the floor for safety. Avoid wet or slippery spots to prevent falls.
Turn Off Power Supply
Always switch off the power at the circuit breaker. This stops electricity from flowing to the switches. Use a tester to confirm no power is present. Working with live wires is very dangerous.
Gather Necessary Tools
Collect tools like a screwdriver, wire stripper, and voltage tester. Keep electrical tape and wire nuts nearby. Having tools ready avoids interruptions during work. Use insulated tools for extra safety.
Clear The Area Around Switches
Remove any furniture or decorations near the switches. This gives easy access to the wall and wiring. It also prevents damage to your belongings. Create enough space to work comfortably.
Wear Safety Gear
Put on safety glasses to protect your eyes from dust or sparks. Use gloves to avoid cuts and shocks. Comfortable clothing that covers arms is best. Safety gear reduces the risk of injury.
Step 1: Turn Off Power
Before starting any electrical work, safety is the top priority. Turning off the power is the first and most important step. It stops electricity from flowing to the switches you will work on. This prevents electric shocks and accidents.
Even if you are careful, electricity can be dangerous. Always take the time to cut the power. This simple action keeps you safe during the project.
Locate The Circuit Breaker
Find the main electrical panel in your home. This is usually in the basement, garage, or utility room. Look for the circuit breaker box with labeled switches inside. Each switch controls power to different parts of the house.
Turn Off The Correct Breaker
Identify the breaker that supplies electricity to the light switches. Flip the breaker to the “off” position. This stops power to the switches. If unsure, turn off the main breaker to cut power to the whole house.
Verify The Power Is Off
Use a voltage tester or a simple light bulb to check. Touch the tester to the switch wires or turn on the light. If the tester shows no electricity or the light does not turn on, the power is off. Never skip this step.
Step 2: Remove Existing Switches
Step 2 is about safely removing the existing light switches. This step prepares you for connecting two switches properly. Care is important to avoid electric shocks and damage.
Turn off the power at the circuit breaker. This stops electricity from flowing to the switches. Always double-check with a tester to confirm no power is running.
Gather Tools And Safety Gear
Use a screwdriver, voltage tester, and insulated gloves. These tools protect you and help with the removal. Keep a flashlight nearby if the area is dark.
Remove The Switch Cover Plates
Unscrew the cover plates gently. Set screws aside for later use. Removing the plates reveals the switch and wiring behind them.
Unscrew The Switch From The Wall Box
Loosen screws holding the switch in place. Pull the switch out carefully. Avoid pulling wires too hard to prevent damage.
Test For Live Wires
Use a voltage tester on each wire. Confirm no wire is live before touching. Safety first to prevent shocks or injury.
Label And Disconnect Wires
Mark each wire with tape or a label. This helps remember where each wire connects. Unscrew and detach wires from the old switch carefully.
Step 3: Identify Wires
Step 3: Identify wires is a key part of connecting two light switches. You must know which wire does what. This helps avoid mistakes and keeps the work safe.
Wires often look similar but have different jobs. Identifying each wire clearly makes the next steps easier. It also prevents short circuits or shocks.
Understanding Wire Colors
Most homes follow color codes for wiring. Black or red wires are usually “hot” wires carrying electricity. White wires are neutral. Green or bare wires are ground wires. Check colors carefully before touching any wire.
Using A Voltage Tester
A voltage tester helps find live wires. Turn off the main power first. Then, turn on power to the switches only. Touch the tester to each wire to see which carries current. This shows which wires are active.
Labeling Each Wire
Mark each wire with tape or labels. Write down if it is hot, neutral, or ground. Labeling keeps track of wires during installation. It saves time and reduces errors.
Step 4: Connect Switches
Step 4 is where the two switches get connected. This part makes the switches work together. Proper wiring ensures both switches control the same light. Follow the steps carefully to avoid mistakes. Safety is important, so turn off power before starting.
Wiring The First Switch
Start by identifying the power source wire. Connect the live wire to the common terminal on the first switch. Use the traveler wires for the other two terminals. These wires link to the second switch. Tighten all screws firmly to avoid loose connections. Double-check that wires are not touching each other.
Wiring The Second Switch
At the second switch, attach the traveler wires to the two traveler terminals. Connect the light fixture wire to the common terminal here. Make sure the ground wire is connected to the green screw. Secure all wires and check for any exposed ends. Test the switches only after restoring power.
Step 5: Secure And Test
Step 5: Secure and Test is the final part of connecting two light switches. This step ensures safety and proper function. Secure wiring prevents accidents and loose connections. Testing confirms that the switches work as intended. Follow these simple actions to complete your project.
Secure The Switches In The Electrical Boxes
Carefully push wires into the boxes. Avoid pinching or damaging them. Use screws to fasten switches tightly. A loose switch can cause flickering or shorts. Make sure the switches sit flush with the wall.
Attach The Switch Cover Plates
Place cover plates over the switches. Secure them with screws. Cover plates protect wires and improve appearance. Tighten screws evenly to avoid cracks. Use plates that fit the switch size exactly.
Turn On The Power And Test
Restore power at the circuit breaker. Test each switch by flipping it on and off. Both switches should control the light properly. If the light does not respond, recheck wiring connections. Never leave faulty wiring unchecked.
Check For Safety And Functionality
Look for any sparks or unusual sounds. Use your hand to feel for heat on switches. If anything seems wrong, turn off power immediately. Call a professional electrician for help if needed. Safety is the top priority in electrical work.
Troubleshooting Tips
Connecting two light switches can sometimes cause problems. Troubleshooting helps find and fix these issues quickly. This section offers clear tips to solve common problems.
Check The Power Supply
Start by ensuring the power is off before testing. Use a voltage tester to check wires. Confirm power reaches the switches. If no power, check the circuit breaker.
Inspect Wiring Connections
Look closely at all wire connections. Loose or wrong wires cause switch failure. Tighten any loose screws. Match wires by color to the correct terminals.
Test The Switches
Use a multimeter to check each switch. A good switch shows continuity when flipped. Replace switches that show no continuity. Testing ensures both switches work properly.
Look For Short Circuits
Short circuits may trip breakers or blow fuses. Inspect wires for damage or exposed copper. Repair or replace damaged wires immediately. Avoid touching wires with power on.
Verify Switch Type Compatibility
Ensure both switches are compatible for two-way control. Single-pole switches won’t work in this setup. Use two-way or three-way switches as needed.

Credit: www.youtube.com
Frequently Asked Questions
How Do I Wire Two Light Switches Together?
To wire two light switches, use a three-way switch setup. Connect the traveler wires between switches and the common wire to the light fixture. Ensure power is off before starting and follow electrical codes for safety.
What Tools Are Needed To Connect 2 Light Switches?
You need a voltage tester, wire stripper, screwdriver, electrical tape, and wire nuts. These tools help ensure safe and secure wiring connections when connecting two light switches.
Can I Control One Light From Two Switches?
Yes, using two three-way switches allows control of one light from two locations. This setup is common in hallways or large rooms for convenience.
Is It Safe To Connect Two Switches To One Light?
Yes, if wired correctly with three-way switches and proper grounding. Always turn off power and follow local electrical codes for safety.
Conclusion
Connecting two light switches is easier than it seems. Follow the steps carefully and stay safe. Double-check all wiring before turning the power back on. This setup lets you control lights from two places. It adds convenience to your home.
Take your time and don’t rush the process. Ask an expert if you feel unsure. With patience, you can complete the task well. Enjoy the new light control once finished. Simple changes can make your home more comfortable.