If you’re locked out or need to replace a stubborn deadbolt, knowing how to drill a deadbolt lock can save you time and frustration. But drilling a lock isn’t as simple as it sounds—it requires the right tools and careful steps to avoid damage.
In this guide, you’ll learn exactly how to drill a deadbolt lock safely and effectively. By the end, you’ll feel confident handling this tricky task on your own. Keep reading to unlock the secrets that will make this process easier than you think.

Credit: www.parkavenuelocks.com
Tools Needed
Drilling a deadbolt lock requires specific tools to do the job right. Having the correct tools helps you work safely and efficiently. This section lists the tools you need before starting.
Essential Drill Bits
Use high-quality drill bits made for metal. A cobalt or titanium drill bit works best. Start with a small bit to make a pilot hole. Then, use a larger bit to widen the hole. A 1/8-inch and a 1/2-inch bit are common sizes. Sharp bits cut faster and last longer.
Safety Gear
Protect your eyes with safety goggles. Flying metal shards can cause serious injury. Wear gloves to protect your hands from sharp edges. Use ear protection if your drill is loud. A dust mask helps avoid breathing metal dust. Safety gear is a must for every drilling job.
Additional Tools
A power drill with adjustable speed is essential. A center punch marks the drilling spot and prevents slipping. A screwdriver helps remove lock components after drilling. Keep a flashlight nearby for better visibility. Have a clean cloth ready to wipe debris.
Preparing The Lock
Drilling a deadbolt lock requires careful technique to avoid damage and ensure success. Using the right methods helps you drill quickly and safely. Focus on drill speed, the cylinder area, and protecting the door. Follow each step closely for best results.
Choosing The Right Drill Speed
Set your drill to a low or medium speed. High speeds generate heat that can damage the lock. Slow drilling gives you more control. It also helps the drill bit stay sharp longer. Use steady pressure and avoid forcing the drill.
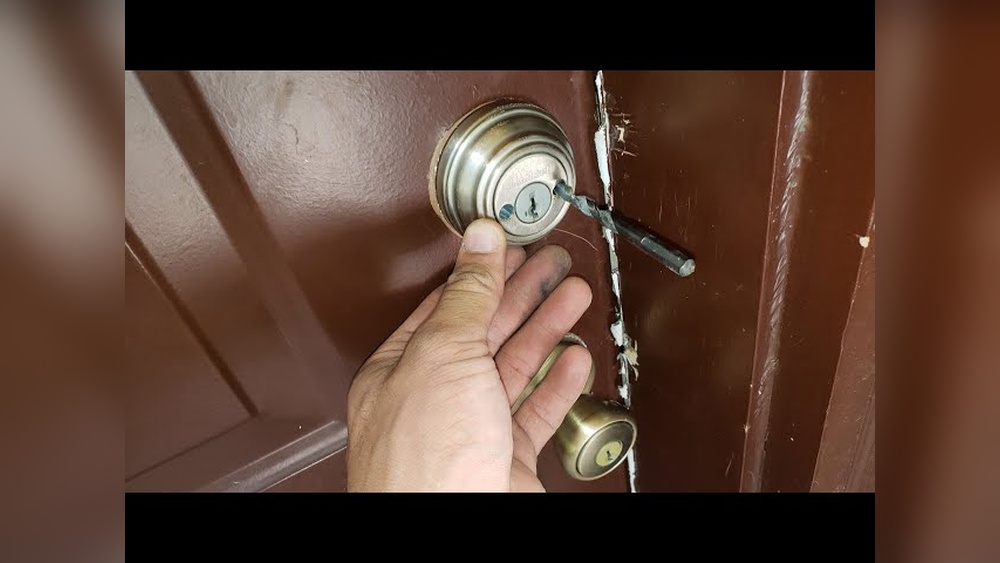
Drilling Through The Cylinder
Target the lock cylinder center. This is the part that holds the pins. Drill straight and steady into the cylinder. Use a strong, sharp bit for metal. Keep the drill steady to avoid slipping. Stop if you feel resistance and reposition.
Avoiding Damage To The Door
Protect the door surface around the lock. Place tape on the door near the drilling spot. This prevents scratches and splinters. Drill slowly to avoid cracking wood or bending metal. Clean metal shavings often to keep the area clear.
Drilling Techniques
Removing the lock cylinder is the first important step in drilling a deadbolt lock. This part holds the key and controls the locking mechanism. Taking it out allows direct access to the inner parts of the lock. This step needs care and the right tools to avoid damage.
Using A Screwdriver
Start by locating the screws on the lock faceplate. These screws usually hold the lock cylinder in place. Use a screwdriver that fits the screw heads perfectly. Turn the screws counterclockwise to loosen and remove them. Keep the screws safe for reassembly later. After removing the screws, gently pull the lock cylinder out. If it feels stuck, wiggle it slightly to free it.
Extracting The Lock Core
The lock core is inside the cylinder. Removing it reveals the pins and springs inside the lock. Insert a flat tool or a small screwdriver into the cylinder’s keyhole. Push or pull the core carefully while pressing the tool. This action loosens the core from the cylinder. Once loose, pull out the lock core completely. Be gentle to avoid breaking any parts inside.
Removing The Lock Cylinder
Drilling a deadbolt lock requires careful attention to safety. Protecting yourself and your property is vital. This section covers key safety steps before you start drilling. Follow these tips to avoid harm and damage.
Protecting Yourself
Wear safety goggles to shield your eyes from metal shavings. Use gloves to protect your hands from sharp edges. Work in a well-lit area for clear visibility. Keep your body steady and avoid rushing the job. Turn off the power to the drill when not in use. These steps reduce injury risks during drilling.
Preventing Door Damage
Mark the exact spot to drill with a pencil or tape. Use the correct drill bit size for the lock type. Drill slowly and apply steady pressure to avoid splintering the door. Cover the surrounding area with tape to protect the finish. Clean metal shavings away before testing the lock. These actions keep your door intact.
Legal Considerations
Drilling a lock on property you do not own is illegal. Always get permission from the property owner first. Be aware of local laws about lock drilling and locksmith work. Improper action can lead to fines or legal trouble. Use drilling only for emergency or authorized situations.
Safety Precautions
After drilling a deadbolt lock, several important steps follow. These steps ensure the door remains secure and the new lock works well. Taking time to clean, install, and test is key. Each step helps avoid problems later.
Cleaning The Area
Remove all metal shavings and dust from the drilled hole. Use a small brush or vacuum to clean the area well. This prevents dirt from blocking the lock parts. Wipe the surface with a damp cloth to clear any remaining debris. A clean area helps the new lock fit smoothly.
Installing A New Lock
Choose a new deadbolt lock that fits your door thickness. Insert the lock cylinder into the drilled hole carefully. Secure it with screws, making sure it sits tight and straight. Follow the instructions from the lock’s manufacturer. Tighten all screws, but do not over-tighten to avoid damage.
Testing The New Installation
Check that the deadbolt moves easily when you turn the key. Lock and unlock the door several times. Ensure the bolt slides fully into the door frame. Test from both inside and outside the door. Confirm the lock holds the door firmly closed for safety.

Credit: www.youtube.com

Credit: www.wikihow.com
Frequently Asked Questions
How Do I Safely Drill A Deadbolt Lock?
Use a power drill with a metal drill bit. Start with a small bit, then gradually increase size. Drill at the keyhole or lock cylinder carefully to avoid damage. Always wear safety goggles and work slowly to maintain control.
What Tools Are Needed To Drill A Deadbolt Lock?
You need a power drill, metal drill bits, safety goggles, and gloves. A center punch helps mark drilling spots. Having a screwdriver and lubricant can assist in lock removal after drilling.
Can Drilling A Deadbolt Lock Damage The Door?
Yes, improper drilling can damage the door and lock mechanism. Use the correct drill bits and techniques to minimize harm. Drilling should be a last resort to avoid expensive repairs or door replacement.
How Long Does It Take To Drill A Deadbolt Lock?
Drilling a deadbolt usually takes 5 to 15 minutes. The time depends on your skill level and the lock’s material. Patience is key to avoid mistakes and ensure safe removal.
Conclusion
Drilling a deadbolt lock takes care and the right tools. Always wear safety glasses and work slowly. Know where to drill to avoid damage. Practice on old locks to build confidence. Remember, drilling should be a last option. Try other methods before using a drill.
Stay safe and protect your property well. With patience, you can handle the task yourself.