Is your light switch not working properly or completely broken? You don’t have to live with a faulty switch or call an expensive electrician right away.
Changing a broken light switch is easier than you think, and you can do it yourself safely with just a few simple tools. In this guide, you’ll learn exactly how to replace your broken switch step by step. By the end, you’ll have your lights working perfectly again—and you’ll save time and money doing it.
Ready to take control and fix that switch? Let’s get started!
Tools And Materials Needed
Changing a broken light switch requires the right tools and materials. Having everything ready makes the job faster and safer. This section covers what you need to prepare before starting.
Essential Tools
A screwdriver is necessary to remove the switch cover and screws. Use a flathead or Phillips screwdriver based on your switch type.
A voltage tester checks if the power is off. Never skip this step to avoid electric shocks.
Wire strippers help remove the insulation from wires. They make clean cuts without damaging the wire.
Needle-nose pliers assist in bending wires and making tight connections.
Electrical tape secures wire connections and prevents short circuits.
Choosing The Right Replacement Switch
Match the replacement switch to your old one. Check if it is single-pole or three-way.
Look at the amperage rating on the switch. It should fit your home’s electrical system, usually 15 or 20 amps.
Pick a switch with the same voltage rating, typically 120 volts in most homes.
Consider the switch style and finish for a neat look on your wall.

Credit: www.parkerandsons.com
Safety Precautions
Working with electrical switches can be risky. Safety is the top priority before starting any repair. Taking the right safety steps prevents accidents and injuries. Follow these simple precautions to stay safe.
Turning Off Power
Switch off the power at the main circuit breaker. Do not rely on the wall switch alone. This step cuts electricity to the light switch. Use the breaker panel to find the correct switch. Turn it off to stop any current flow. Confirm that the power is off before touching wires.
Using A Voltage Tester
Use a voltage tester to check for live wires. This tool tells you if electricity is still present. Place the tester on the switch wires carefully. A reading means electricity is still flowing. Do not proceed until the tester shows no voltage. Testing ensures you do not get shocked.
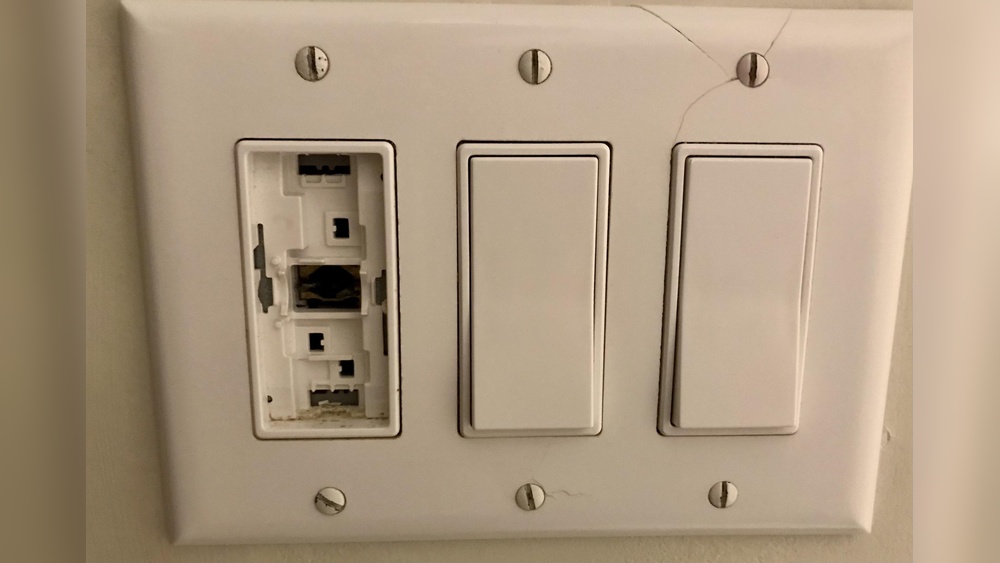
Removing The Old Switch
Removing the old light switch is the first step to fixing a broken one. It is important to do this safely and carefully. Turn off the power at the circuit breaker before starting. This prevents electric shock and keeps you safe. Follow these steps to remove the old switch easily.
Removing The Wall Plate
Start by unscrewing the wall plate covering the switch. Use a flathead or Phillips screwdriver. Keep the screws in a safe place. Gently pull the plate away from the wall. This reveals the screws holding the switch in place.
Unscrewing The Switch
Next, unscrew the screws that hold the switch to the electrical box. Hold the switch steady as you remove the screws. Slowly pull the switch out from the wall. You will see the wires connected to the back of the switch now.
Disconnecting The Wires
Look closely at how the wires are attached. They may be connected with screws or pushed into holes. Use a screwdriver or gently pull to disconnect the wires. Remember their positions for the new switch. Carefully separate the wires and remove the old switch completely.

Credit: www.youtube.com
Installing The New Switch
Installing the new light switch is a careful process. Each step must be done safely and correctly. This ensures the switch works well and lasts long. Follow these clear steps to install your new switch with confidence.
Connecting The Wires
Start by matching the wires from the wall to the new switch. Usually, there are two or three wires. Attach each wire to the correct terminal on the switch. Tighten the screws to hold the wires firmly. Loose wires can cause problems or shocks. Double-check each wire is secure before moving on.
Securing The Switch
Push the wires gently back into the electrical box. Align the switch with the holes on the box. Use screws to fix the switch in place. Make sure it is tight but do not over-tighten. The switch should not move or wiggle. A steady switch feels safe and looks neat.
Replacing The Wall Plate
Place the wall plate over the switch carefully. The plate covers the electrical box and wires. Screw the plate into the wall using the small screws. Tighten the screws so the plate sits flat and firm. Clean the plate if needed. The finished look should be smooth and clean.
Testing The New Switch
Testing the new switch is a key step after installation. It ensures the switch works safely and correctly. This step helps you avoid future problems and confirms your work is done right.
Restoring Power
First, turn the power back on at the circuit breaker. This will supply electricity to the new switch. Be careful and keep your hands dry during this step. Never touch the switch wires after restoring power.
Checking Functionality
Next, flip the switch on and off a few times. The light or device should respond immediately. If the light does not turn on, double-check your wiring. Listen for any unusual sounds or sparks. If all works well, the switch is ready to use.
Troubleshooting Common Issues
Troubleshooting common issues helps fix broken light switches quickly. Understanding the problem saves time and effort. It also keeps you safe while working with electricity.
Switch Not Working
Check the circuit breaker first. Sometimes, the power is off due to a tripped breaker. If the breaker is fine, test the switch with a voltage tester. No power means the switch might be faulty. Replace the switch if needed.
Flickering Lights
Flickering lights can mean a loose or damaged connection. Look for worn wires inside the switch box. Tighten any loose screws holding the wires. Replace the switch if flickering continues after tightening.
Loose Connections
Loose connections cause switches to fail or spark. Turn off power before touching wires. Check all wire nuts and terminal screws. Tighten any that feel loose. Make sure wires are securely fastened to the switch.

Credit: www.youtube.com
Frequently Asked Questions
How Do I Safely Turn Off Power Before Replacing A Switch?
Always switch off the circuit breaker for the switch’s circuit. Use a voltage tester to confirm no power is present. This ensures your safety before starting any electrical work.
What Tools Are Needed To Change A Broken Light Switch?
You need a screwdriver, voltage tester, wire stripper, and replacement switch. Having these tools ready makes the process quicker and safer.
How Do I Remove The Old Broken Light Switch?
After power is off, unscrew the switch plate and mounting screws. Gently pull the switch out and disconnect the wires carefully.
Can I Replace A Single-pole Switch With A Dimmer Switch?
Yes, you can replace a single-pole switch with a compatible dimmer. Ensure the dimmer matches the bulb type and switch voltage.
Conclusion
Changing a broken light switch is easier than it seems. Always turn off the power first. Take your time and follow each step carefully. Use the right tools to avoid mistakes. Safety matters most in any electrical work. After replacing the switch, test it to be sure.
A working light switch improves your home’s comfort and safety. Practice makes the task more familiar and less scary. Now, you can handle this simple fix with confidence.