Have you ever tried to take down a picture from your wall, only to find those stubborn metal hooks left behind? Removing metal picture hooks can be tricky, and if not done right, they can damage your walls or leave ugly marks.
But don’t worry—this guide will show you simple and effective ways to get those hooks out cleanly. Keep reading, and you’ll learn the best tricks to restore your walls quickly and easily, saving you time and stress.
Tools You’ll Need
Removing metal picture hooks from walls requires the right tools. Having these tools makes the job easier and prevents wall damage. Prepare them before you start.
Flathead Screwdriver
A flathead screwdriver helps to gently pry the hook away from the wall. Choose one with a thin blade for better control. It fits under the hook’s base to lift it carefully.
Pliers
Pliers give a strong grip to pull the metal hook out. Needle-nose pliers work best for small hooks. They help remove hooks stuck tightly in the wall.
Putty Knife
A putty knife slides between the hook and wall surface. It loosens the hook without causing damage. Use a flexible putty knife for smooth results.
Patch Kit
A patch kit repairs holes left by hooks. It usually includes spackle, a small spatula, and sandpaper. Patch kits restore the wall to its original look.
Soft Cloth
A soft cloth cleans dust and debris after hook removal. It prepares the wall for patching or painting. Use a damp cloth for best cleaning results.
Preparing The Area
Removing metal picture hooks can be tricky if they stick tight to the wall. Loosening the hook carefully prevents wall damage. It also makes the removal process smoother and cleaner. Use simple tools and gentle methods to ease the hook off. The goal is to reduce resistance without pulling hard.
Using Pliers For Grip
Start by grabbing the metal hook with pliers. Hold the hook firmly but gently. Twist the hook back and forth to loosen it. Avoid sudden jerks to protect the wall. Pliers give better control than fingers alone. Small movements help break the grip of the hook.
Applying Heat To Soften Adhesive
Some hooks use sticky glue or adhesive. Heat can soften this material for easier removal. Use a hairdryer on low heat near the hook. Keep the heat moving to avoid wall damage. Warm the area for a few minutes before pulling. Heat loosens the bond between hook and wall.
Loosening The Hook
Removing metal picture hooks safely protects your walls from damage. It also helps avoid injury. Using the right techniques makes the process smooth and easy. Take your time and follow simple steps to get the hook off cleanly.
Gentle Pulling Techniques
Start by holding the hook firmly but gently. Pull it straight out from the wall. Avoid twisting or bending the hook as this can cause wall damage. Use slow, steady pressure. If the hook feels stuck, stop pulling to prevent harm.
Try wiggling the hook slightly to loosen it. Small movements can help release the hook from the wall. Keep your hands steady and controlled during this step. This method works well for hooks with thin nails or wires.
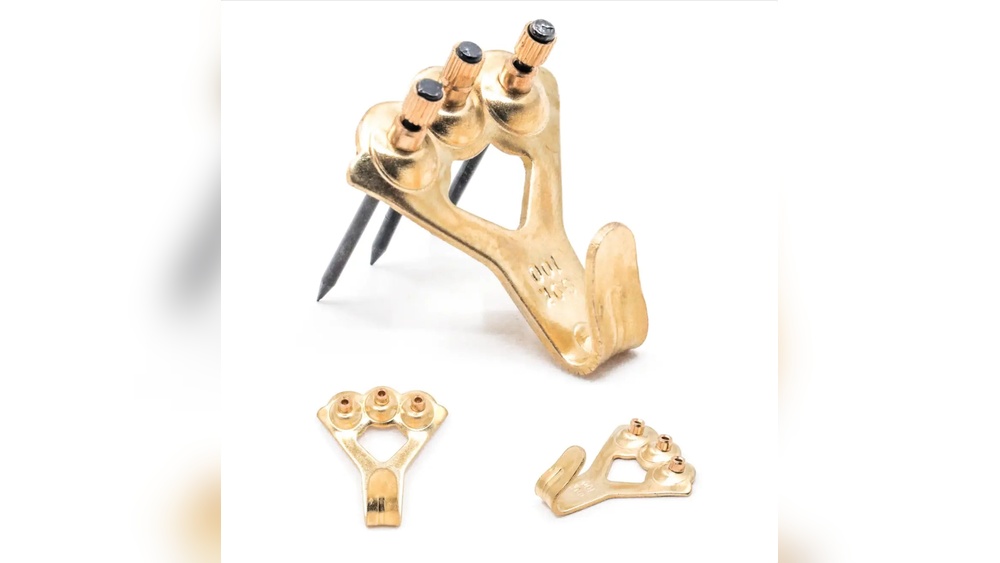
Using A Putty Knife
Slide a putty knife under the base of the hook. Use the knife to lift the hook carefully. This reduces pressure on the wall surface. Push the knife gently to avoid scraping or gouging the paint.
Work the knife back and forth slowly. This helps loosen the hook from the wall. Once the hook begins to lift, pull it out by hand. The putty knife provides extra leverage for safer removal.
Credit: www.homedepot.com
Removing The Hook Safely
Removing metal picture hooks varies by wall type. Each wall material reacts differently to tools and pressure. Understanding the wall type helps prevent damage. Use the right method for drywall, plaster, or brick walls. This makes removal easier and safer.
Drywall Tips
Drywall is soft and can tear easily. Use pliers to gently pull the hook straight out. Avoid twisting or bending the hook too much. This stops the drywall from breaking. If the hole is big, fill it with spackle. Let it dry, then sand smooth for painting.
Plaster Wall Tips
Plaster walls are hard but brittle. Use a putty knife to loosen the hook base. Pull slowly to avoid cracking plaster. If cracks appear, fill them with plaster patch. Sand lightly once dry. Be gentle; plaster repairs need patience.
Brick Or Concrete Walls
Brick and concrete are tough. Use a hammer and chisel to remove hooks set in mortar. Tap gently to loosen the hook without breaking bricks. Avoid using too much force. Fill holes with mortar or concrete patch. Let it dry fully before painting.
Handling Different Wall Types
Removing metal picture hooks often leaves small holes or marks on your wall. Fixing these damages is simple and helps your wall look clean again. Repairing the wall properly prevents future paint peeling and keeps your home neat.
Filling Small Holes
Start by cleaning the hole area. Remove any loose paint or dust. Use a small amount of spackling paste or wall filler. Apply it with a putty knife, pressing firmly into the hole. Smooth the surface and remove extra filler. Let it dry completely before the next step.
Sanding And Smoothing
After the filler dries, sand the area gently. Use fine-grit sandpaper for a smooth finish. Sand until the patch is level with the wall. Wipe away dust with a dry cloth. This step ensures the wall feels even and looks natural.
Touching Up Paint
Match your wall paint color carefully. Use a small brush or roller for touch-ups. Apply paint over the patched area in thin layers. Let each layer dry before adding more. This process blends the repair with the rest of the wall perfectly.

Credit: www.reddit.com
Fixing Wall Damage
Preventing future damage to walls is important after removing metal picture hooks. Small holes and marks can spoil your wall’s look. Taking care when choosing and installing hooks helps keep walls smooth and clean. Follow simple steps to protect your walls and avoid extra repairs.
Choosing The Right Hooks
Select hooks made for your wall type. Plastic or adhesive hooks work well on drywall. Metal hooks suit plaster or wood walls better. Use hooks that support your picture’s weight. Avoid heavy hooks on weak walls. This reduces the chance of holes and cracks. Use rust-resistant hooks to stop stains on walls.
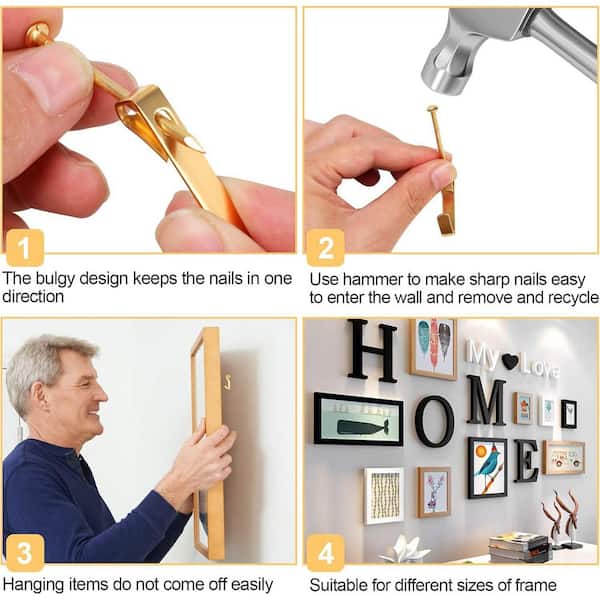
Proper Installation Tips
Mark the spot lightly with a pencil. Use a level to keep pictures straight. Insert hooks slowly to avoid wall damage. Use small nails or screws for better hold. Don’t force hooks into the wall. If unsure, drill a small pilot hole first. Hang pictures close to the wall to reduce stress. Check your hook’s weight limit before hanging.

Credit: www.picturehangsolutions.com
Frequently Asked Questions
How Do I Safely Remove Metal Picture Hooks?
To remove metal picture hooks safely, use pliers to gently pull the hook straight out. Avoid twisting to prevent wall damage. If resistance is strong, try wiggling the hook slightly while pulling. Always protect your hands and work slowly for best results.
What Tools Are Needed To Remove Picture Hooks?
You only need basic tools like needle-nose pliers or regular pliers. A flathead screwdriver may help pry hooks if needed. Additionally, keep a putty knife handy for any wall patching after removal. These tools make hook removal easy and efficient.
Will Removing Metal Hooks Damage My Wall?
Removing metal hooks can cause minor wall damage if done carelessly. Pulling hooks straight out reduces risks. Small holes or paint chips may appear, but they can be patched easily with spackle or wall filler. Proper technique minimizes wall damage.
How To Fill Holes After Removing Hooks?
Use spackle or wall filler to fill small holes left by hooks. Apply with a putty knife, smooth the surface, and let dry. Sand lightly if needed. Finally, repaint the area to match the wall color for a seamless finish.
Conclusion
Removing metal picture hooks from walls does not have to be hard. Use simple tools like pliers and a putty knife. Pull the hook gently to avoid wall damage. Fill any holes with spackle for a smooth finish. Let it dry before sanding or painting.
Taking your time helps keep walls neat. Soon, your wall will look clean and ready for new decor. Small steps make a big difference. Try these tips for easy and safe hook removal.