Are you tired of that unused outlet taking up space on your wall? What if you could turn it into a convenient light switch instead?
Changing an outlet to a light switch is easier than you might think, and it can instantly improve how you control lighting in your room. In this guide, you’ll discover simple steps to make this switch safely and effectively. Keep reading, and by the end, you’ll have the confidence to upgrade your space with just a few tools and a bit of know-how.
Tools And Materials Needed
Basic tools like a screwdriver, voltage tester, and wire stripper are needed. Materials include a light switch, electrical box, and wire nuts. Safety gear such as gloves and safety glasses is important too.
Turn Off The Power
Always switch off the power at the circuit breaker. This stops electricity from flowing. Test the outlet with a voltage tester to be sure the power is off. Never work on live wires. Safety first.
Use Proper Tools
Use insulated screwdrivers and pliers. These tools protect you from electric shocks. Avoid using damaged or worn tools. Good tools make the job safer and easier.
Wear Safety Gear
Wear rubber-soled shoes to avoid shocks. Safety glasses protect your eyes from sparks or debris. Gloves can help, but make sure they do not reduce your grip on tools.
Understand The Wiring
Know which wires are hot, neutral, and ground. Label wires before disconnecting them. A clear understanding prevents mistakes and danger.
Check Local Codes
Follow your local electrical codes. Rules protect your home and family. Some areas need a permit or inspection. Always comply with these rules.

Credit: www.reddit.com
Safety Precautions
Turning off the power is the first and most important step before starting any electrical work. Safety must come first to avoid shocks or accidents. Always treat electricity with caution.
Make sure no electricity flows to the outlet you want to convert. This step protects you and your home during the project.
Locate The Circuit Breaker
Find the main electrical panel in your home. It is usually in the basement, garage, or utility room. The panel controls power to different parts of the house.
Look for the switch that controls the outlet’s circuit. It may be labeled or you might need to test it.
Switch Off The Correct Breaker
Flip the breaker switch to the off position. This stops electricity from reaching the outlet. Double-check that the switch is fully off.
Do not guess the right breaker. Turning off the wrong one could be dangerous.
Verify The Power Is Off
Use a voltage tester or a simple plug-in device to check the outlet. The tester should show no power. This confirms the electricity is off and safe to work on.
Test the outlet twice to be sure. Never start wiring if the outlet still has power.
Turn Off Power
Connecting the switch is a key step in converting an outlet to a light switch. This part controls the flow of electricity to the light. Proper wiring ensures the switch works safely and correctly. Follow clear steps to attach wires and secure the switch in place.
Attach Wires To Switch
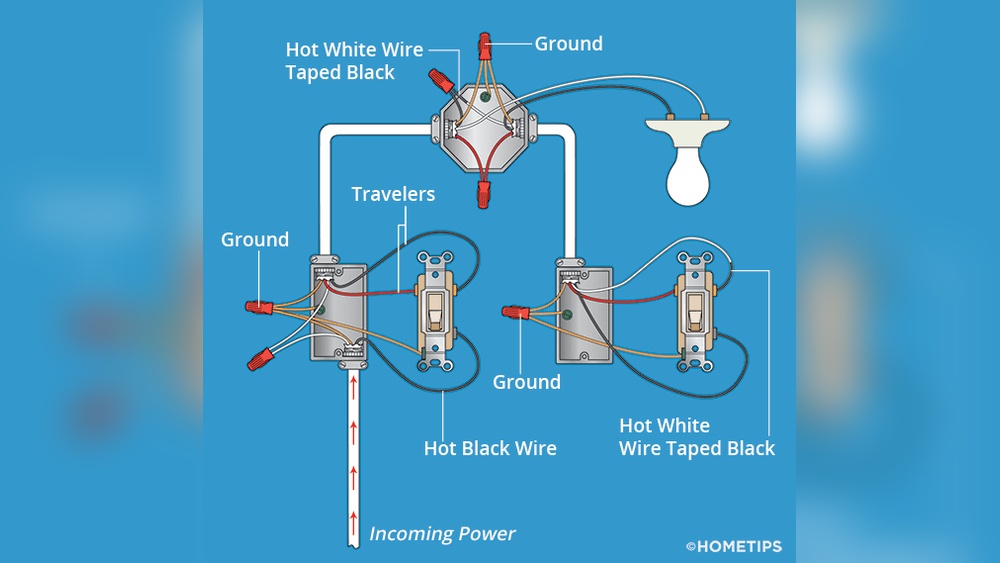
First, identify the wires inside the box. Usually, there is a black (hot) wire, white (neutral) wire, and a green or bare copper ground wire. Connect the black wire to the switch’s brass terminal. Attach the ground wire to the green screw on the switch. Do not connect the white wire to the switch. Use a screwdriver to tighten the screws firmly. Loose connections cause problems or hazards.
Secure Switch In Box
Push the switch gently back into the electrical box. Make sure no wires get pinched or bent sharply. Use the screws provided to fix the switch to the box. Tighten screws evenly to hold the switch steady. Check that the switch sits flush with the wall. Attach the switch cover plate to finish the job.
Remove The Outlet
Installing a wall plate is the final step in converting an outlet to a light switch. It covers the switch and the wiring, giving a clean look. A proper wall plate protects the wires and keeps the switch secure.
Choose the right wall plate for your new switch. Use a size that fits the switch and the box. Standard single-gang plates work well for most switches.
Turn Off The Power
Start by turning off the power at the circuit breaker. This stops any chance of electric shock. Double-check the power is off with a tester before touching wires.
Attach The Wall Plate
Hold the wall plate over the switch. Align the screw holes with the switch box. Use a screwdriver to fasten the screws gently. Avoid overtightening to prevent cracking the plate.
Check The Fit And Finish
Make sure the wall plate sits flush against the wall. It should cover all wires and gaps. Clean off any dirt or dust for a neat finish.
Identify Wiring
Troubleshooting is important when converting an outlet to a light switch. Problems can happen even with simple projects. Knowing how to fix common issues saves time and frustration.
This section covers key tips to solve typical troubles. Follow these easy steps to check your work and ensure safety.
Check The Power Supply
Make sure the power is off before working. Use a voltage tester to verify no current flows. Double-check the circuit breaker is switched off. Safety first prevents shocks and injuries.
Verify Wire Connections
Loose wires cause the switch to fail. Inspect all wire nuts and terminals. Tighten any loose connections carefully. Confirm each wire matches the switch’s instructions.
Test The Switch Functionality
Test the switch with a multimeter for continuity. Replace the switch if it shows no continuity when toggled. Faulty switches stop the light from working properly.
Look For Damaged Wiring
Damaged or frayed wires create shorts or open circuits. Examine all visible wires for cracks or wear. Replace damaged wires to avoid electrical hazards.
Confirm The Outlet’s Compatibility
Not all outlets convert easily to switches. Check the outlet box size and wiring type. Some outlets need extra parts or a different switch model.

Credit: www.youtube.com

Credit: www.youtube.com
Frequently Asked Questions
How Do I Convert An Outlet To A Light Switch Safely?
Turn off the power at the breaker first. Remove the outlet and identify the wiring. Connect the switch to the hot wire and the light fixture. Use wire nuts and electrical tape for secure connections. Always follow local electrical codes or consult a professional.
What Tools Are Needed To Convert An Outlet To A Switch?
You need a voltage tester, wire strippers, screwdriver, wire nuts, electrical tape, and a new light switch. These tools help ensure safe removal and installation. Having the right tools makes the job faster and safer.
Can I Replace Any Outlet With A Light Switch?
Not all outlets can be converted. It depends on the wiring setup and if the circuit supports a switch. Check for a constant hot wire and neutral wire in the box. If unsure, consult an electrician to avoid hazards.
How Do I Wire A Light Switch From An Existing Outlet?
Identify the hot (live) wire in the outlet box. Connect this hot wire to one terminal on the switch. Connect the light fixture wire to the other terminal. Ensure the neutral wires are joined together with a wire nut. Test the connections carefully.
Conclusion
Converting an outlet to a light switch can improve room lighting easily. Follow safety steps carefully to avoid any hazards. Use the right tools and double-check wiring connections. Take your time and work with patience. This simple change can make your space more functional.
Always turn off power before starting any electrical work. Ask a professional if you feel unsure at any point. Small projects like this boost your home’s comfort and style. Keep these tips in mind for a safe and smooth process.