Have you noticed your brake lights acting up or not turning on at all? A faulty brake light switch could be the culprit, and ignoring it can put your safety at risk and even lead to a traffic ticket.
But don’t worry—fixing this common issue is easier than you might think. You’ll discover simple, step-by-step tips to identify and repair your brake light switch quickly. Keep reading to get your brake lights working perfectly again and drive with confidence.
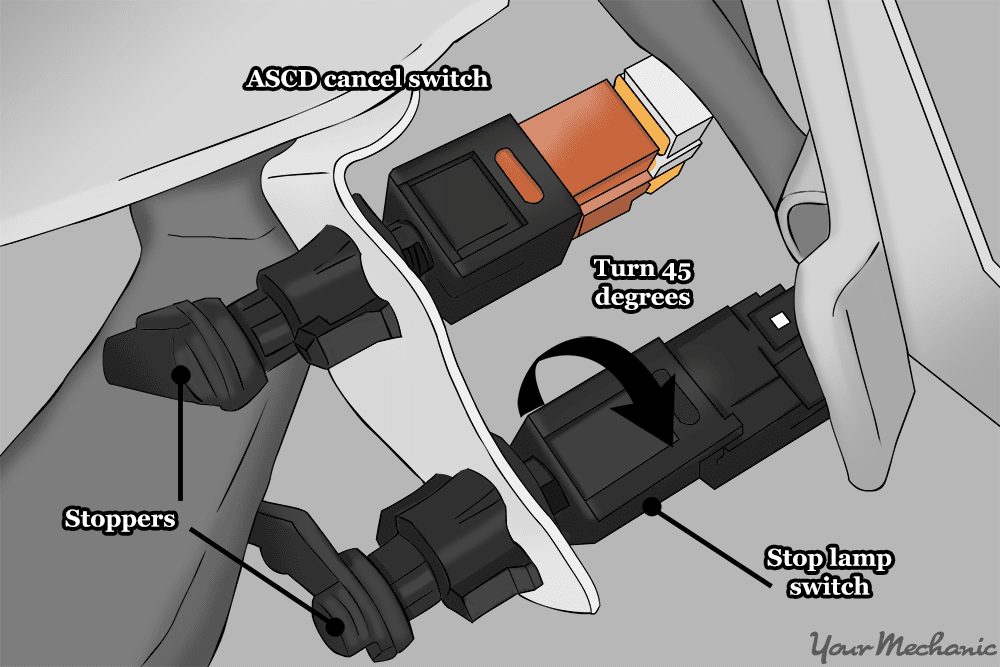
Credit: www.yourmechanic.com
Signs Of A Faulty Brake Light Switch
Signs of a faulty brake light switch often appear suddenly. They affect your car’s safety and can confuse other drivers. Spotting these signs early helps you fix the problem quickly. This section explains the common signals that show your brake light switch may be bad.
Brake Lights Not Illuminating
Brake lights that do not light up after pressing the pedal show a likely switch problem. This fault can be dangerous because other drivers cannot see your stop signals. The switch may fail to send power to the brake lights. Check this issue immediately to avoid accidents.
Brake Lights Staying On
Brake lights that stay on even when the pedal is not pressed indicate a stuck switch. This can drain the car battery if ignored for long. The switch might be stuck in the “on” position or have a wiring issue. This problem needs fast attention to save your battery and avoid trouble on the road.
Intermittent Light Function
Brake lights that work sometimes and fail other times show an inconsistent switch. This issue can confuse drivers and cause safety risks. The problem may be loose wiring or a switch that is about to fail. Monitor this behavior closely and replace the switch if the problem continues.
Tools And Materials Needed
Fixing a faulty brake light switch requires some basic tools and materials. Having the right items ready makes the task easier and safer. This section lists what you need before starting the repair.
Basic Hand Tools
You need a few common hand tools. A screwdriver set with both flathead and Phillips heads is essential. A socket wrench set helps remove bolts and screws. Needle-nose pliers come in handy for small parts. A multimeter can check electrical connections if you want to test the switch.
Replacement Switch
Buy the correct brake light switch for your car model. Check the owner’s manual or ask at an auto parts store. Using the right switch ensures proper fit and function. Avoid generic parts that may not work well.
Safety Equipment
Safety is important during any car repair. Wear gloves to protect your hands from sharp edges. Use safety glasses to shield your eyes from dust or debris. Work in a well-lit area to see clearly. Disconnect the car battery to avoid electrical shocks.
Locating The Brake Light Switch
Finding the brake light switch is the first step to fix it. This small part controls the brake lights on your car. It sends signals to turn the lights on when you press the brake pedal. Knowing where to find this switch makes repair easier and faster.
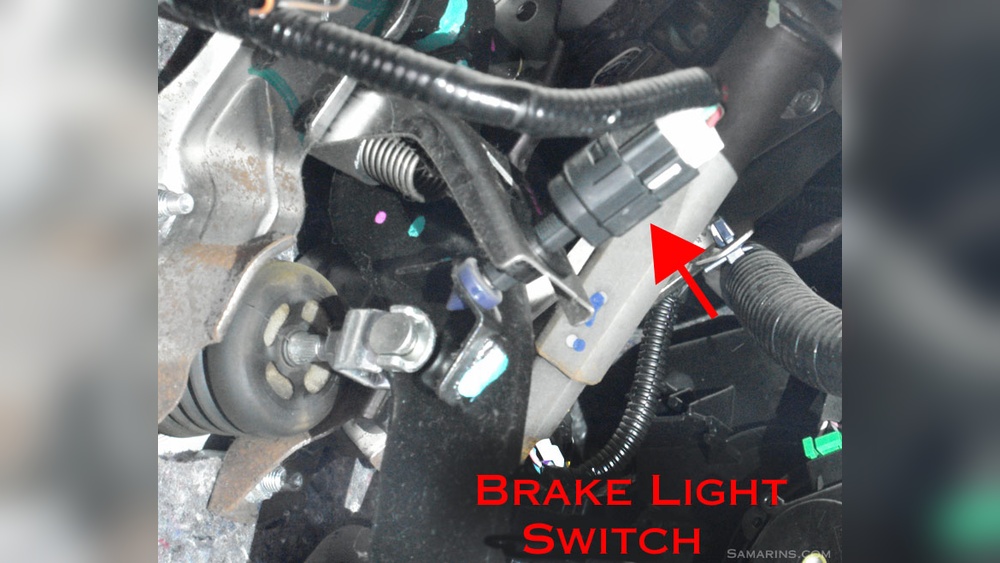
Common Switch Locations
The brake light switch usually sits near the brake pedal. Often, it is attached to the pedal arm or the bracket behind the pedal. In many cars, it looks like a small button or sensor. Sometimes, it hides under the dashboard, close to the driver’s foot area.
Some vehicles place the switch near the master cylinder in the engine bay. This spot is less common but still worth checking. The switch is often connected by wires or a small plug. Knowing these places helps you spot the switch quickly.
Access Tips
Clear the area around the brake pedal first. Remove any floor mats or covers blocking your view. Use a flashlight to see better under the dashboard. Sitting in the driver’s seat can give a good angle to find the switch.
Be careful not to damage wires or parts nearby. Use your hands to feel for the switch if you can’t see it. Sometimes, gently pressing the brake pedal helps the switch stand out. Patience and gentle touch work best here.

Credit: www.youtube.com
Testing The Brake Light Switch
Testing the brake light switch is an important step to find problems. This switch tells your car when to light up the brake lights. If it fails, your brake lights may not work. This can cause safety risks and even lead to a traffic ticket.
There are simple ways to test the brake light switch. Two common methods include using a multimeter and manual switch activation. Both give clear results about the switch’s condition.
Using A Multimeter
A multimeter measures electrical signals in the brake light switch. First, turn off your car’s engine. Find the brake light switch near the brake pedal. Remove the switch from its holder carefully.
Set the multimeter to test continuity or resistance. Attach the multimeter leads to the switch terminals. Press the switch to simulate pressing the brake pedal. The multimeter should show a change in reading.
If the multimeter shows no change, the switch might be faulty. Repeat the test a few times for accuracy. This tool helps you know if electricity flows properly.
Manual Switch Activation
You can also test the switch by hand. Locate the brake light switch under the dashboard. Press the switch with your finger as if pushing the brake pedal. Watch the brake lights on the back of your car.
If the brake lights turn on, the switch works. If they stay off, the switch might be broken. This test is quick and requires no tools. It shows if the switch can send signals to the brake lights.
Both testing methods help find brake light switch problems. You can fix or replace the switch based on your test results.
Removing The Faulty Switch
Removing the faulty brake light switch is the first step in fixing the problem. This part controls the brake lights and must be handled carefully. Follow these steps to remove it safely.
Disconnecting The Battery
Start by disconnecting the car battery. This stops any electrical shock or damage. Use a wrench to loosen the negative terminal. Remove the cable and keep it away from the battery. This step ensures safety while working on the switch.
Unplugging The Switch Connector
Next, locate the brake light switch under the dashboard. Find the wiring connector attached to it. Press the tab on the connector to release it. Gently pull the connector away from the switch. Avoid pulling the wires to prevent damage.
Unscrewing The Switch
The switch is usually held by screws or clips. Use a screwdriver to remove the screws carefully. If clips hold it, press or slide them to free the switch. Pull the faulty switch out slowly. Keep the screws safe for the new switch installation.
Installing The New Brake Light Switch
Installing the new brake light switch is a simple task that restores safety. This part controls the brake lights, signaling other drivers when you stop. Proper installation ensures your brake lights work correctly every time.
Positioning The Switch Correctly
Find the brake pedal arm where the switch mounts. Place the switch so its plunger touches the pedal arm. It should not be too loose or too tight. The switch must activate when you press the pedal.
Securing The Switch
Use the mounting bracket or clip to hold the switch firmly. Tighten screws or bolts without overdoing it. The switch must stay stable during driving. Avoid any movement that could stop it from working.
Reconnecting The Wiring
Attach the electrical connector to the switch terminal. Make sure the connection clicks into place. Check for any loose wires or damaged insulation. Proper wiring ensures the brake lights respond instantly.
Final Testing And Adjustments
After fixing the faulty brake light switch, the final step is testing and adjusting it. This step ensures your brake lights work safely and properly. Testing the lights and adjusting the switch position helps prevent future issues. It also confirms your repair is complete. Follow these simple steps to finish the job correctly.
Verifying Light Operation
Start by sitting in the driver’s seat. Press the brake pedal slowly. Watch the brake lights at the back of the vehicle. They should turn on instantly. If they stay off or blink, the switch may need adjustment or replacement. Test multiple times to be sure. Check both brake lights for consistent operation. Proper light function ensures safety on the road.
Adjusting Switch Position
If the brake lights do not respond correctly, adjust the switch position. Locate the brake light switch near the brake pedal. Loosen the mounting screws slightly. Move the switch up or down in small steps. Press the brake pedal and check the lights after each move. Tighten the screws when the lights activate correctly. This adjustment ensures the switch triggers at the right pedal position.
Preventive Maintenance Tips
Preventive maintenance keeps your brake light switch working well. It helps avoid sudden failures and costly repairs. Simple steps can improve safety and vehicle reliability. Small efforts today save big problems tomorrow.
Regular Brake System Checks
Check your brake system often. Look for worn pads, leaks, or damaged parts. Test the brake lights each time you drive. Make sure they turn on and off correctly. Early checks catch problems before they get worse.
Switch Cleaning Suggestions
Keep the brake light switch clean. Dirt or dust can cause it to fail. Use a soft cloth and mild cleaner. Avoid harsh chemicals that damage the switch. Clean contacts improve signal flow and switch response.

Credit: www.youtube.com
Frequently Asked Questions
What Causes A Brake Light Switch To Fail?
A brake light switch can fail due to wear, electrical issues, or physical damage. Dirt and corrosion also affect its function. Regular inspection helps identify early problems and ensures safety on the road.
How Do I Test A Faulty Brake Light Switch?
To test, press the brake pedal and observe the brake lights. Use a multimeter to check for electrical continuity. If lights don’t illuminate or multimeter shows no signal, the switch likely needs replacement.
Can I Replace A Brake Light Switch Myself?
Yes, replacing a brake light switch is usually simple. Locate the switch near the brake pedal, disconnect wiring, remove the old switch, and install the new one. Follow your vehicle’s manual for specific steps and safety tips.
How Long Does A Brake Light Switch Last?
A brake light switch typically lasts 50,000 to 100,000 miles. Usage, driving conditions, and maintenance affect its lifespan. Regular vehicle check-ups help extend its durability and prevent unexpected failures.
Conclusion
Fixing a faulty brake light switch keeps you safe on the road. It helps your car signal stops clearly to others. Check the switch carefully and replace it if needed. Simple steps can save you time and money. Regular car care avoids bigger problems later.
Stay alert and maintain your vehicle often. Your safety depends on clear brake lights working right. Keep these tips handy for quick repairs anytime.