Have you ever wished you could control your fan with the same switch as your light? It sounds simple, but many people don’t know how to make it happen safely and effectively.
If you want to save space, reduce clutter, or just make your room more convenient, connecting a fan to a light switch is a smart move. You’ll discover easy steps you can follow right now to get it done without confusion or risk.
Ready to take control of your fan and light with a single switch? Let’s dive in and make your home smarter and more comfortable.
Tools And Materials Needed
Connecting a fan to a light switch requires some basic tools and materials. Having the right items ready makes the job easier and safer. This section lists what you need before starting the work.
Essential Tools
A screwdriver set is necessary for removing and installing screws. Wire strippers help to remove insulation from wires without damage. A voltage tester checks if the power is off for safety. Pliers are useful for twisting wires together securely.
Required Materials
Use electrical wire that matches your home’s wiring size. Wire nuts connect wires safely and prevent shorts. Electrical tape adds extra protection around wire connections. A fan switch or a combination switch controls both fan and light.
Safety Equipment
Wear insulated gloves to protect from electric shocks. Safety goggles shield your eyes from dust and debris. A flashlight or headlamp helps to see clearly in dark spaces. Turn off the power at the breaker before starting any work.
Safety Precautions
Always turn off the power at the breaker before starting any wiring work. Use a voltage tester to ensure no electricity flows through the wires. Wear insulated gloves to protect yourself from shocks during installation.
Turn Off Power At The Circuit Breaker
Always switch off the power from the circuit breaker before starting. Do not rely on the light switch alone. This step prevents electric shocks and serious injuries. Use a voltage tester to confirm no power flows in the wires.
Use Insulated Tools
Use tools with insulated handles for safety. Insulation protects you from electric currents. Avoid metal tools without insulation. Keep your hands dry to reduce the risk of shock.
Wear Safety Gear
Wear rubber-soled shoes to avoid grounding. Safety glasses protect your eyes from sparks or debris. Gloves add an extra layer of protection against shocks and cuts.
Check Wire Condition
Inspect wires for damage or wear before connecting. Replace any frayed or cracked wires. Damaged wires can cause shorts or fires. Use wires that meet your local electrical codes.
Follow Proper Wiring Codes
Adhere to local electrical codes and standards. Proper wiring ensures safety and functionality. Incorrect wiring can lead to hazards and damage. Consult a professional if unsure about code requirements.
Identify The Switch And Wiring
Before connecting a fan to a light switch, identifying the switch and wiring is important. It helps ensure safety and proper function. Knowing the parts you work with makes the task easier and faster.
Start by turning off the power at the breaker. This step protects you from electric shock while working. Then, remove the switch cover to access the wiring inside.
Locate The Light Switch
Find the light switch that controls the light or fan. Test the switch by turning it on and off. This confirms you have the right one. Use a voltage tester to check if power is off before touching wires.
Examine The Wiring Inside The Switch Box
Look inside the switch box for wires. You will see a few wires connected to the switch. Usually, there is a black (hot) wire, a white (neutral) wire, and a green or bare copper (ground) wire.
Note the color and position of each wire. This helps when connecting the fan later. Take a photo or draw a diagram for reference.
Identify The Hot Wire
The hot wire carries electricity from the power source to the switch. It is usually black or red. Confirm which wire is hot with a voltage tester. The hot wire connects to the switch’s common terminal.
Find The Load Wire
The load wire sends power from the switch to the light or fan. It is often black or red but separate from the hot wire. Identify this wire by tracing it or testing with a voltage meter.
Check For Neutral And Ground Wires
Neutral wires complete the circuit and carry current back. They are usually white. Ground wires protect against electrical faults and are green or bare copper. Ensure these wires are present in the box.

Credit: smafan.com
Turn Off Power
Before starting any electrical work, safety is the top priority. Turning off power stops electricity from flowing. This prevents shocks and accidents during the fan installation. Never skip this step.
Power usually comes from the main circuit breaker. You need to find the right switch to turn off the power for the room. Check twice to be sure the power is off before touching any wires.
Locate The Circuit Breaker
Find the home’s electrical panel. It is often in the basement, garage, or utility room. Open the panel door carefully. Look for the breaker labeled for the room where you will work.
Switch Off The Correct Breaker
Flip the breaker to the OFF position. This stops electricity to the light switch and fan area. Make sure the breaker stays in the OFF position during the work.
Confirm Power Is Off
Use a voltage tester or a simple light tester. Touch the tester to the wires in the switch box. No light or sound means the power is off. Never assume power is off without testing.
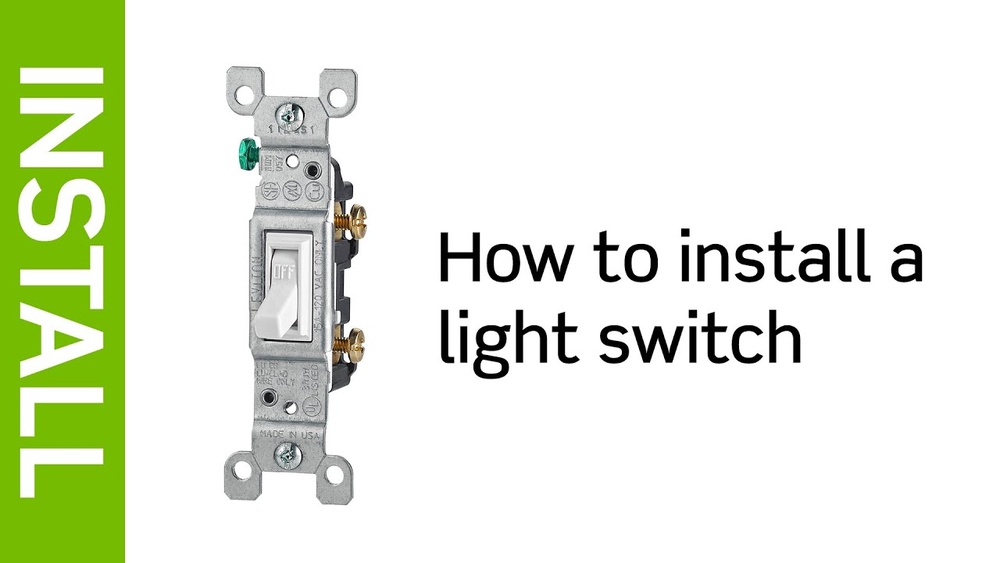
Remove Existing Switch
Removing the existing switch is the first step to connect a fan to a light switch. This step ensures a safe and clean setup. It lets you work on the wiring without risk. Follow the steps carefully to avoid damage or injury.
Turn Off Power At The Circuit Breaker
Safety starts here. Switch off the power to the room where the switch is. Use the circuit breaker to cut power. Double-check by flipping the switch and seeing if the light goes off.
Remove The Switch Cover Plate
Use a screwdriver to take off the cover plate. This exposes the switch and wiring. Keep the screws safe for later use. Be gentle to avoid cracking the plate.
Unscrew The Switch From The Wall Box
Find the screws holding the switch to the wall box. Unscrew them carefully. Pull the switch out slowly to see the wires behind it. Do not pull hard to avoid wire damage.
Identify And Label The Wires
Look at the wires connected to the switch. They are usually black, white, or ground wires. Use tape or markers to label each wire. This step helps during the new fan switch installation.
Disconnect The Wires From The Switch
Use a screwdriver to loosen the screws holding the wires. Gently pull each wire off the switch. Keep the wires separated to avoid confusion. The switch is now ready to be removed.
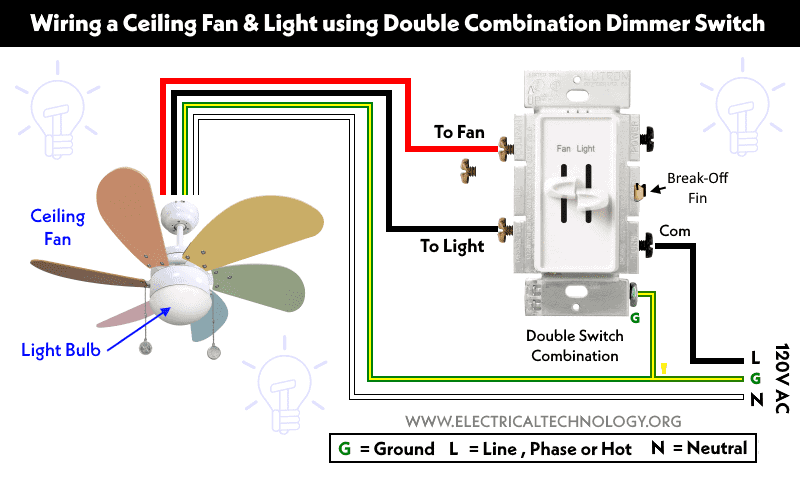
Credit: www.electricaltechnology.org
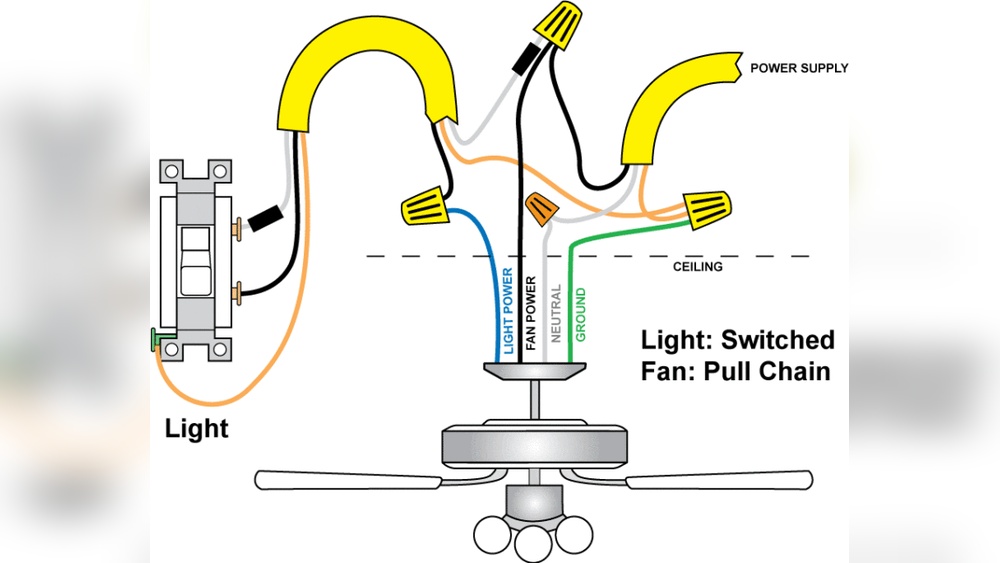
Connect Fan To Switch
Connecting a fan to a light switch lets you control the fan with the switch. This setup is simple and saves space on your wall. Follow clear steps to make sure the fan works safely and correctly.
Locate Fan Wires
First, find the wires coming from the fan. Usually, there are three wires: black, white, and green or copper. The black wire carries power. The white wire is neutral. The green or copper wire is for grounding. Make sure the power is off before touching any wires.
Match Wire Colors
Match each fan wire with the same color wire from the switch box. Connect black to black, white to white, and green or copper to the ground wire. This color code helps keep the wiring safe and correct. Double-check that the wires are not damaged.
Use Wire Connectors
Use wire connectors to join the wires together. Twist the wires tightly and screw on the connector. This keeps the wires secure and prevents shorts. Wrap electrical tape around the connectors for extra safety. Make sure no bare wire is showing.
Secure The Switch And Fan
Securing the switch and fan is a crucial step in connecting a fan to a light switch. This step ensures safety and stability for your electrical setup. A loose connection can cause sparks or make the fan and switch stop working. Take your time to fasten everything properly. This will help your fan run smoothly and safely.
Secure The Light Switch To The Wall Box
Start by pushing the wires neatly into the wall box. Align the switch with the screw holes on the box. Use a screwdriver to tighten the screws firmly. Do not overtighten; this can crack the switch or the box. The switch should sit flat and not wiggle.
Attach The Fan Wires Correctly
Twist the fan wires together with the matching wires from the switch. Use wire nuts to cover the connections. Twist the wire nuts clockwise until tight. Tug lightly to check if they hold. Wrap electrical tape around the wire nuts for extra security.
Mount The Fan Base Securely
Place the fan base against the ceiling or wall bracket. Line up the screw holes with the mounting bracket. Insert screws and tighten them with a screwdriver. The base should feel solid and not move. Check that the fan blades have room to spin freely.
Restore Power And Test
After wiring your fan to the light switch, restoring power is the next step. This process allows you to check if everything works correctly. Testing the connection ensures safety and functionality.
Never skip this step. It confirms the fan responds to the switch as intended. Follow the instructions carefully to avoid electrical issues.
Turn On The Circuit Breaker
Locate your home’s main electrical panel. Find the breaker that controls the room where you worked. Flip the breaker switch back to the ON position. This action restores power to the fan and switch.
Test The Fan Operation
Go to the light switch and toggle it. The fan should turn on immediately. Listen for any unusual sounds or vibrations. If the fan runs smoothly, the wiring is likely correct.
Check The Light Switch Function
Operate the switch several times. Make sure it turns the fan on and off without delay. If the switch feels loose or does not work, turn off the breaker again. Double-check your wiring connections.
Troubleshooting Tips
Troubleshooting helps fix common problems when connecting a fan to a light switch. It saves time and prevents damage. Follow simple checks to find the issue fast. Understand what to look for and how to solve it safely.
Check wires, power, and switch function before calling an expert. Small mistakes cause big problems. Fixing them is easy with clear steps.
Check Power Supply
Ensure the power is on at the breaker box. Use a tester to verify voltage at the switch. No power means the fan won’t work. Reset any tripped breakers before testing again.
Inspect Wiring Connections
Loose or wrong wires cause issues. Turn off power first. Open the switch box and check wire nuts. Tighten any loose connections. Confirm wires match instructions for fan and switch.
Test The Light Switch
Switches can fail. Use a multimeter to check continuity. Flip the switch on and off while testing. Replace the switch if it does not work properly.
Look For Fan Motor Issues
Sometimes the fan motor stops working. Listen for humming or no sound at all. Check for burnt smells or visible damage. Motor problems need professional repair or replacement.
Examine The Remote Control
Fans with remote controls may lose sync. Replace batteries first. Re-pair the remote following the fan’s manual. A wrong remote setting can stop the fan from turning on.
Confirm Switch Compatibility
Not all switches work with fans. Use a switch rated for fan motor load. Standard light switches may cause flickering or no power. Buy a compatible switch for safe operation.

Credit: www.homedepot.com
Frequently Asked Questions
How Do I Connect A Fan To An Existing Light Switch?
To connect a fan to a light switch, turn off power first. Use a wire stripper to connect fan wires to switch wires. Secure connections with wire nuts. Finally, mount the fan and restore power to test the switch.
Can I Control A Fan And Light Separately On One Switch?
Yes, but you need a double switch or a fan control switch. This setup allows independent control of the fan and light. It requires separate wiring for each function from the switch box.
What Tools Are Needed To Connect A Fan To A Light Switch?
You need a screwdriver, wire stripper, voltage tester, wire nuts, and electrical tape. These tools help safely connect and secure wires between the fan and the switch.
Is It Safe To Connect A Fan To A Light Switch?
Yes, if you follow electrical safety rules. Always turn off power at the breaker. Use proper wiring techniques and secure all connections to avoid hazards.
Conclusion
Connecting a fan to a light switch is simple with the right steps. Always turn off the power before starting work. Use a voltage tester to stay safe. Follow wiring instructions carefully and check your connections twice. Test the switch and fan once finished.
This project can save space and add convenience. Take your time and work with care. Soon, you will control both light and fan easily from one switch.