Are you ready to take control of your lighting and add a touch of convenience to your space? Connecting a light switch to a light might sound tricky, but with the right steps, you can do it yourself quickly and safely.
Imagine flipping your switch and instantly brightening up your room without waiting for an electrician. In this guide, you’ll discover simple instructions that anyone can follow, even if you’re not an expert. Keep reading, and by the end, you’ll have the confidence to handle this common home project on your own.
Gather Necessary Tools
Gathering the right tools is the first step to connect a light switch to a light. Having everything ready makes the job easier and safer. Preparation helps you avoid delays and mistakes during the work.
List Essential Equipment
Start with basic tools like a screwdriver and wire strippers. You will also need a voltage tester to check power. Electrical tape helps secure wire connections. Wire nuts are useful to join wires safely. A drill might be necessary if new holes are needed. Keep a flashlight nearby if the light is off.
Safety Gear To Use
Wear insulated gloves to protect from electric shock. Safety goggles shield your eyes from debris. Use closed-toe shoes to avoid foot injuries. Avoid loose clothing that can catch on tools. Always turn off the power before starting any work.
Turn Off Power
Turning off the power is the first and most important step before connecting a light switch to a light. It keeps you safe from electric shocks. Never start any electrical work without cutting off the electricity supply.
Always double-check that the power is off. This simple action protects you and your home.
Locate Circuit Breaker
Find your home’s circuit breaker panel. It is usually in the basement, garage, or utility room. Open the panel door carefully. Look for the switch that controls the light circuit you want to work on. The switches are labeled, but if not, look for the one that matches the room.
Flip the correct breaker switch to the OFF position. This stops electricity from flowing to the light switch and wiring.
Verify Power Is Off
Use a voltage tester or a multimeter to check the wires. Touch the tester to the wires connected to the light switch. If there is no light or beep, the power is off. If the tester shows power, turn off the correct breaker again.
Do not rely on the breaker switch alone. Always verify with a tester. Safety first.
Identify Wires
Identifying wires is the first step in connecting a light switch to a light. It helps ensure safety and proper wiring. Knowing which wire is which prevents mistakes and electrical problems. You must recognize the live, neutral, and ground wires before starting.
Recognize Live, Neutral, And Ground Wires
The live wire carries electricity from the power source. It is usually black or red. The neutral wire completes the circuit and returns electricity. It is often white or blue. The ground wire protects against electric shocks. It is green or bare copper.
Colors may vary by country, so check carefully. Always treat wires with caution.
Use A Voltage Tester
A voltage tester checks if a wire is live. It helps avoid electric shocks. Touch the tester to each wire to see if it has current. The tester lights up or beeps for live wires.
Test all wires even if colors look correct. This step confirms safety before touching wires.
Prepare The Switch Box
Preparing the switch box is an important first step to connect a light switch safely and correctly. This step helps to avoid electrical problems and makes the installation smooth. Proper preparation ensures the switch will work well and last longer.
Start by removing the old switch carefully. Then, check the wiring for any damage or wear. These tasks help create a safe and ready space for the new switch.
Remove Old Switch
Turn off the power at the circuit breaker before touching anything. Use a screwdriver to take out the switch cover plate. Unscrew the old switch from the box. Gently pull the switch out to see the wires connected to it. Remember the wire positions or take a photo for reference. Disconnect the wires from the old switch carefully.
Inspect Wiring Condition
Look closely at the wires inside the box. Check for cracks, frays, or exposed copper. Make sure no wires are loose or broken. If wires look damaged, replace them before installing the new switch. Clean any dust or debris inside the box. This step helps ensure a safe and reliable connection.
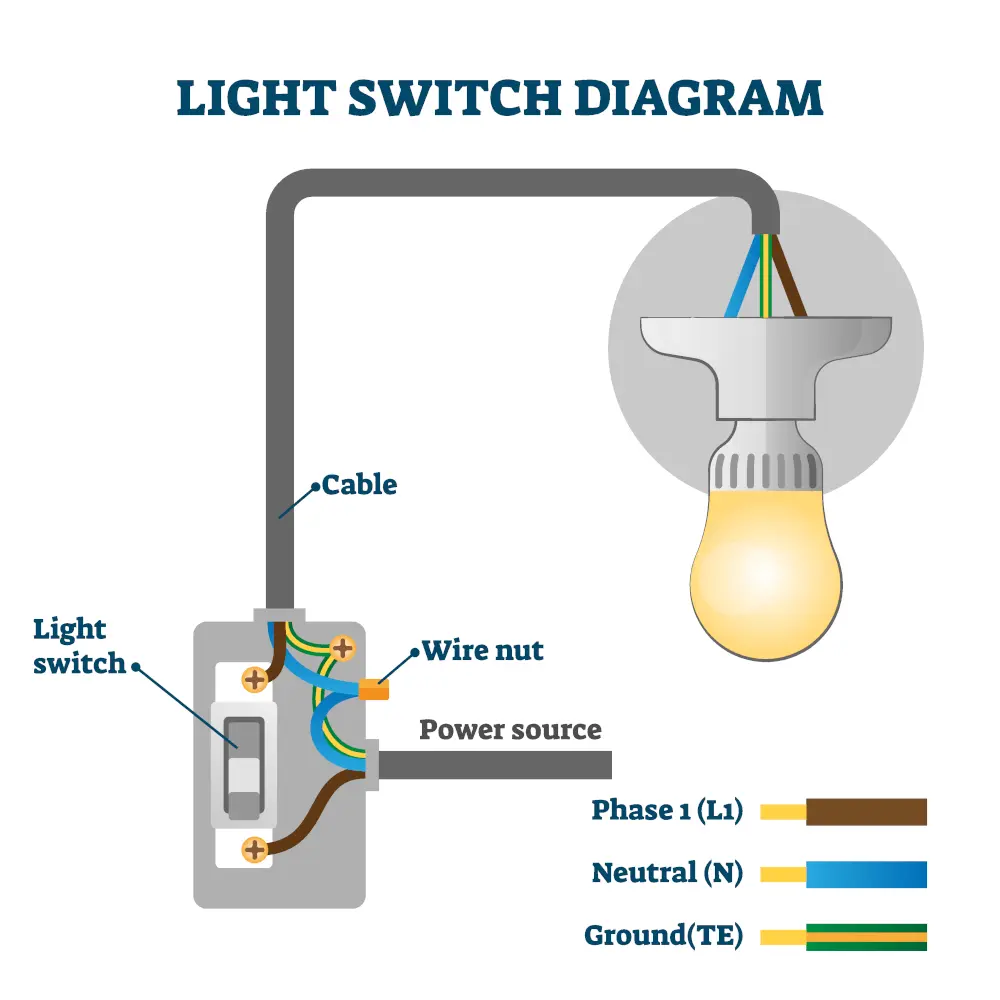
Connect The Wires
Connecting the wires is a key step in installing a light switch. This process links the switch to the power source and the light fixture. Proper wiring ensures your light works safely and reliably. Take your time to connect each wire carefully and securely.
Attach Live Wire To Switch
Start by identifying the live wire, usually black or red. Connect this wire to the switch’s live terminal. Tighten the terminal screw to hold the wire firmly. This wire carries electricity from the power source to the switch.
Connect Load Wire To Light
Next, find the load wire that leads to the light fixture. Attach this wire to the switch’s load terminal. Secure the connection with the terminal screw. This wire sends power from the switch to the light.
Secure Ground Wire
Locate the ground wire, often green or bare copper. Connect it to the switch’s ground terminal or grounding screw. This step protects against electrical shocks. Make sure the ground wire is tightly fastened for safety.

Credit: community.smartthings.com
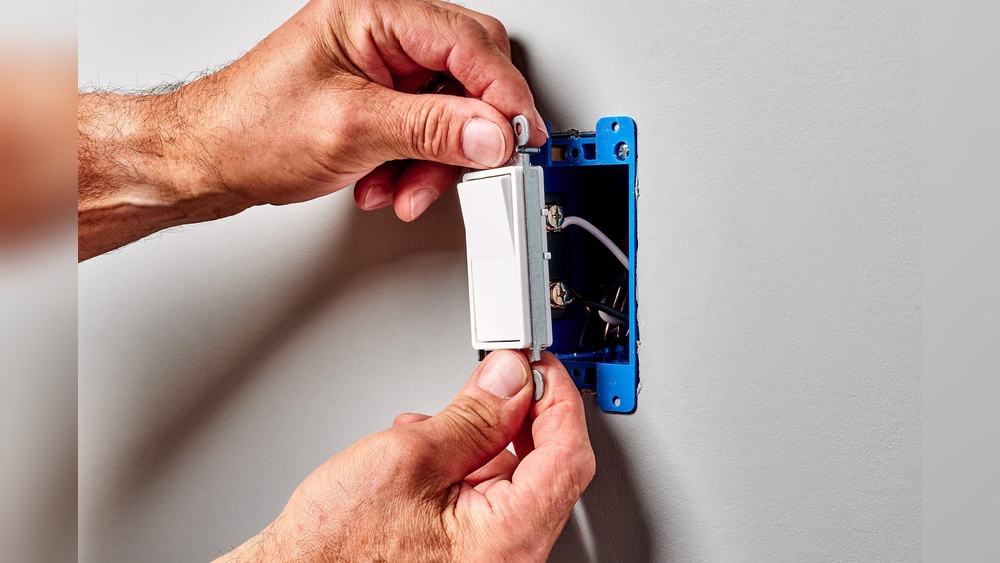
Mount The Switch
Mounting the switch is a crucial step in connecting your light switch to the light. This step secures the switch in place and ensures safe operation. Proper mounting keeps wires protected and prevents any loose connections.
Focus on fixing the switch correctly inside the electrical box. Then, finish by installing the faceplate for a clean look.
Fix Switch In Box
Start by placing the switch inside the electrical box. Align the screw holes on the switch with the holes in the box. Use a screwdriver to tighten the screws. Make sure the switch fits snugly without forcing it. Check that the wires stay connected and do not pinch.
Install Faceplate
Place the faceplate over the switch. Align the holes on the faceplate with the switch screws. Use a screwdriver to secure the faceplate tightly. The faceplate protects the wiring and gives a finished look. Avoid overtightening screws to prevent cracking the faceplate.
Test The Connection
Testing the connection after wiring a light switch is very important. This step confirms that your work is safe and the light will work correctly. It helps catch any mistakes before you finish the job.
Restore Power
Turn the circuit breaker back on. This supplies electricity to the switch and light. Do not touch any wires while restoring power. Stand clear to avoid shocks.
Check Light Operation
Flip the switch to see if the light turns on. If it does, the connection works well. If not, switch off power and check your wiring. Make sure all connections are tight and correct.
Credit: futurehousestore.co.uk
Troubleshoot Common Issues
Troubleshooting common issues helps fix light switch problems fast. Knowing simple checks saves time and effort. Many issues happen from loose wires or poor connections. Some problems can be unsafe if ignored. Always turn off power before testing or fixing switches.
Light Doesn’t Turn On
First, check if the bulb is good. Replace it with a new one to be sure. Test the power at the switch with a tester. Tighten any loose wires on the switch terminals. Check the circuit breaker for a tripped switch. Reset it if needed. Faulty wiring or a broken switch may cause failure. Replace parts carefully if needed.
Switch Feels Hot
A hot switch shows a serious problem. It may have loose wiring or a bad connection. Overheating can cause fire risk. Turn off power and inspect the switch box. Tighten all wire nuts and terminal screws. Replace the switch if it is damaged. Use the right switch type for your light fixture.
Flickering Light
Flickering lights annoy and waste energy. Check the bulb first. Loose bulbs cause flicker. Tighten or replace the bulb. Look for loose wires at the switch and fixture. Secure all connections tightly. Dimmer switches may cause flicker with some bulbs. Use compatible bulbs for dimmers. Call an electrician if flicker continues.

Credit: www.youtube.com
Frequently Asked Questions
How Do I Connect A Light Switch To A Light Fixture?
Turn off power at the breaker. Connect the switch’s live wire to the power source. Attach the switch’s output wire to the light fixture’s live wire. Connect the neutral wires together. Secure all connections and test the switch.
What Tools Are Needed To Connect Light Switches?
You need a screwdriver, wire stripper, voltage tester, electrical tape, and wire nuts. These tools help safely strip, connect, and secure wires when installing a light switch.
Can I Connect A Light Switch Without An Electrician?
Yes, if you follow safety guidelines and local codes. Turn off power, understand wiring, and use proper tools. If unsure, hiring a licensed electrician is safer.
What Wire Colors Connect To A Light Switch?
Typically, black or red wires are live (hot), white wires are neutral, and green or bare wires are ground. Connect live wires to the switch terminals and ground to the switch’s ground screw.
Conclusion
Connecting a light switch to a light is simple with the right steps. Always ensure the power is off before starting work. Follow the wiring instructions carefully and double-check your connections. Test the switch after installation to make sure it works well.
Taking safety seriously keeps you safe and your home secure. This basic skill can save money and add confidence to future projects. Keep practicing, and wiring will feel easier each time.