
Are your cabinet hardware looking dull, outdated, or just plain worn out? You don’t have to replace them to give your kitchen or bathroom a fresh new look.
Refinishing your cabinet hardware is a simple, budget-friendly way to transform the feel of your space. Imagine how satisfying it will be to hold those shiny, like-new handles and pulls every day. In this guide, you’ll discover easy, step-by-step tips to refinish your cabinet hardware yourself, even if you’ve never tried it before.
Ready to bring new life to your cabinets and impress everyone who walks through your door? Keep reading, because your hardware makeover starts here.
Gather Supplies
Gathering the right supplies is the first step to refinish cabinet hardware. Proper tools and materials make the project easier and more effective. Prepare everything before you start to avoid interruptions. Focus on quality supplies for a smooth and lasting finish.
Choose Paint And Finish
Select paint that suits the material of your hardware. Spray paint works well for metal pieces. Choose a finish like matte, satin, or glossy depending on your style. Primer helps paint stick better and last longer. Clear topcoat protects the paint from scratches and wear.
Select Tools And Materials
Gather sandpaper, cleaning cloths, and a small brush for detailed areas. Use screwdrivers to remove hardware from cabinets. Have gloves and masks to protect your hands and lungs. Cardboard or a drop cloth keeps your workspace clean. Organize everything for easy access during the project.
Remove Hardware
Removing cabinet hardware is the first step in refinishing. Take care to avoid damage to your cabinets and hardware. This process sets the stage for a smooth refinish. Proper removal helps in achieving a professional look.
Handle each piece with care. Keep track of all parts to make reinstallation easy. Follow simple tips to remove hardware correctly.
Label And Organize Pieces
Start by labeling each piece of hardware. Use small bags or containers for screws and parts. Write the cabinet or drawer number on each label. This method prevents confusion during reassembly. Organized pieces save time and reduce mistakes.
Use Proper Tools
Select the right tools before starting. A screwdriver that fits the screws snugly is best. Avoid stripping screws by using a worn or wrong-sized driver. For stubborn hardware, a gentle pry tool may help. Work slowly to protect cabinet surfaces from scratches.
Clean Thoroughly
Cleaning cabinet hardware is the first vital step before refinishing. Proper cleaning removes dirt, grease, and old residues. This ensures the new finish will stick well and look smooth. Take your time and be thorough. Clean hardware will help your refinishing project last longer.
Degrease With Soap
Start by soaking the hardware in warm soapy water. Use a mild dish soap to cut through grease and grime. Let the pieces sit for 10 to 15 minutes. Then, scrub gently with a soft brush or cloth. This removes oils and dirt that block paint or stain. Rinse well and dry completely to avoid rust.
Remove Old Finish
Old paint or varnish can prevent new finishes from adhering. Use a chemical stripper or fine sandpaper to remove it. Apply the stripper carefully and follow the instructions on the label. After the finish softens, wipe or scrape it off gently. Sand any rough spots until smooth. Clean the hardware again to remove dust before refinishing.
Sand Surfaces
Sanding cabinet hardware is a key step in refinishing. It removes old finish and smooths the surface. This helps new paint or stain stick better. Proper sanding creates a clean base for a fresh look.
Take your time sanding. The goal is a smooth, even surface without scratches or rough spots. Careful sanding improves the final appearance and durability of your hardware.
Use Fine Grit Sandpaper
Choose fine grit sandpaper, such as 220-grit, for best results. It gently removes the old finish without damaging the metal. Coarse sandpaper can leave deep scratches that show later.
Wrap the sandpaper around a small block for better control. Sand with light pressure and smooth, even strokes. Check the surface often to avoid over-sanding.
Smooth Edges And Details
Pay close attention to edges and detailed parts of your hardware. Use folded sandpaper or sanding sticks to reach tight spots. Sand these areas gently to keep the original shape intact.
Smoothing edges prevents roughness that can chip paint. Detailed sanding also helps the new finish cover every part evenly. Take extra care to preserve the hardware’s design.
Prepare For Painting
Preparing your cabinet hardware for painting ensures a smooth, even finish. This step prevents paint runs and helps the paint adhere well. Clean hardware and organize your workspace before starting. Proper preparation saves time and improves results.
Attach Hardware To Cardboard
Place a piece of sturdy cardboard on a flat surface. Use the screws from your hardware to attach each piece through the cardboard. Push the screws through so the hardware stands upright and easy to paint. This method keeps the hardware steady and avoids touching wet paint.
Set Up Spray Area
Choose a well-ventilated space to spray paint your hardware. Lay down newspaper or a drop cloth to protect surfaces. Keep the cardboard with hardware on a flat, stable surface. Wear a mask and gloves to protect yourself from fumes. Proper setup helps control overspray and keeps your area clean.
Apply Paint
Applying paint to cabinet hardware is a key step in refinishing. It changes the look and feel of your cabinets. Proper painting ensures a smooth, durable finish. Follow simple tips to get the best results.
Use Even Spray Coats
Hold the spray can about 6 to 8 inches from the hardware. Spray in light, steady strokes. Avoid heavy coats that cause drips or runs. Move the can side to side evenly over all surfaces. Multiple thin coats work better than one thick coat.
Spray outside or in a well-ventilated area. Use a cardboard box to catch overspray. Rotate the hardware to cover all angles. Keep a consistent speed and distance for smooth coverage.
Allow Proper Drying Time
Let the paint dry fully between coats. Follow the paint can’s recommended drying time. Usually, wait at least 15 to 30 minutes before the next coat. Longer drying time prevents smudges and fingerprints.
After the final coat, allow hardware to dry for 24 hours. This ensures the paint cures and hardens. Handle the pieces carefully until fully dry to avoid damage.
Add Protective Finish
Adding a protective finish is a key step in refinishing cabinet hardware. It guards the new surface from scratches, moisture, and wear. This layer keeps your hardware looking fresh and new for a long time.
Choosing the right type of protective finish can affect the durability and shine of your hardware. Applying a sealer adds extra strength, making your refinished pieces last through daily use.
Choose Clear Coat
Select a clear coat that matches your hardware’s finish. Glossy clear coats add shine, while matte ones give a subtle look. Acrylic or polyurethane clear coats work well for most metals.
Apply the clear coat in thin, even layers. Avoid heavy coats that may drip or bubble. Let each layer dry completely before adding the next.
Apply Sealer For Durability
A sealer protects the finish from scratches and moisture. It also prevents tarnishing or rust on metal hardware. Use a spray sealer for easy and uniform coverage.
Hold the spray can about 8 to 12 inches from the hardware. Spray in short bursts to avoid runs. Allow the sealer to dry fully before handling the hardware.

Credit: porchdaydreamer.com
Reinstall Hardware
Reinstalling cabinet hardware is the final step in giving your cabinets a fresh new look. Take your time to place each piece correctly. Proper reinstallation ensures your hardware looks great and works well.
Organize the hardware before starting. This helps avoid confusion and speeds up the process. Keep screws and pieces together to prevent loss.
Match Pieces To Cabinets
Start by matching each hardware piece to its original cabinet or drawer. Look for any unique shapes or sizes. This keeps the design consistent and avoids mistakes.
Lay out the pieces near their cabinets. Check the screw holes to confirm the fit. Avoid forcing hardware onto the wrong spot.
Secure With Screws
Use the screws that came with your hardware. Insert each screw carefully through the cabinet or drawer face. Tighten screws just enough to hold the hardware firmly.
Do not overtighten screws to prevent damage. Use a screwdriver or drill on a low setting. Test each handle or knob to ensure it is secure and functions smoothly.
Maintain Refreshed Hardware
Maintaining refreshed cabinet hardware extends its life and keeps your kitchen looking neat. Clean and care for hardware regularly to avoid dullness or damage. Simple habits help preserve the new finish and shine after refinishing.
Clean Gently
Use a soft cloth to wipe cabinet hardware. Dust and dirt build up quickly and can dull the finish. Avoid scrubbing hard, which may scratch or remove paint. Light cleaning keeps hardware bright and fresh without harm.
Avoid Harsh Chemicals
Stay away from strong cleaners or abrasive materials. Harsh chemicals can strip paint or metal finishes. Choose mild soap and water instead. This gentle approach protects your refinished hardware for longer use.
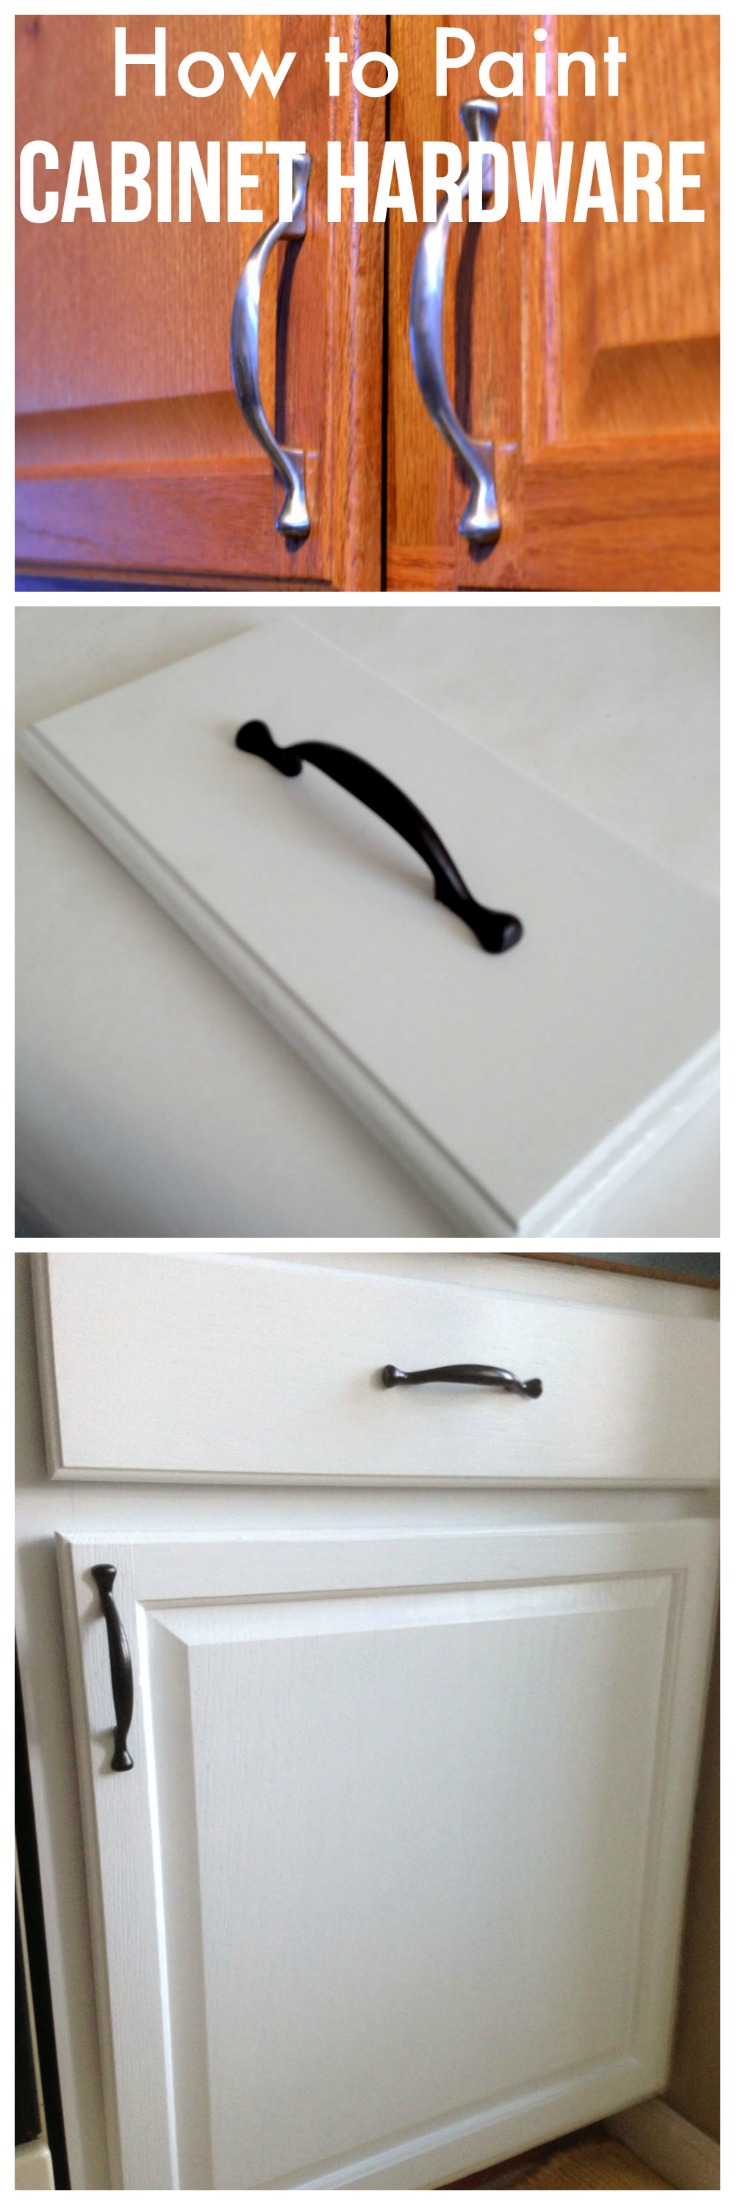
Credit: createandbabble.com

Credit: www.thriftydecorchick.com
Frequently Asked Questions
How Do I Make My Cabinet Hardware Look New?
Clean cabinet hardware with warm soapy water and a soft cloth. Remove grime and polish with a metal cleaner. For a fresh look, repaint or spray paint evenly after sanding. Reattach once dry. This restores shine and makes hardware appear new.
How To Refinish Metal Cabinet Pulls?
Remove metal pulls, clean thoroughly, sand lightly, then spray paint evenly on a secured surface. Let dry fully before reinstalling.
What Is The 1/3 Rule For Cabinet Pulls?
The 1/3 rule for cabinet pulls means the pull’s length should equal one-third the drawer’s width or cabinet door’s height. This ensures balanced aesthetics and comfortable grip.
Can You Refinish Metal Hardware?
Yes, you can refinish metal hardware by cleaning, sanding, and applying spray paint or a suitable metal primer.
Conclusion
Refinishing cabinet hardware brings new life to old fixtures. It saves money and refreshes your space quickly. Use simple tools and follow steps carefully for best results. Take your time cleaning, sanding, and painting each piece. Enjoy the satisfaction of a DIY project well done.
Your cabinets will look fresh and stylish once again. Try this easy update for a noticeable kitchen or bathroom change. Small details make a big difference in home decor.


