Are your cabinet handles looking dull or covered in grime? You don’t need expensive cleaners or harsh chemicals to bring back their shine.
Vinegar, a natural and affordable household staple, can work wonders on your cabinet hardware. In this guide, you’ll learn simple, step-by-step methods to clean and restore your cabinet knobs and pulls using vinegar. Whether your hardware is tarnished, greasy, or just a bit tired-looking, these easy tips will save you time and money while making your cabinets look fresh and inviting.
Keep reading to discover how you can transform your cabinet hardware with just vinegar and a few common tools you already have at home!
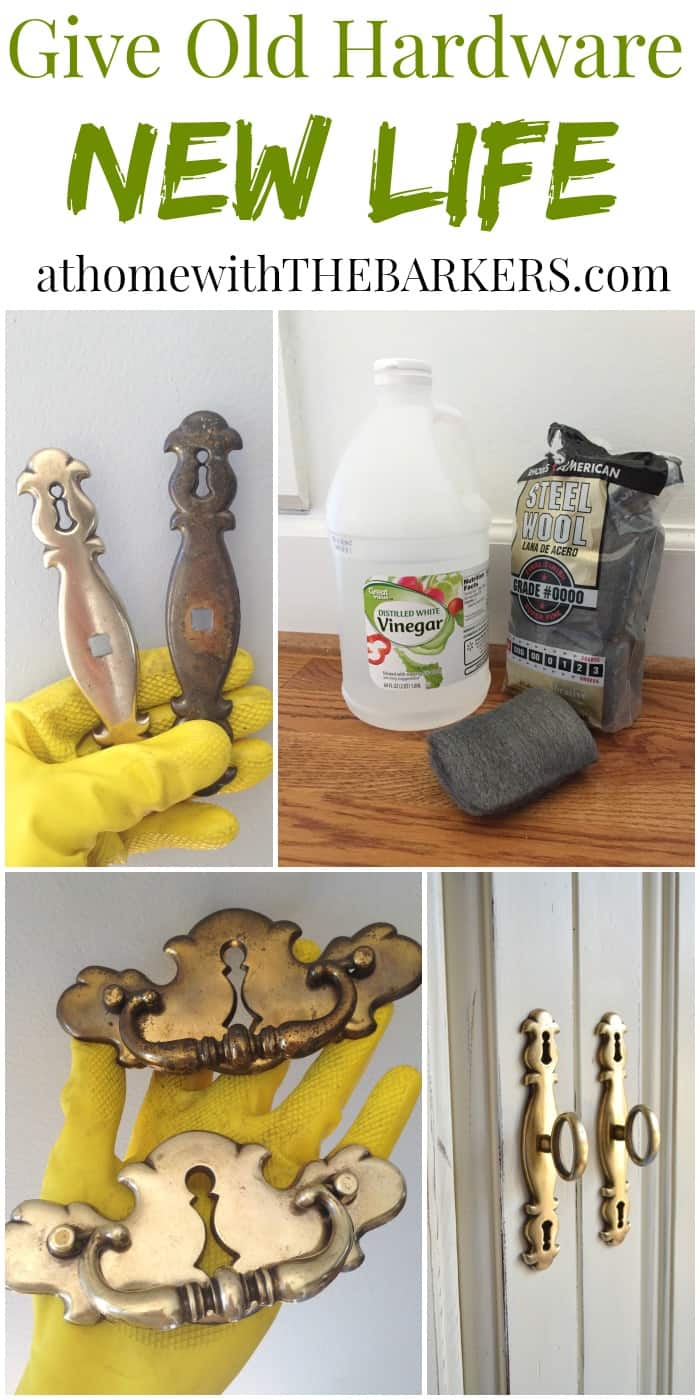
Credit: athomewiththebarkers.com
Vinegar Cleaning Basics
Vinegar is a natural and effective cleaner for cabinet hardware. It removes dirt, grease, and tarnish without harsh chemicals. Understanding the basics of vinegar cleaning helps achieve the best results. This section covers how to choose the right vinegar, prepare the cleaning solution, and stay safe during the process.
Choosing The Right Vinegar
Use white distilled vinegar for cleaning cabinet hardware. It has a strong acidity that breaks down grime well. Avoid apple cider vinegar as it can leave stains. Choose vinegar with at least 5% acidity for best cleaning power.
Mixing The Cleaning Solution
Mix equal parts vinegar and water in a bowl or spray bottle. This dilution is gentle enough for most metals. For tougher grime, use undiluted vinegar but test on a small area first. Adding a few drops of dish soap can boost cleaning strength.
Safety Precautions
Wear gloves to protect your skin from vinegar’s acidity. Work in a well-ventilated area to avoid strong fumes. Do not use vinegar on natural stone or delicate finishes. Always test the solution on a hidden spot before full cleaning.

Credit: www.markethouserestorations.com
Prepping Cabinet Hardware
Preparing your cabinet hardware is the first step to a successful cleaning. Proper preparation helps protect your cabinets and ensures the hardware cleans evenly. Taking time to prepare avoids damage and saves effort later.
Remove each piece carefully. Check the condition of the hardware before cleaning. These steps make the vinegar cleaning more effective and safe.
Removing Hardware Safely
Use the right tools, usually a screwdriver, to remove hardware. Turn screws gently to avoid stripping them. Place screws in a small container to keep them safe. Handle each piece with care to prevent scratches or dents. If hardware is stuck, apply a little lubricant and wait. Avoid forcing pieces off to protect your cabinets.
Assessing Hardware Condition
Look over each piece for rust, cracks, or deep grime. Rusty hardware may need soaking longer in vinegar. Cracked or broken pieces might need replacement. Check if screws are bent or damaged. Clean hardware will respond better to vinegar treatment. Knowing the condition helps decide the best cleaning method.
Cleaning Methods
Cleaning cabinet hardware with vinegar is simple and effective. Vinegar removes dirt, grease, and tarnish gently. Choose the right method based on your hardware type and how dirty it is. Each method uses vinegar’s natural acidity to restore shine without harsh chemicals.
Soaking In Vinegar Solution
Fill a bowl with equal parts white vinegar and water. Place the cabinet hardware inside and let it soak for 15 to 30 minutes. This loosens grime and light rust. After soaking, scrub gently with a soft brush or cloth. Rinse with water and dry completely to avoid spots.
Boiling Hardware In Vinegar
Boil a pot of white vinegar on the stove. Turn off the heat and drop the hardware into the hot vinegar. Let it sit for 10 minutes to break down tough buildup. Remove carefully using tongs. Wipe the hardware clean and rinse well. Dry fully to prevent rust and water marks.
Spot Cleaning With Vinegar
Dip a cotton swab or cloth in undiluted vinegar. Rub directly on stubborn spots or stains on the hardware. Leave the vinegar on for a few minutes to work. Wipe away with a clean damp cloth. Repeat as needed for heavy stains. This method saves time and avoids soaking the whole piece.
Credit: hapnyhome.com
Scrubbing Techniques
Scrubbing cabinet hardware with vinegar is simple yet effective. Proper scrubbing techniques ensure a clean, shiny finish without damage. Use gentle tools and the right motions. This section explains how to scrub hardware using common household items. Each method targets different cleaning needs.
Using Toothbrushes And Cloths
Toothbrushes reach small crevices on cabinet hardware easily. Dip the brush in vinegar and scrub gently. Circular motions help lift dirt without scratching. Soft cloths are perfect for wiping smooth surfaces. Use microfiber cloths for a streak-free shine. Always clean cloths after use to avoid spreading grime.
Handling Tough Stains
Tough stains need more focused scrubbing. Soak hardware in vinegar for 10-15 minutes first. Then use a toothbrush or soft brush to scrub stubborn spots. Avoid steel wool or hard brushes that can scratch metal. Repeat soaking and scrubbing if stains remain. Patience delivers the best results for tough grime.
Non-abrasive Scrubbing Options
Non-abrasive scrubbing protects the hardware’s finish. Use soft sponges or foam pads with vinegar. These tools remove dirt gently without causing damage. Baking soda mixed with vinegar forms a mild paste for scrubbing. Apply the paste with a soft cloth and rub softly. Rinse well and dry after scrubbing to prevent water spots.
Rinsing And Drying
After cleaning cabinet hardware with vinegar, rinsing and drying are key steps. These steps remove vinegar residues and prevent damage. Proper rinsing and drying keep your hardware shiny and long-lasting. Follow simple methods to ensure no spots or moisture remain.
Proper Rinsing Steps
Use warm water to rinse the hardware thoroughly. Gently rub the surface with your fingers to remove leftover vinegar. Avoid harsh scrubbing to protect the finish. Rinse under running water or in a clean bowl. Make sure no vinegar smell remains.
Preventing Water Spots
Water spots can dull your hardware’s shine. Use filtered or distilled water for the final rinse. Tap water often leaves mineral deposits. Wipe hardware with a soft cloth immediately after rinsing. This prevents spots and keeps metal smooth.
Drying Best Practices
Dry hardware with a clean, lint-free towel. Pat dry instead of rubbing to avoid scratches. Let hardware air dry fully before reattaching it. Ensure all moisture is gone to stop rust or corrosion. Proper drying keeps your cabinet hardware looking new.
Additional Tips
Cleaning cabinet hardware with vinegar is simple and effective. To keep your hardware safe and shiny, follow these additional tips. They help avoid damage and ensure the best results every time.
Testing On Small Areas
Always test vinegar on a small hidden area first. This prevents unexpected damage or discoloration. Apply a small amount and wait a few minutes. Check if the finish changes or fades. If safe, continue cleaning the whole piece.
Avoiding Prolonged Soaking
Do not soak hardware in vinegar too long. Vinegar is acidic and may harm metal finishes. Limit soaking to a few minutes only. For stubborn dirt, use a soft brush to scrub gently. Rinse and dry hardware immediately after cleaning.
Protecting Delicate Finishes
Some hardware has delicate or painted finishes. Avoid harsh scrubbing or strong vinegar solutions on these. Use diluted vinegar with water for gentle cleaning. Dry the hardware thoroughly to prevent rust or stains. Use a soft cloth for best results.
When Not To Use Vinegar
Vinegar is a popular natural cleaner for cabinet hardware. It cuts through grease and grime well. Yet, vinegar is not safe for every surface or material. Using it in the wrong places can cause damage. Knowing when not to use vinegar protects your cabinets and other items.
Avoiding Stone Surfaces
Do not use vinegar on stone surfaces like marble or granite. Vinegar’s acidity can eat away at the stone’s finish. This leads to dull spots and permanent damage. Stick to mild soap and water for stone countertops and backsplashes.
Protecting Appliances And Electronics
Avoid vinegar on appliances and electronic parts. Vinegar can corrode metal components and damage screens. Use a soft cloth dampened with water or a cleaner made for electronics. This keeps your devices safe and working well.
Handling Special Materials
Certain metals and finishes do not react well to vinegar. Brass, aluminum, and some painted surfaces may discolor or corrode. Test vinegar on a small hidden area first. If unsure, choose a cleaner made for the specific material.
Frequently Asked Questions
How Do I Make My Cabinet Hardware Look New?
Clean cabinet hardware by soaking it in equal parts white vinegar and warm water. Scrub gently with a toothbrush, rinse, and dry thoroughly to restore shine.
Where Not To Use White Vinegar For Cleaning?
Avoid using white vinegar on natural stone countertops, hardwood floors, electronic screens, knives, appliances, tile grout, dishwashers, and clothes irons. Vinegar can damage or etch these surfaces, causing discoloration, corrosion, or deterioration. Use alternative cleaners designed for these materials to protect their finish and functionality.
How To Clean And Restore Cabinet Hardware?
Mix equal parts white vinegar and warm water. Soak hardware for 30 minutes. Scrub gently with a toothbrush. Rinse with warm water and dry thoroughly. Use mild dish soap for extra cleaning power. This restores shine and removes grime effectively.
How To Clean Old Hinges And Hardware With Vinegar?
Mix equal parts white vinegar and warm water. Soak hinges and hardware for 1-2 hours. Scrub with a toothbrush. Rinse with water and dry thoroughly to prevent rust.
Conclusion
Cleaning cabinet hardware with vinegar saves time and money. The process is simple and uses common household items. Vinegar helps remove dirt, grease, and tarnish effectively. Regular cleaning keeps hardware looking fresh and new. Avoid harsh chemicals that can damage finishes.
Try this method for a natural, safe clean. Your cabinets will look brighter and more inviting. Give your kitchen or bathroom a quick refresh today. Easy steps lead to great results every time.